After a week of rainy weather in the 50s, we got a beautiful spring day for our visit to the house. Because of the poor weather, there wasn't much progress on the exterior, but the interior trim work and cabinet installation trudges forward. Mike said that this week would be a little slow since some of the installers were on vacation. Even still, we saw good progress on the interior window trims, cabinet installation, and the greatroom coffer ceiling was laid out.
Stuck to the back of the front door was this green sticker, which I relocated to our sticker collection on the kitchen glass door. It's the inspector approval for the master bathroom shower pan. The pan was filled with water last week and no leaks were detected. I'm not sure why this shower pan was singled out for inspection since we already have the mudroom and guest bathroom shower pans installed.
Much of the trim in that was stored in the dining room has been either relocated or exhausted since this is all that's left in the room. Most of the windows have been trimmed out on the second floor with the tricky ones remaining. I'm guessing there's enough material here and staged elsewhere to finish the windows, but it doesn't look like there's enough baseboard molding to go around.
Something I didn't see last time was these 1x1 pieces of trim poplar. I'm not sure what they're used for since I haven't seen them installed anywhere. Maybe they'll be used for the coffer ceiling because it's much to large for any shoe molding.
Much of the trim is being staged in the rotunda. It would make sense to stage the second floor trim in here so they don't have to make lots of trips up and down the stairs. Only some of these are window and door trims. Some of them are squared off, so it looks like they'll be used in the creation of the coffer ceiling. Again, there are some of the 1x1 pieces stacked up here, but it doesn't look like any of the baseboard molding is present.
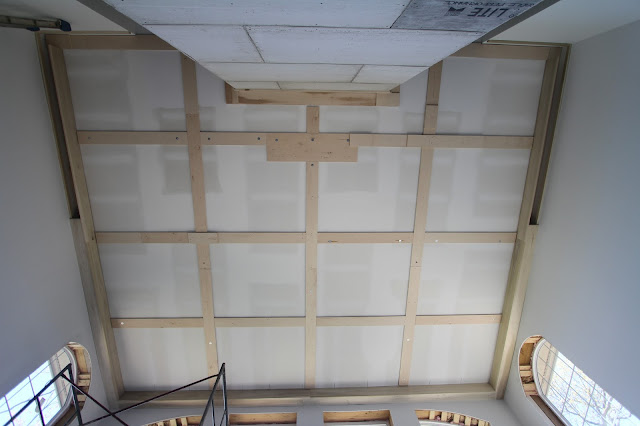
Here's what the layout of the coffer ceiling looks like. They attached 3/4" plywood to the ceiling to act as the inner base of the coffer beams. They used fasteners with washers screwed into the roof trusses. There's a perimeter beam on the exterior walls. It acts as a header across the second story lookout. The beam also carries around the fireplace column so it doesn't look so odd, terminating on the sides.
Here's what the layout looks like standing at the fireplace. The extra box spaced away from the fireplace is additional coffer beam build up so we can mount a special light in that location. The light as a large mounting plate and will hang down in front of the fireplace at a height yet to be determined. One of the main reason we made the trip this time was to take a look at the coffer beam placements and try to determine what we want for recessed light layout. The easiest route would be to place one in each coffer, but while it would provide enough light, it wouldn't provide good visual aesthetics. Considering we have two wall sconces on the walls flanking the fireplace, and plan to have table lamps in the middle of the room, 14 recessed cans might not be necessary.

Here's the view from the back corner of the greatroom. You can see they use a combination of ladders and scaffolding to get up there and that some of the coffer beams on the exterior wall are in place. Each coffer will have a crown molding detail. Some people like to put the cans in the beams themselves, but we don't really like that look so they'll be placed in the drywall ceiling. Mike wants to get the electricians back in here to install those cans so we can finally get the attic insulated.
I was worried that the exterior wall coffer beams would drop down too much and interfere with any trim that is going around the upper windows. We changed the plan for the window areas to accommodate that, and I can see that there's no issue with the window detailing impinging upon the coffer beams. The finished window frames for these windows haven't been installed yet.
The special light that will be mounted in this location is the
Hubbardton Forge Theta. We got the idea from their catalog and couldn't get the idea out of our heads. While it does have LED lights, it doesn't illuminate much so it's more of an art piece than light source. It requires a mounting plate that's 54"x16.5" so we'll incorporate the base into the coffer beam, and bump out the remaining mounting platform so the plate will mount to the underside of the beam.

There was a little visual progress in the kitchen, but that little progress is pretty big considering the effort that goes into it. They started installing the top trim and crown molding on the wall cabinets. There's some crown that remains to be installed, but they're in areas that still have some uncertainty. Over the glass front cabinets, access openings were cut so that lighting could be installed on both the upper and lower cabinets. We haven't really picked anything out yet, so I'm not sure if this trim will remain uninstalled until we make that decision or if they can pull the wires through and hook them up later. Crown needs to be installed on the oven tower and near the range hood as well.

The trim on the wall cabinet to the left of the rangetop looks finished. The molding is nailed with a finishing nail gun, creating very small holes that will be filled and painted for completion. Since we designed and ordered the cabinets over two years ago, I can't remember if we opted for the bottom trim as well, so I guess there will be a surprise if it's installed. The space to the right of this cabinets will have the range hood, but the entire wall will be covered with the back-splash tile before the hood is installed. The doors will be micro-adjusted to equalize the gaps and ensure proper installation.

Here's the first part of the two-part trim installed on the wall cabinets in the opposite corner of the kitchen. It's left of the mudroom door and includes one glass front cabinet and the double oven cabinet tower. You can see that the first part of the trim doesn't quite reach the ceiling and leaves a little gap, which will be covered by the crown molding. The mudroom door will require some attention since there's not enough room on the sides of the door for the standard door trim. Since we could install the standard trim at the top, we'll have to come up with something creative here because it might not look good with the cabinet trim.

Here's the other side of the mudroom door to highlight the detail in the wall cabinet finish trim. The first part has a small cove near the bottom to add that first shadow line. The crown molding is a pretty standard affair with a slight cove at the bottom and top of the primary cove. I haven't seen any convex crowns installed yet so I'm not sure if they'll be mitering the inside corners or coping them. It's nice to see how the professionals install things on a production level. You can see why we'll need some creative designing for the door trim here. We could panelize the door trim all the way to the ceiling since the crown molding doesn't look like it's going across the header here. Or we could install some crown to match across the door header with the build up including the door frame. Ahh, finishing details.

Here are some cutoffs of the trim pieces. On the bottom is the first trim piece with the small cove on the left side of the piece. Depending on the gap above the wall cabinet that needs to be filled, the crown molding can be placed anywhere on the flat field. The other two pieces are the crown molding, the top piece offering the best look at the profile. It's a pretty standard design, with a small cove on the bottom (right) and a step on the top (left).
These two window casings were sitting in the kitchen, but I'm not sure where they're going. The only windows of these sizes are up stairs and it looks like they already have casings installed. I got a little excited at first because from the side, it looked like they could have been mock ups for the banquette that will be going in this location. We still haven't nailed down a design for that seating, but I'm excited about completing that solution.

The wall cabinets for the butlers pantry have been installed. They're a similar style to the glass fronts in the kitchen, but they're Omega Dynasty line, a little more budget conscious line vs the standard Omega cabinets. I can't see a difference in the general construction and since these will be seeing less daily use than the kitchen cabinets, I think it was a good choice to go with this line. These glass front cabinets will be lit similar to the kitchen ones. Down light in the top cabinet with hidden face lights for the lowers. The shelves in the cabinets are solid so down lighting wouldn't work in there.

Here's what the trim situation looks like in the pantry. There's still a sizable stack of cabinet trim left to be installed but most of it is completed in the kitchen. The butlers pantry has the same trim as the kitchen, but in walnut and I think some of these are probably toe kicks for all the base cabinets. There's a pretty good pile of cardboard in the garage from cast of trim packaging, so it's easy to see the progress so far.

Moving up stairs to the rotunda landing, you can see how the coffer ceiling beam will split around the fireplace column and wrap around both sides. It wasn't in the original design intention and was thought up while Distinctive Designs was out here at our last meeting. I think this will be a nice way to terminate the stone, and tie in the coffer beams from the great room to this sitting area. The rim of wood lower down is where the bottom of the coffer beam will drop to. We're installing a rustic beam mantle above this fireplace and probably hanging some kind of art above that so there should be plenty of room for everything.

Here's the closest I could get to the perimeter beams. Sure I could have climbed up the scaffolding, but I still couldn't get to a partially constructed section easily. Distinctive Designs appear to have attached a ledger board to the wall so that the bottom face of the beam has something to nail into. The bottom face has an overlapping bevel so the surface will remain flush. The beams are obviously hollow and they're missing some of the finishing details, but for now this is an exciting step. As with the trim in the rest of the house, these are constructed of poplar, which is appropriate since we'll be painting them white.

The master bathroom cabinets have been relocated to the second bedroom upstairs. These window trims have been completed, but the oval window in the bathroom has bet to be completed. I saw some curved pieces of kerf cut wood in the basement, held in a jig so it will keep its shape. They probably have to curve it to the desired radius, then apply an edge banding to hide the kerf cuts on the back side.
The master bedroom has one window completed, but the large arch window above the bed needs to be completed. The small windows have the casing boxes cut but the casings on the eyebrow window need to be constructed and the curved window trim needs to be created. I think they're doing that in their workshop.
Here's a close up of what the window sill looks like. Both pieces of trim are the same size, but the bottom one is turned so the thick end makes up the window sill. The edges are trimmed and mitered so they die into the wall. You can see the nail holes from the finished nailer they use to set the sills, which will be patched with wood filler before the painters come in.
The laundry room window is in the same state as the master bedroom window with the straight side casing installed, but the curved casing yet to be created. This window will also get a center stile installed, which hasn't been done on the windows in the study and dining room, so I'm eager to see what they'll look like.
This last picture of the stained siding is the same as last week, but we had sun this week. During the first round of painting, the trim was accidentally painted with Sherwin Williams Mindful Gray, which is a little too brown for our tastes. The Earl Gray looks blue or green in comparison, but in person, still looks pretty gray. I think when the trim is painted white, it will make the Earl Gray looks more gray. The gray green of the roof shingles matches the color of the siding well.
Here's a sneak peak of our front door, which is completed and almost ready for delivery and installation. We ordered the mortise hardware for this last week so that Hardwood Door and Bevel could cut in the mortise and door handles. I can't wait to see this thing installed, but it might be more towards the end of the build since you don't want lots of people going in and out, increasing the changes of damaging. I think we'll at least get the front porch and stone installed before we get this thing in.
That's about it for this week. We should see the work pick back up this week since Old Country Stone needed to make some more granite cobble to complete the house. I think decking should be delivered and started this week and there will definitely be more completion on the interior trim, maybe even some interior doors installed. We should see cool but dry weather this week and I think when a good warm and dry week is in the forecast, we'll get to see the completed painting of the house. The first step to finalizing our extended loan from the bank took place today, so I think we'll close on the primary loan next week, then there will be no stopping us! 16 weeks until the end of August!


No comments:
Post a Comment