Progress continues to push forward on multiple fronts with the continued install of exterior granite cobble, tile floors in the bathrooms, and finished carpentry throughout the entire house. Everything is really coming together well and the soul of the house is finally starting to show through. Mike has gotten this project back on track and continues to knock down milestones on time or ahead of schedule. While we're not on the final finishes, we're one stage ahead of it. If the walls are the bones of the house, the exterior and drywall is the skin, then we're on the distinguishing features with the finished carpentry. The finished electrical and plumbing will be the jewelry.

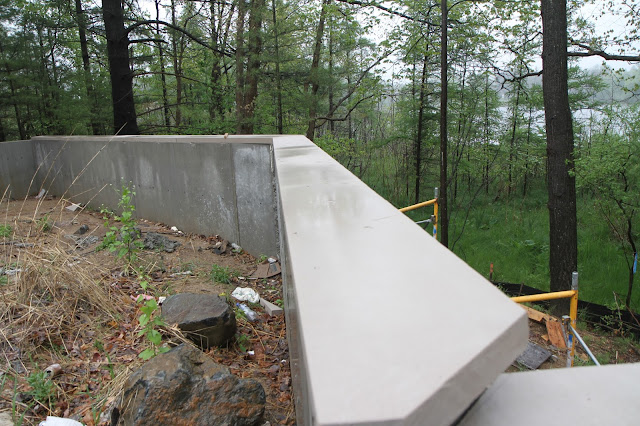
The concrete retaining wall is completed. The mortar is filling the joints and a limestone cap tops the wall. The original landscaping plans called for a bluestone wall cap, but I think the limestone will work better. While it's not the same stone that's on the back deck, it's much flatter than the bluestone, which will accept the fence that needs to be installed on top of the wall better. I think the wall turned out really well and it's a shame it's not more visible. I think once we have the catwalk deck installed at the end of the garage, you'll be able to see the wall better, so I'm glad we got it finished so nicely.

Here's a closer look at the limestone wall cap. This is on the driveway side and the cap sits flush to the wall. The edge on this side of the wall is finished smooth and the other side has a rough honed finish and overhangs the wall. Since we'll have plantings on this side of the wall, you don't want any overhang. The limestone provides a super clean look and finish. The stone on the wall be added to this edge to finish the look.
Here's what the rest of the limestone wall cap looks like from the driveway side. There's so much fill we need to bring in, but the cap will eventually be at grade. We had a meeting at the site with multiple parties, one of which was Great Oaks. Mike wanted to coordinate responsibilities and grade requirements with Great Oaks. It was decided that Mike would provide a finished grade and Great Oaks would come in to provide the landscaping grade. Finished grade means that Mike will be responsible for bringing in the majority of the fill dirt to achieve proper grading away from the house. This should happen in the next few weeks now that we're just about out of the heavy machinery era.
Old Country Stone is also working on installing the cinder block pylons for the bottom of the wrap around deck supports. These pylons will also be covered in the same granite cobble stones that adorn the rest of the house. A limestone cap will be placed on top of the pylon and a wooden post wrap will be applied to match the ones above. Besides this and the remaining wall stone above on the porch, the only other installations to complete will be the stone on the chimney.

As we've come to expect from the previous builder and build crew, the posts aren't always centered in the concrete pad. Fortunately, there are ways to hide this. The pylons aren't really supporting weight, so one side can float off the pad as long as it's tied into the other cinder block. Although this offsets the post in the pylon, the wooden post covering will conceal this. The most important part in setting the cinder block pylon is that it's centered to the beam above, and that they're all in line with each other. Luckily, all the other discrepancies can be hidden.

For all the posts, I think there's only one with the post in the middle of the pylon, and the pylon positioned well on the footing. The pylons are all lined with reference to the porch beam and the discrepancies in the post position will be taken up by the wooden post wrap. When this is completed, you won't even know there's an issue. The post in the first tier of the retaining wall won't get the same treatment. The footing is buried deep in the ground so we can't install a pylon. We'll be painting this, along with the posts under the front porch, black so they can just disappear into the landscaping.

These are the limestone caps that will be placed on the pylons. In turn, the wooden post wraps will be sitting on these. I'm not sure how they'll install these since there's going to be a metal post going up through the middle. I'm guessing they will mark where the post penetrates and cut a hole with a diamond hole saw, then split the stone in two to clamshell it onto the post at the top of the pylon. They're working their way though these projects pretty quickly so if we should see some good progress next weekend.

OCS also got a lot done on the exterior cobble stone above the front wrap around porch. Here's the section of deck next to the garage, to the right of the front door. All the stone is applied and all that's left is the mortar and limestone ledge. They installed down to the white flashing, which gives space for the Azek deck board to slip under. I think Mike said that we'll be installing the deck boards soon. With the number of guys in the OCS crew, I think they'll be able to finish the remaining cobble stone above the deck by the end of the week or early next week.
All the cobble stone has been applied to the front of the house, but mortar and limestone ledge still need to be completed. They don't have a full deck to sit on, but that's probably for the best since there's always some mortar dropping down off the pieces they're working on that would probably damage the Azek. They make do with plywood sheets and boards to stage the stone and sit on.
This is how far OCS got on the side of the house. There's stone staged up, ready for installation and it's a pretty straight shot to the next corner. Since this area is covered by the porch roof, they'll be able to work on it rain or shine, as long as the temperatures don't get below freezing, which they shouldn't at this time of year. I'm hoping that they'll progress through this quickly so we can finally get the deck installed. The Azek is on site, ready to be installed, but I'm not sure if it's all here. Finally having a full deck will be a pretty big milestone.
Inside,
Distinctive Designs charged ahead with completing the coffered ceiling. At first, I didn't even consider having something like this installed on the ceiling, but I absolutely love how this turned out. It would have been such a blank slate if something wasn't done and I don't think it's too over the top, especially since we'll be painting it white. Maybe if it was stained a dark wood, it could come off as more pretentious, but going white with a non-white ceiling will look nice.

Here's an angle of the ceiling from the fireplace column. The wide spot in the beam will be used as a space to mount a base plate for a decorative light that will suspend down in front of the fire place column. Now that the beams are in places, I'm really glad we didn't put a light in every coffer. It would make the ceiling look way too busy and would probably be unnecessary. I'm also glad we figure out a good way to wrap the coffer beams around the fireplace column. It allows the coffer beams to act as a header across the rotunda overlook, but incorporates the rotunda landing into the great room.

Here's what the coffered ceiling looks like from the rotunda landing. You can see how the beams wrap around both sides of the fireplace column. I think there will be a crown molding installed on this side of the beam as well, but I can't recall if we're getting it around the entire rotunda landing. The coffer beams will provide a nice stopping point for the fireplace column stone and adds a nice finished look. I was worried the coffered ceiling would drop down too much and be visually obtrusive up here, but it doesn't make the space feel shorter at all.

The window casings have also been completed in the great room. They used the back kerfed MDF to complete the arched tops on the upper windows and installed all the casings. The next step in this room is to implement the paneling that will integrate all the windows into one architectural element. We've seen some rough drawings of the concept, but haven't seen a final design. We'll probably never put curtains on these windows, so this element will always be visible. Just another thing to add visual interest in the room without being too obtrusive.

Here's how they made the curved window trim molding, which I though was very creative. Rather than cutting the molding from a single piece of wood, like the other trim moldings around the house, Distinctive Designs made the curved moldings from quarter inch laminated strips of poplar, probably created and clamped into a jig. Since the profile of the molding is pretty simple, stepping from thin to thick with a slight round over on the transitions, narrower width laminated strips could be used and no cutting of the final piece would be involved. This wouldn't be as easy to create if we used a curved molding profile, like an ogee, since the piece would need to be curved on a compound plane. Going with a cleaner and simpler profile was a good suggestion.

Here's a better angle of the molding profile. It will be mitered into the straight pieces of molding and all the profile elements will match up perfectly. The wood grain color isn't important since it will all be painted white. After it's painted, you would never be able to tell it's comprised of multiple pieces of wood.

Distinctive designs has also completed and place, but not set all the curved casings for the oval and round windows. They made it form the same back-kerfed mdf with veneer applied to the inner surface. For these, they used contact cement and formica on the outside curve to keep the curve shape. When it's not installed, there's still a slight flex overall, but there's no risk of it getting smashed flat. It's pretty amazing that all the round windows will have a tube-like casing. I'm sure they'll make the trim molding in a simliar fashion to the curve-topped windows. When we were originally pricing trim installers, one suggested we use a rubber molding product that could be bent to any radius we desired. I'm glad we went with Distinctive Designs since while the rubber would look good once painted, it would still feel like rubber when touched.

Here's the large curved window trim for the master bedroom window. It was made in the same laminated manner as the other curved windows and just needs to be mitered for installation. I think we're on week three of trim work and nearly all the windows are completed. It seems like there are two crews working for Distinctive Designs; one on the specialty install pieces, like the coffered ceiling, and one installing all the trim work. We are getting our interior doors supplied by them so there will probably be a door crew on site soon.

The trim in the turret is going up as well with the continuous bottom trim already installed and all the side pieces already cut. The continuous bottom trim is a great detail. If we had used individual trims on the bottom, there would have been very small gaps between each window, not enough to add any significance to the room. Combining it all almost creates a lower skirt and adds a nice enclosed ambiance to the turret. The tops will be separate since there's no overhang to them.
Construction of the continuous trim is as creative as the laminated curved trim. Again, rather than cutting the trim from a single piece of wood to be bent around the room, built up the trim from three pieces of wood of proper thickness. The thinner strips of wood are easier to bend and the design of the profile allows the build-up to happen naturally. This also adds the advantage of not having a single continuous vertical seam in the trim, which can sometimes be visible even after paint.

Omar the tile installer was hard at work installing tile in all the bathrooms. We talked to him during the Thursday design meeting last week and confirmed all the tile locations and installations specifics with Margaret. We're getting tile in all the bathrooms, mudroom, and laundry room, so there's a good amount going in. Some of the bathrooms will have tile going up the wall like a wainscot, while most will have just a baseboard tile installed. All the shower and tub walls will have tile installed, but none on the ceilings. There's almost a different color grout in each bathroom, matched to the color of the tile. I didn't even know they made grout in so many colors. During the week, Omar completed the laundry room, and laid and grouted floor tile in all the smaller bathrooms. Here's the floor tile in the guest bathroom. It gets a little tricky in here since there's zero threshold shower, but it was discussed at the design meeting.

Here's the laid and grouted floor tile in the other bathroom upstairs. Wall tile still needs to be installed in the tub area, but the floor is completed enough to get the base cabinet in and set. Holes were drilled in the cabinet to allow the drain and water supply to pass through. These grouted tile floors are the finished floor for as long as we'll be alive and it's an encouraging thought that we're currently walking on a final product.

The tile in the turret bathroom was already laid last week, but Omar grouted the tile this week and the base cabinet has been placed. There was some debate if the tile extending into the walk in closet beyond was supposed to be implemented, or if we wanted wood floor installed. At the design meeting, we decided that it's okay that the tile was installed since there will be so little floor visible once the closet system is installed. You can see the round window case for the round window and the formica material applied to the back side of the flex MDF. It's currently sitting where the toilet will go, but it should be installed soon.

Omar has nearly finished installing the wall tile in the bathtub of the turret bathroom. There's one more course of cut tiles to install at the top and the detail work of the built in shelf. We decided at the design meeting to use a piece of counter top material on the bottom and middle shelf of the built in and the same wall tile on the back and sides. There will also be a boarder of the same wall tile with mitered corners installed around the built-in shelves.

The base cabinet in the turret bathroom was also placed and set, with all the plumbing supply and returns cut through. Since this bedroom will be shared by our twin girls, ideally, each will have three drawers and half of the cabinet under the sink. There's also a small alcove we'll be installing shelves in that can be used to hold other girly supplies. I'm a little apprehensive about having the closet accessible only through the bathroom once they get into their teenage years, but I'm informed that girls share bathrooms all the time so there's no need for concern. All the bathroom cabinets, save for the master, are made by Homecrest. They come in at a nicer price point while still retaining a high quality, as well as full extension, slow closer slides and doors.

The tile in the laundry room has been installed and grouted, completing the tile work in here. Well, there will be a tile backsplash installed on the laundry machine wall, but that will wait until after the countertops are installed. The baseboard in this room will be wood to match the rest of the house. The floor drain will help ensure that any overflows or floods won't damage the walls or wooden base moldings.
All the cabinets have been installed in the laundry room and the top finishing trim completed.
The left cabinet will have a deep basin sink for hand washing and the right has a drawer and two trash bins. The laundry machines will be going in the space between, washer on the left and dryer on the right. Yet to be installed are two panels that will support a counter top above the machines and enclose the washer and dryer. We opted for open faced cabinets above the machines to make access easier at the high height. We'll generally keep bottles of detergent or extra empty laundry baskets up there. You can also see the installed curved window trim in this room, first to be completed. The center trim still needs to be installed on all the windows and I can't wait to see how they pull that off.

While tile hasn't started in the master bathroom, quarter inch cement board was installed on the curved wall in the shower, prepping for the tile. A penny round marble tile will be installed on this side of the wall, as well on the wall of the vanity. We sorted out other tile install details in this room, but I'll provide more details once installation commences. There's a lot of detail going on in here and it's hard to keep track of it all.
That's about it for this week. We'll be signing the final bank documents this week, which will unleash the full amount of the loan for Mike to draw from. I expect there will be an increase in activity after this is done, even though there has been a lot present. In the next coming weeks, we should see more tile work, interior doors, exterior fill and grading, deck installation, stone completion, and finished woodworking trim. Other than that, there's floor, exterior and interior paint and necessary landscaping installation before our certificate of occupancy can pass. 15 weeks left!


No comments:
Post a Comment