We're getting lucky with our warm fall weather with daytime temperatures reaching into the mid 70's F with clear an sunny skies. The fall colors are popping in the sun make us remember back to spring when Tanja said "The leaves budding now will be on the ground when we move in". It's not too far from the truth as we tackle a few more stepping stones towards completion, a finished driveway, finished painting, and partially installed finished electrical. Stone work in the gazebo is also finished with just the rework on the columns and painting left. We're pushing hard to get everything in quickly but it looks like we'll overshoot the end of October deadline.

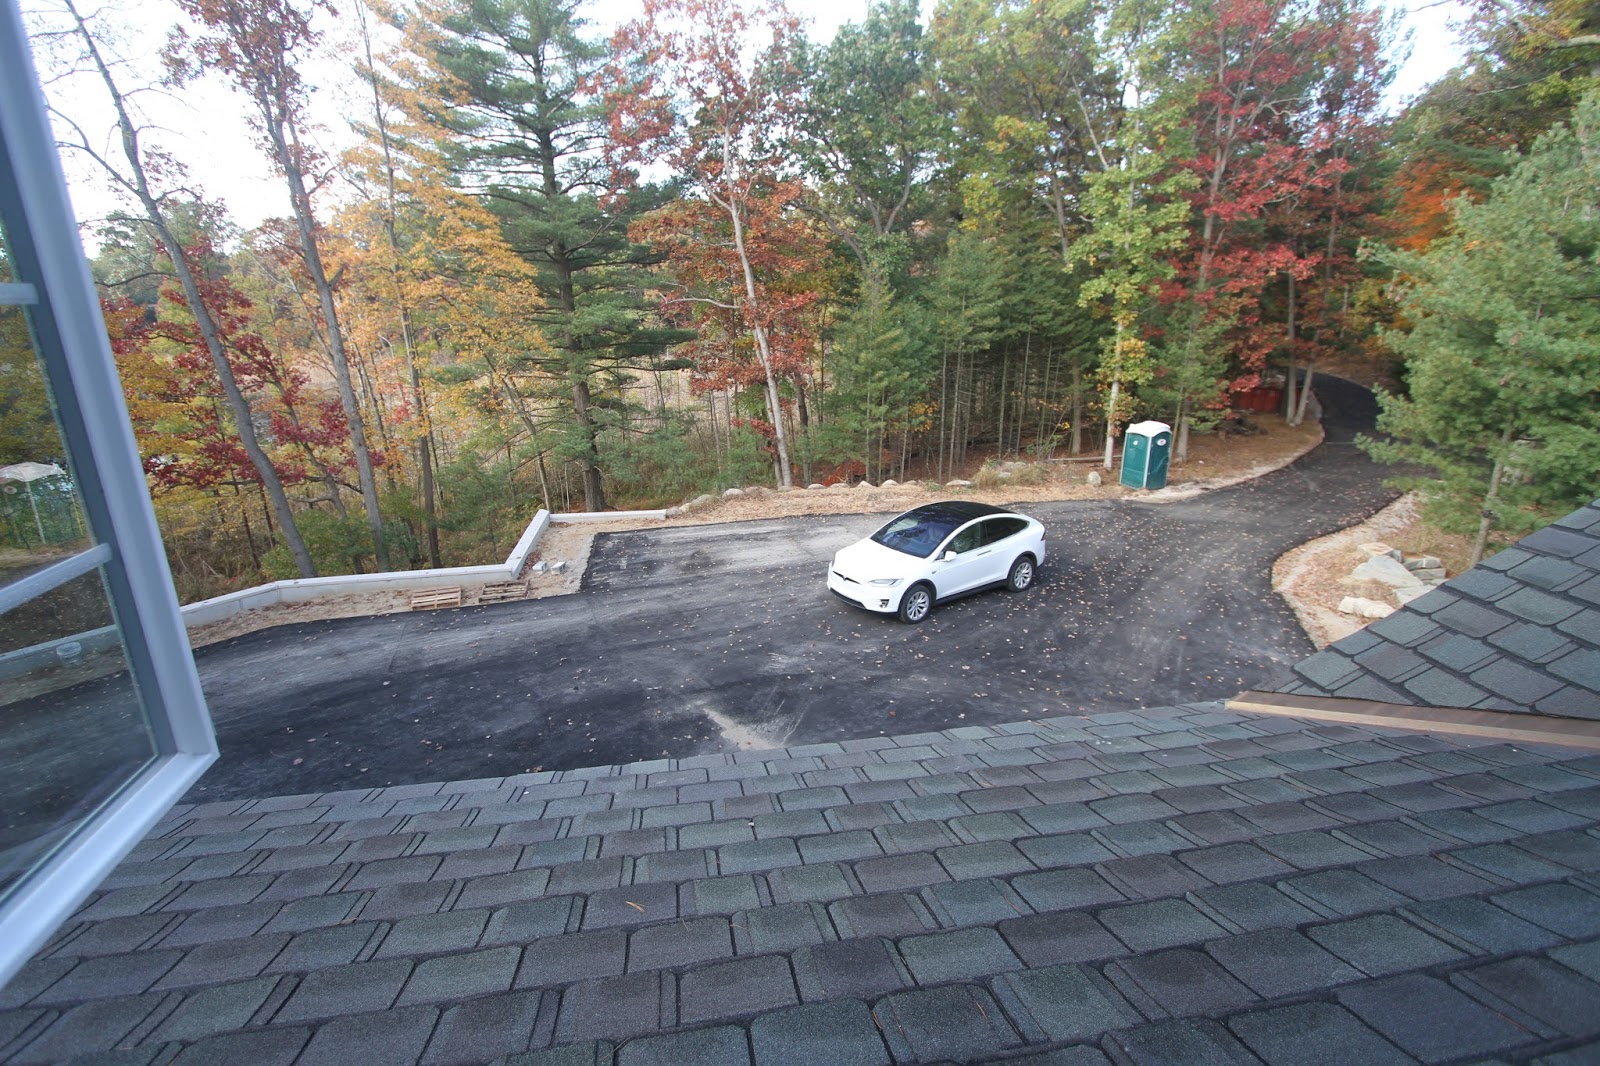
Gone are the days of mud puddles and a dirty car now that the base for the asphalt driveway is in. From street to house, over 250 ft, was laid and compressed in one day, with cars driving on it the next day. This is just the base, so visually it contains some larger aggregate, and it's still a couple inches lower than final coat, but after living with a dirt driveway for three years, this is a huge improvement. The entire motorcoach is laid, and this area will also receive the finished top coat since we also need to install an asphalt curb near the retaining wall.

The grade of the driveway is significantly higher than the lower side of the ground on some parts of the driveway, with some base stone exposed. We'll have to figure out how we'll cover this base and grade off the side. The extra parking is in place, which can probably park a couple cars, and may come in handy if we have a large party. We eyeballed that we could fit about 7 cars up at the house and two here, with some more on the unpaved section where I'm storing my uncut firewood. Now we just need to find more friends.

Here's a shot of the driveway from the laundry room window. All the bump outs in the profile of the driveway are there to facilitate turning around from backing out of the garage. I've so far tested both bays of the large garage door, without actually driving into the garage, and found there to be plenty of turn around room, even with my larger vehicle. The large motor coach also provides a big area for the kids to ride their bikes, which we took advantage of during our visit.

Three PVC conduits are buried across the driveway to ease installation of any future landscape lighting. They're marked by a painted stake, which will probably disappear before the winter is over, so we'll need to find a better way to locate these. Maybe a large rock or something. We missed our opportunity to lay communication lines for a future gate, so we'll need to have The Sound Vision figure out that aspect of the install. These will come in handy once we figure out exterior lighting, a topic we haven't even broached in the landscape design.

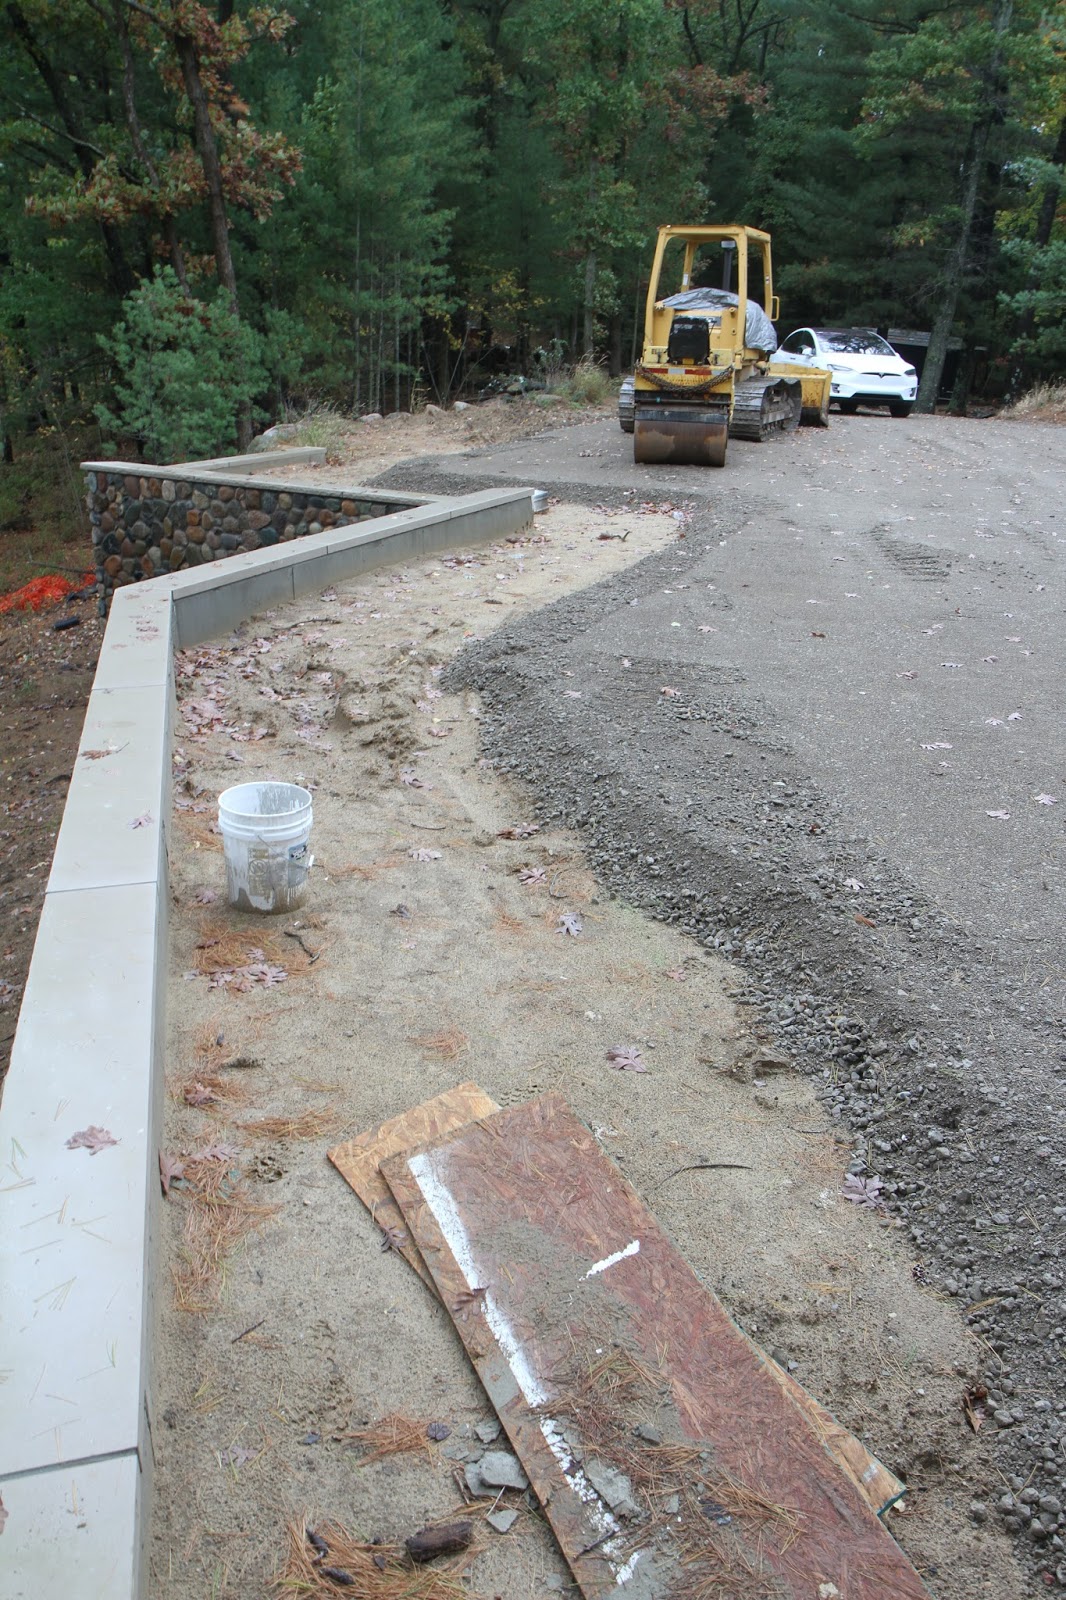
A bit of a cross sectional look at the driveway, up near the house. It's a good three inches of asphalt sitting on about 5 inches of base, with more in some places. There will be a couple more inches on top of this when the final layer is applied. I'm not sure what the timetable is for the final up at the house, but we'll be holding off on it up the rest of the driveway until the majority of the back yard landscaping is completed, a few years from now. For now, this is completely smooth and driveable. Some people even keep this layer as the final driveway, as it's the same as used on roads. Residential driveways usually use a smaller aggregate for the final layer, which provides a cleaner blacktop look.

The front porch landing bluestone was mortared, but the remaining treads still need to be installed on both the front and back steps. The "urn pedestals" also need to be capped with a piece of bluestone to complete the installation. After all the trials we had with this, it's almost done and the result is great. I'm happy with the way the five steps are broken up into two and three and the width creates an inviting entry way.
The asphalt at the landing and garage slab ramp up to meet the higher grade. This will disappear when the final asphalt layer is installed but there will have to be one ramp on the driveway where the final layer stops. This is good for now but it will be nice when the final layer is installed. There's about a two in drop from the landing to the driveway so the entire thickness of the asphalt will approach five inches when completed.

There's some evidence of planning or prepping for the railing installation on the retaining wall. I found marks on the walls limestone top, which should coordinate with the installation location of the safety railing end posts. The same railing will be installed on the front porch and gazebo, but I didn't find any markings in those locations. Now that the driveway is in place, this railing becomes more important as it's easier to walk up to the edge. Bushes in the planing bed will also act as a barrier, but we won't have those in for inspection, so the railing is needed for our certificate of occupancy.
Exterior lights have begun to go up, even if they're not functioning yet. The lights that flank each garage door, front and back, are the "State Street" model made by
The Copper Smith. It's made of 20 oz copper and comes with gas or electrical options. We got these cool
LED Weiyan bulbs that simulate a gas flame, and the seeded glass that masks the bulb. We can't turn it on yet because, while all the fixtures are wired up, the switches are not. It will be a pretty big project to get all the lighting circuits, including those on the Control4 system, connected up so it might be some time before we see working lights in the house.
All the faux hardware has also been installed on the garage doors. Hinges and vertical handles make the garage doors look like carriage doors that swing out, while the horizontal handle at the bottom actually allows you to lift the door vertically. The double bay garage door was also switched out with the correct window arch, which I can't believe I didn't get a picture of. We really like how the lights mounted on the brackets turned out and can't wait to see the flame affect light up for the first time.
Here's a closer look at the single bay door on the front of the house. The top faux hinge sits a little high on the door stile due to a door panel seam, but in all, we're happy with the look of the doors. Additionally nice is that they should be maintenance free and they're insulated so the garage should never get too cold or too hot.
The rear garage door got the final installation and exterior lights as well. With the repairs to the front double bay door, this completes the garage door installation. There are some extra parts, like the dome lights that are supposed to come on with the opening of the garage door. We also didn't purchase the web adapter yet, that will hook the control of the doors up with the Control4 system, but we might do that in the future so we can not only control the doors, but check on their status and tie the opening in with the control of the house lights.

All the riser cobble on the back steps have been laid, but not mortared and some of the bluestone on the landing has been mortared. The treads still need to be installed but the steps are usable for now. After the first correction, the installation here has been smooth. I haven't heard any mention of the addition of another hose bib to the side of the porch, but we have a rough going through the wall there. We would need to connect it to the interior and run the pipe under the porch. I'm not sure if it will also be complicated by freezing temperatures since a good length of pipe will run through the unconditioned space under the porch. That odd corner is the perfect place for a hose reel and it's the only hose supply for this side of the house so it's pretty important.
The gazebo is complete, minus the counter top for the barbecue. All of
Old Country Stone's mortar work is completed and the results are fantastic. The installation is solid, everything is clean and all extra stone has been removed. The only thing I didn't see is weeper holes going under the bench, but I'm not sure if we'll need them. When it was only concrete, some water could blow its way in and sit on the floor until it evaporated, but I'm not sure weepers would help drain that. It could be useful when we power wash the floor, but that's the only situation in which I expect a lot of water in the gazebo.

Here's the finished gazebo from the sliding door in the kitchen. A thin piece of stone was installed behind where the barbecue will go. filling the gap that wasn't needed. Everything here is now ready for the stone counter top to be delivered, which is scheduled for later this week on the 27th, so next weeks update should have all installed counter tops. We won't have the barbecue for move in, but we'll probably get it before next summer at the latest. No need to have it before we'll need it. The range top inside the kitchen will have a charbroiler that we can use over the winter.
Here's how the other side of the back porch looks. This section does have a slight slope, but you really don't feel it in your feet. It's most visible with the diagonal cut at the boots for the columns. The slope is enough to allow a ball to roll, but not enough to be uncomfortable. Like the rest of the porch, this section came out great and we're really happy to have it in.
Now that the stone has been installed, the final trim details can be installed on the gazebo columns. The lower boots have been installed on all the columns and the quarter rounds are going on. After this, one more round of paint and we'll be ready for rails. Unfortunately, the completion of all the columns is dependent upon the delivery and installation of the barbecue stone, supplied by
PMP marble and granite and they're a little behind, delivering this week on the 27th. Hopefully the weather will hold out a bit longer so we can still paint outside.
Lighting installation is about 65% completed on the interior of the house. These sconces in the foyer were installed, but they're supposed to be centered in the panel. The electricians were supposed to move the light box before installation, so now they'll need to remove the sconce and move the box before reinstalling. Not that big of a deal but it will involve some drywall work, and repaint. Nick the painter was already planning on coming back for touch-ups after the floor is installed, so I guess it's not too much of an inconvenience. These lights are
Framburg Theorem 1157 in polished silver
The delivery wasn't without its mishaps. This
Framburg Brocatto semi flush in the foyer was supposed to be 22", but they delivered a smaller once. The exchange is already shipping out but it was realized too late after the electrician installed the light. I think it's just a swapping of the shade, so the replacement should be easy.
All the masking was removed from the built in shelves and cabinets in the study in preparation for staining. Electricians have also installed socket plates in many of the rooms, but there's an issue with those.
The color of the plates don't match the color of the sockets. For that matter, the plates are supposed to be Lutron so it doesn't seem like the correct plates were used. These have a slight crackle appearance, which isn't very appealing and doesn't match with any of the other trims.
The plates are in fact from Mulberry. Although they are metal, which is a much more durable choice, they have a wrinkle finish, and they're not what we were expecting. Mike and Margaret are aware of this and will deal with it accordingly. I'm not sure if there was some miscommunication or if these were installed as part of a standard installation, but they need to be changed.
These are the switches being installed for all the standard light switches in the house. These are the paddle style, which I like and a pretty standard installation so nothing special going on here. Many of the lights are on the Control4 lighting control and have dimming capabilities, but those on these switches won't have dimming for now. If I feel like we need dimmers I can always swap them out in the future.
Here's the first look at the French doors in our study, painted and unmasked! They need some adjustment to close properly, but this is the first time we're seeing the actual glass in the doors. The left door is the static one with an astrigal latch, so the light switch to the room is on that side. I'm not sure how often we'll have these doors closed, but it will be nice to shut out some noise, or at least deny some entry when guests are over. The glass also allows some of the light in this room to get into the darker foyer.
The chandelier in our dining room has been installed, but extra cable left for a final height adjustment. This is called
Winter from Hubbardton Forge, and one of the splurge items on our lighting list. It's an LED light that illuminates from the rectangular frame. There's hexagonal metal pieces that look like they're falling through a portal from another dimension, which we thought was pretty cool. We still have to order the dining room table that will go in here, so until then, we'll need the light height adjustable.
The installation of the light in the butlers pantry went in without a hitch and looks great. It's called
"Caress" from Progress Lighting and has a texture water glass and polished nickel metal. We had to move the position of this light so it was centered in the space left by the cabinet and the wall. It's a good thing we did this, otherwise the cabinets wouldn't be able to open without hitting the light.

LED retrofits were installed in most of the second floor recessed lights with these from TCP. They run on 14W at 3000k CRI and replace 120W halogens, so they put out a lot of light. These will be the primary lighting in all recessed can locations both interior and exterior on the porches. I have experience with other LED bulbs and know to stay below the 3000k range for CRI or else the light will start to look too blue. When the electrician's finally get these hooked up, we should have enough light around the house, excluding all the feature lights. Recessed lights are a controversial topic, but I enjoy the light they put out almost all our other light fixtures are mostly decorative.

All the walk in closets will get some form of this light. Some closets are bigger than others, so we went with a slightly larger diameter to those, but most of them are a 10" size. It's a little nicer looking than a standard flush mount light, but not too expensive. We'll be getting something else in the master closet that will be installed at a later date.
Currently sitting in the rotunda awaiting installation is this box of goodies from The Sound Vision. I didn't look through all the boxes, but many of these are the Control4 customizable switches for the lighting controls. There were some larger boxes on the bottom, which I think contained the actual light controllers that will be installed in the control panels. I don't think the expensive wireless remotes or keypads were present in this box.

These are all the button configurations the switch can take. You have the option of using all the little buttons if you need lots of functionalities, the large buttons if you need less, and combinations in between. The nice thing is that you can get the switches reprogrammed, so if you find that you need to add some functionality, it just takes a visit from the installer. When you think about lighting controls, you need to get away from thinking about "This switch controls the lights in this room". With this system, "This switch could control the light in any room" or "This switch turns off the over head cans and turns on the under cabinet lights to 20% for a night light mode." Of course, you could still program with switch to have a 1 to 1 functionality, but you'll be losing some of the power of programmable controllers.

This is what sits behind the buttons. There are 6 micro-switches that can be actuated by the button fascias to perform the different tasks. This controller can also be used to control audio in distributed systems if desired. We refrained from adding these switches to some of the bedrooms so people wouldn't need to learn how to turn on the light when they visit. Even still, we have a good number of them going into the house, so installation of the system will take some time. These all communicated back to the control panels in the basement or laundry room, then turn on the lighting circuits as applcable

The meter for the geothermal HVAC system was installed by DTE so heat should be working at the house now, just in time for the flooring installation. Unfortunately, the thermostats on all three floors are throwing error codes, so Mike has to call Porter & Heckman back to troubleshoot the issue. It's not a good sign that the system is failing before we even move in, but hopefully the issue will be resolved quickly so the wood floor can acclimate to the house and we can keep moving forward.
The railing in the rotunda was finally unmasked again so we can get another look at how awesome it looks. The railings and risers still need to be stained, and I'm not sure if that will happen before or after stair installation, but it should be happening soon. All the balusters will need to be taped off before staining, so when we see that happening, we'll know that stain is on the way.
The last gray portion of the second floor has been painted, completing the paint inside the house. You can also see some of the recessed lights with their LED retrofits installed. They're low profile and the integrated trim has clean lines, so they don't cast any large shadows. I'm hoping that the 3000k light will be yellow enough to provide a nice bright natural light look, especially in the darker rotunda.
These lights are installed in the stairwell to the basement, two in total with a recessed light at the basement landing. They're a little bit of a departure from the rest of the lights, but we like the look. They're glass that looks like a crystal and incorporates the same finishes of the rest of the house, while providing a different look. They almost provide a fantasy look, like a magic glowing crystal that's used as a light source, which is perfect for the curved stairs leading down into the basement.
The second lighting splurge item on our list is this
Hubbardton Forge "Theta". We need to get an extension kit to lower it down more, hopefully so it hangs just below the handrailing on the second floor. It's also LED lit, with light emitting from the rectangular frame. As you can see, we designed the coffers in the ceiling with this light specifically in mind, modifying the pattern to accept the mounting plate. It turned out perfect in its execution, as long as we can extend the length down to the height we want. The online examples show it in a very similar situation as ours, so we know it's possible.
Not only are there four cables that suspend the rectangle, but there are two rods that suspend the ring. Both of those need to be extended in order to get the height we want. It doesn't cast much light as it's intended as more of an art piece than a light provider. It might cast enough light to throw some interesting shadows on the fireplace stone
I braved climbing up on the scaffolding to take a closer look at the light. We had a few options for the color of the finish, and landed on this bronze and gold combination. The color should match perfectly with our dark floors. Hopefully this will be one of those "wow" items that people see and like. The chandelier in the rotunda is the last interesting lighting element that we haven't seen yet. I didn't see it on the premises, but I know that all the lights have been delivered save for the great room sconces, which are back ordered until December.

In-floor receptacle been installed in the great room and study. They protrude enough so that they'll be close to flush with the wood floor. Instructions on the cement say "Sandwich between floor and cement", which I think means sandwich the mounting tabs or something. The two boxes in the great room will be placed right under arm tables so we can have lamps in the middle of the room without cords running across traffic paths to the wall. The box in the study will be under the corner intersection of our desk and will be used to power our computers.
If the light isn't installed, then it's ready to be installed. Here are the pendant lights that will hang over the kitchen island. I'm not sure if they're going to install these before they set the island and install the counter top or if they'll wait so no heads are getting bumped. There aren't too many other lights that need to be installed, just switches that need to be wired. We have two F
eiss 3 light globe pendants going above the kitchen island, which I hope will provide enough task lighting.
The
Harlow 3 light semi flush from Nuvo lighting is what we chose for the mudroom. It has polished nickel metal and a slate gray fabric shade that matches nicely with the colors and materials in the room. The swing of the dutch door comes within 6 inches of this light, so we have no problems with obstructions. There's a little natural light from the exterior door, but it's kind of tucked back behind the closet, so this is the second darkest room in the house. We have some other recessed lights in this room, so this semi flush isn't the only artificial light source.

These are the two large crates that the Hubbardton Forge "Theta" and "Winter" were shipped in. They're not solid side crates, but they have a wood frame covered with cardboard, to protect them during transit. These two are by far the most expensive lights in the house and blew our lighting budget, but we were willing to pay out of pocket to install these showcase pieces. I haven't seen the chandelier for the rotunda yet, but I think that should come in a large crate too.

The shutoff switch was installed next to the Tesla wall charger, but I don't think the charger is connected to the circuit yet. We need to get the circuit installed completed before DTE will come and install the meter so I'll try to press to get it installed. The dedicated charger is on a 100A circuit at the main EV panel but through line losses, you shouldn't realistically exceed 80A, which is why this switch is 80A rated. Also, the charger will only run at 72A, which is the max my car can charge at outside of the Tesla Supercharger, so we're well below the max circuit draw for both the switch and primary circuit.
We have three
Feiss tubular vanity lights going on the wall between the medicine cabinets in the master bathroom. They show them as horizontal on the website, but can be installed vertical, which is what we're doing. These won't be able to be installed until the tile goes on the wall, which will be after the counter tops are installed later this week. You can see how things can cascade out of schedule if you have one supplier that's slow to deliver.
No special lights in the laundry room, but all recessed LEDS installed. They also finished painting the laundry machine cabinets and plate under the upper cabinets. Once the finished plumbing is installed, this room is done. There's still a lot of lighting control stuff that needs to be installed for all the lighting circuits on the second floor, but this room isn't controlled by them.

The gray color and satin finish on the laundry machine cabinets was color matched to the Homecrest cabinet door color perfectly. I wouldn't even be able to tell that the two pieces came from different sources. The underside of the cabinet is the standard birch plywood color, which would have been fine, but Margaret insisted that we fill the underside with a piece of wood and have it color matched. It definitely looks more finished with the piece in and painted and I'm glad she suggested it. We really like how the laundry room turned out and think it's actually one of the nicest rooms in the house. It has a great view of the front yard, tons of light, and a peaceful pallet.
The girls room was painted and contains the only non-neutral color walls in the house. The walls are painted with Sherwin-Williams "
Potentially Purple" and the ceiling is "
Inspired Lilac". These two colors are in the same family with Potentially Purple being one shade darker than Inspired Lilac. To our eyes, the Potentially Purple looks really, really purple right now, but maybe because it's the darkest thing in the room right now. Maybe when the floors are in, it will look less saturated. The girls love the color, as little girls do and can't wait to live in the house.
Here's another angle of the painted turret room in a different light. It's a little less purple with direct natural light on it but when viewed from the first floor through the rotunda, the doorway to this room is lit up like a neon sign. I guess it can be expected considering it's the only color in the house. We've decided to have the ceiling vents color matched to the ceiling color rather than keeping them white. I'm not sure if we'll carry that thought throughout the house since we have white wall and switch plates.
That's about it for this week. Next weeks update should include a wood floor delivery, if not some installation. We should be getting in all the stone counter tops, but I'm not sure if the tile installers will return that quickly to complete their install. Finished electrical progress should continue with The Sound Vision coming in for some installation work. I don't know what the time table is for the finished plumbing install is, but it should be on the books. The last week in October is upon us. With so much to do, I don't think it's possible to finish it all this month, but we should be safe to file for our Certificate of Occupancy soon. Better start thinking about hiring movers and getting a big dumpster to clean up the house a bit!