Monday, July 25, 2016

Garage slab and HVAC roughs completed

   We finally have the garage slab poured and it looks like they did a pretty good job of it.  We were green tagged for the slab on June 14th so a month and a week later we got concrete to cover the underlayment and light rebar mesh.  We were a little worried about the state of the slab prep since it sat around for so long and we didn't get to watch the pour but the surface of the slab looks like it turned out well.  Most of the HVAC rough openings have been installed and ducted with the remaining work left in the basement for the primary supply and returns.

   Here's what our awesome garage looks like now.  They drove down rebar rods to hold back a 2x6 buck for the slab.  This was done on all the doorways.  It looks like they used power float since you can see very slight sweeping marks.  The surface of the slab is smooth, not rough brushed like a driveway.  You can see the slab went right up to the garage door bucks, so the height is spot on.

   Here's what the garage looks like from the single car bay.  There's a slight slope towards the front of the garage and notice that there aren't any crack relief lines cut into the slab yet.  I think they come back with a power diamond saw to cut grooves into the slab so if it does shift or settle a bit, the cracks can propagate in a controlled manner.  Just eyeballing off the ICF layers, it looks like there's a 4"-6" drop from the back of the garage to the front, which is good for drainage.  We're just around 30" from the garage slab to the house floor so online stair calculators put that at 4 steps up to the house with 3 treads.  The stairs will have a total run of 31 inches.  Considering before we raised the garage floor by 12", there would have been 5 steps and 4 treads with a total run of 42 inches, I'd consider raising that slab well worth the money over our entire life time.  Not only is the number of stairs decreased, but the space it protrudes into the garage is decreased by almost a foot.  We still might need a railing since there are 4 risers, but I'll find out what code is when the time comes.

   Here's the garage from the corner close to the house, showing both front bay doors and the bump out.  We had to adjust the height of the window in the bump out so we could have enough height to install a garden work bench.  Since this is the southern exposure, I think it would make a great place to over-winter plants.  The garage is, of course, insulated, but not climate controlled, so we shouldn't get frost, but it will still be cool enough to make plants dormant.  In the spring, this might be a nice place to put seed starter greenhouses for our garden.

    Here's the long shot of the garage.  We have about 11.5' from floor to ceiling in this garage.  This is mainly due to the amount the house came out of the ground to achieve the basement height we desired.  Since the rooflines of the garage needed to match up with those of the house, the garage ceiling needed to be at the same height as those in the house.  Since the garage floor needed to be close to grade, that means we have much more height in the garage than we do in the house.  Pretty simple, but also pretty awesome.  The garage doors will be about 9' high, which is a bit taller than standard so the scale will feel correct.  Right now, it feels super high, but I love it.

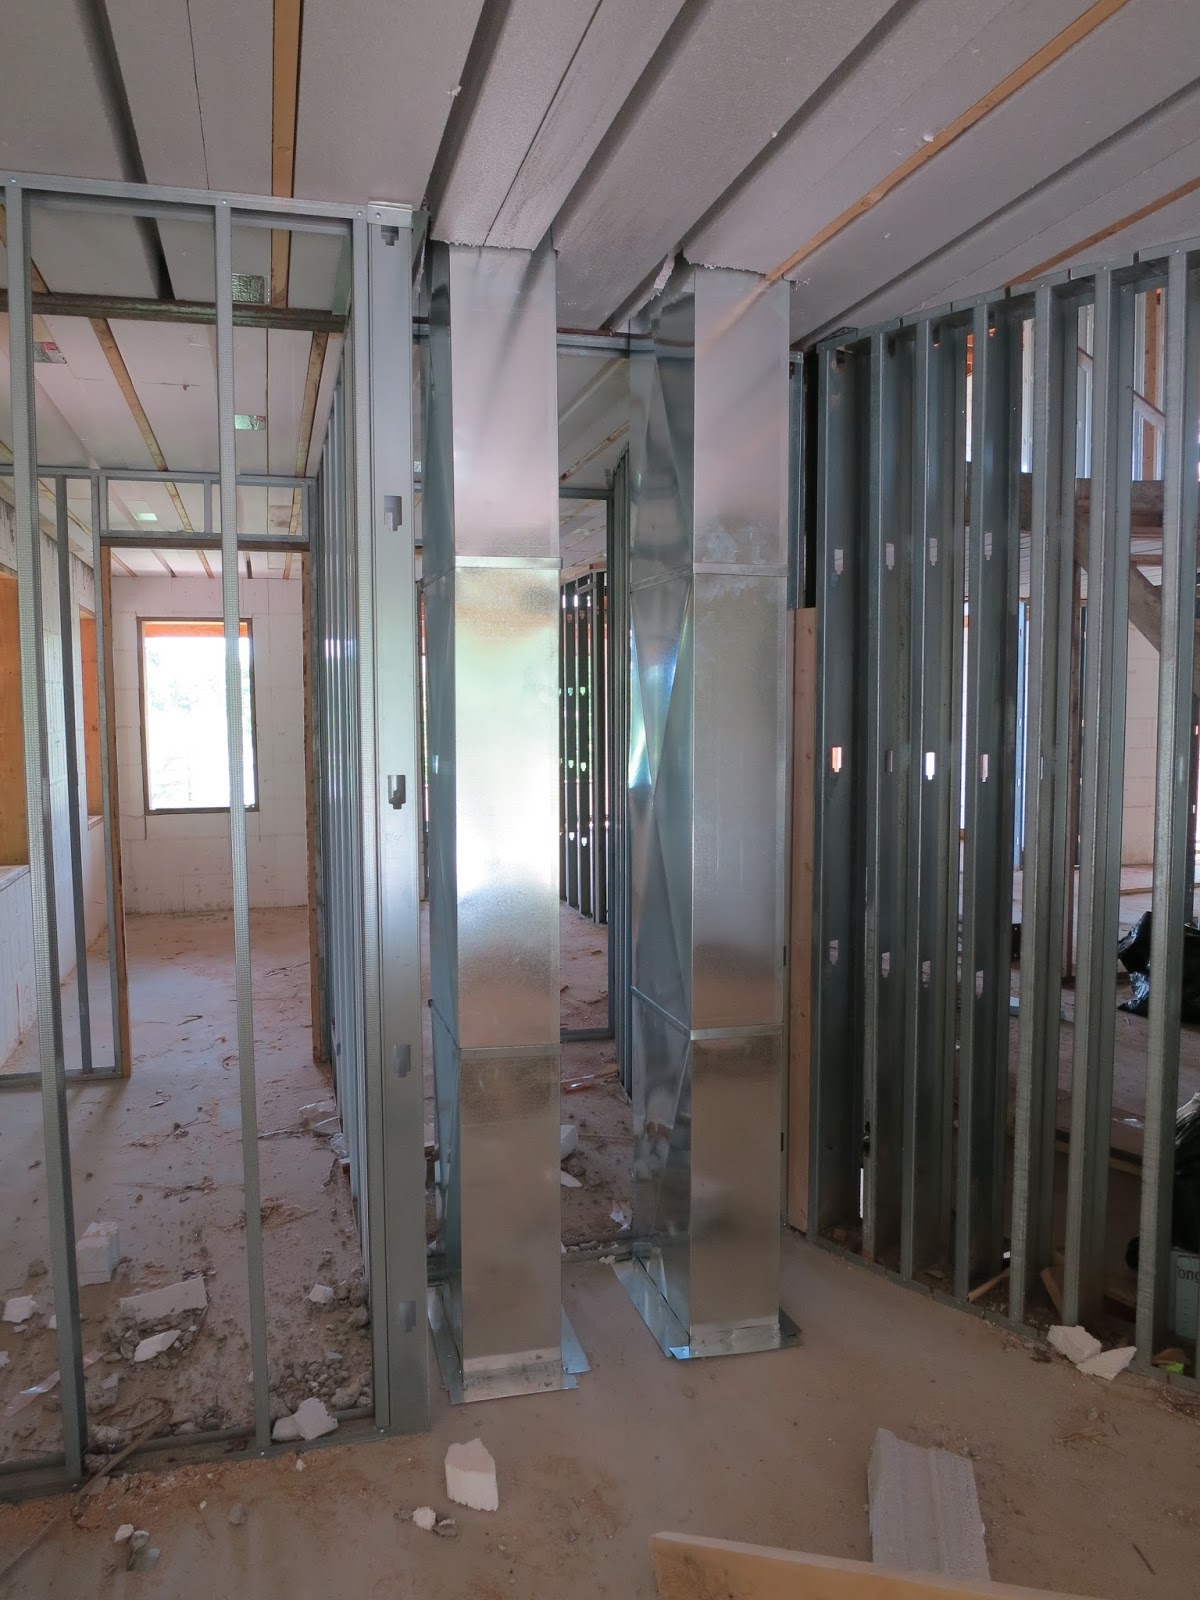
   Here's the door to the storage space that comes off the garage.  You can see how Porter and Heckman is running the bathroom ventilation through the Lite Deck floor.  This one is going out into the garage, but I'm not sure where it will go from there.  It should vent outside, but it can't go across the beams unless it goes underneath them.  It can't continue to go across the garage since there's a laminated and steel beam there.  It can't go up because the unconditioned storage space off the master closet is there. I guess we could sacrifice a bit of that space to run the pipe up through, if it meant not having an odd box in the garage.  In that space the vent could come out the front or back (preferred) roof overhang.  Although this will be covered with drywall, I would love it if it was also spray foamed for sound insulation, but it's not a requirement.  

   Here's the mudroom wall that's shared with the mudroom bathroom.  In this case, rather than coming through the floor to supply this space with conditioned air, we've decided to come through the wall, since there really wasn't a great space to come through the floor.  We have a few of these kinds of wall registers in our current house and haven't had any troubles with them.  The duct isn't currently connected to anything below but it looks like all the floor pass-throughs and second floor ducts are completed.  There's a fair bit of duct work that needs to happen in the basement, but I think that's the next phase.

   Here's how the return registers are connected to the return ducts on the second floor.  Again, the silver foil wrapped ducts are used for the returns and the black poly wrapped ducts are used for the supply.  This is a really short run to the main trunk in the attic.  I believe there's a rigid aluminum flange that's cut and screwed to the duct box to which the inner flexible duct pipe is clamped to.  I'm not sure if they come back and tape this seam.  The last time I was out there, they were asking what kind of insulation was going in the attic.  We're looking into the budget to see if we can spray foam everything up there, but if not, P&H said they installed the attic ducts so we could at least spray foam the duct system, rigid and flexible all together.  This would probably seal up any air leaks in the attic ventilation and provide a much better insulation than what's installed now.

   Here's where the powder room vent will exit the house.  This runs straight across the kitchen and will run in the porch roof out to a vent, either in the overhang or on the porch roof.  As I mentioned before, all the bathroom ventilation on the first floor should be embedded in the ceiling and can only run forwards and backwards because of the concrete beams.  This doesn't look like it will present any problems.  The second floor bathroom vents are run in the attic space so they can just take the shortest path outside.  I'm hoping that we'll be able to run all the gas, electrical, and water to the second floor in a similar fashion.  It will take some fancy planning to accomplish this without any first floor soffits.
   This is the guest bathroom vent run to the back porch.  Pretty much the same concept as the other first floor bathrooms.  If we can't get some spray foam up there for sound isolation, at least we could get some fiberglass insulation stuffed up there before the drywall is installed.  Since it's rigid piping, I worry a little about the fan vibration propagating through the duct.  It doesn't look like there's enough space to run a short piece of flexible vent to isolate the vibration so we'll have to install insulation to mitigate any sound.

   This is the same guest bathroom vent run.  It's a 6" duct, so you can see how much space is available to us to run the other mechanicals.  We can cut out the foam on in every concrete beam gap.  There's also a couple of inches of foam under each beam, which I think can be removed to run the smaller diameter mechanicals like gas, plumbing, and electrical.  Once the concrete is hardened, the foam is just insulation so as long as the concrete beam is intact, the foam can be removed.  This will help with running the second floor utilities, but doesn't help much with larger diameter things, like bathroom drains.

   Here's how they cut the air return for the first floor study.  Larger rooms and areas should have appropriately sized air returns and since this room has two air supply vents it needs a larger air return.  This is pretty much standard in wood constructed houses as well.  The stud spaces in the wall are used as an air chase,  The wall will have a vent plate up high and the system will suck the air through the vent and wall into the return trunk it's connected to below.  In our current house, the installer just used a hole saw or large bore drill bit to cut holes in the wall sill plates and plywood floor.  For both all constructions, as long as the wall isn't sitting on a floor joist or beam, you're good to cut through.  Below, the floor joists are sometimes used as the HVAC return chases.  All they have to do us screw some sheet aluminum to the bottom of the joist and the whole cavity is used to move the return air.  In this house, we might need to have ducts installed in the basement for every return.

   Here's the single return in the dining room.  This room only has one air supply vent and it's pretty open to the rest of the house, so it should only need one return vent.  It looks a little narrow because the foam isn't completely cleaned up.  Also, you'll never see it once everything is installed, so as long as it's clean enough to function properly, it's okay.


   Moving back upstairs, it looks like all the supplies and returns have been connected.  Here's one of the laundry room vents connceted up with the black poly flexible ducts.  It's a pretty sizable air supply vent compared to those normally found in a house, and there are two of them for this room.  You can get a glimpse of the pipe clamp or zip tie used to connect the duct to the vent.

   Here's what the mudroom supply looks like from the basement.  One nice thing about this ICF floor system is that all the gaps you see between the foam and ducts can be spray foamed when the installation is complete.  It will really lock in the ducts, provide vibration dampening, add insulation value, and seal any air leaks that inherently exist with the rigid aluminum ducts.  Ideally, all the seams are taped with aluminum tape, and these still might be, but it's nice to gain all the other positive attributes of filling the gaps.  In a wood joist or even open web steel joist floor system, these ducts aren't really surrounded by much material so you need to install a fiberglass blanket for insulation, strapping for vibration mitigation and use other methods to ensure an air tight installation.

      So that's about it for this week.  There's a bit of turmoil going on behind the scenes, which I might be able to comment on when it's all resolved, but hopfully, the resolution will bring about enough change that will move this project forwards quicker.  There's still a ton left to do, and it's nice to see progress every week, but we really need to kick this into high gear if we're going to try to finish this year (still crossing our fingers).  July is almost over and we'll already be into August, so we really need to turn our attention towards buttoning up the house and getting the other mechanical trades through.

Monday, July 18, 2016

Lungs are going in.

   If the walls are the bones of the house and the roof is the hair, then the HVAC is the lungs, and they're going in quickly.  Porter & Heckman worked hard last week to cut through our concrete floors on the first floor and route the main supply and return for the second floor.  If you're looking for a great HVAC installer, I can recommend them.  They don't hesitate to call and ask me for my input when the design needs to change and I really appreciate that.  A few supplies on the first floor needed to be moved from their original location, and some wall redesign was needed to run the second floor supply and return, but we worked through it together.  I'm hoping they'll complete their work this week and we can move on to other subs.

   Here's one of the holes cut in the first floor for the supply.  Since P&H needs to dodge the Lite Deck concrete beams, they drill a test hole to gauge their position in the floor then mark and cut the slab with a diamond blade in an angle grinder.  A good number of swings with the hammer and the concrete comes out.  All they have to do cut and clean up the foam then run the duct work through.  There's a light metal mesh in the concrete that also needs to be cut, but that's no match for the diamond blade.  There's no rebar in the places between the beams so we don't have to worry about those.
   Here's where we needed to make some modifications to the original floor plan in order to get air to the second floor.  Usually, when you have a forced air system on the second floor, you need to run supply and return ducts against the ceiling in the first floor.  Since we used the ICF Lite Deck, if we wanted to run these supply and returns perpendicular to the concrete beams, the would have to sit below the finished ceiling level, which necessitates ugly boxes hidden in obvious soffits.  Another way is to run a second floor supply and return up to the attic space and supply the air through the ceiling.  This cleans up the design, but comes at a slight cost of efficiency since you're running HVAC through the unconditioned space of the attic.  Any air leak or radiant energy loss goes into the attic instaed of into the living space.  It's not he ideal way to do it, but in this case, probably necessary.
   So here we have our second floor supply and return.  It's sitting in what used to be our study nook, where we were going to install some built-in cabinets and shelves.  There's a steel beam just on the other side of those ducts, so we couldn't move them back.  If we were to go on the other side of the beam, it would have drastically reduced the closet space in both the guest bedroom downstairs and second bedroom upstairs so we decided that the nook could be sacrificed.  Fortunately, it sits right above the mechanical room in the basement so there's minimal head pressure loss running to the second floor.

   Here's the closet wall in the guest bedroom, just on the other side of the second floor trunks.  That wall sits right on a beam and there's another one above it.  While a walk in closet isn't important for the guest bedroom, we couldn't take away space from the second bedroom upstairs.  It wouldn't be nice for that room to not have the turret feature AND not have closet space.  I could hear children's' arguments ringing from the future about who has to stay in that room, right before I put them in a cardboard box outside (just kidding).  There's still finishing work that needs to be completed on these trunks but it looks like this was the last thing they did before they stopped working last week.  In a good installation, seams are taped with aluminum tape and hopefully we'll get some rigid insulation on the boxes.

   Here's what the boxes look like coming out of the second floor.  Unfortunately, the turret bedroom wall that shares the second-bedroom bathroom.  Since the turret room wall doesn't sit right on the study wall below, we'll need to furr-out the existing wall in order to wall in the second floor trunks.  That means that the turret room is losing a few inches, but when it's closed up, you'll never know. We could gain that space in the second-bedroom bathroom but since it's right where the tub will go, we'll have to see how the drain lands on that beam.
   Here are the trunks as they enter the ceiling.  It's unfortunate that we need to dodge a roof truss because every bend in the pipe adds some head pressure and flow loss, but as beds go, I think these are pretty benign.  You can see they've already installed rigid insulation on these boxes and taped up the seams. On top of this will also be the blown-in insulation, but I might investigate getting some spray foam up there to seal and insulate the trunks more.  Attic spaces are really hot in the summer and really cold in the winter and the greater the temperature differential, the greater potential for radiant energy loss.

   Here's another first floor hole after it's all cleaned up.  Supplies are cut into the floors as close to windows as possible.  I think they do that to help with condensation in the winter time and help equilibriate the temperature in the room.  If you had it on the wall opposite the window, you might get hot or cold spots in the room if there's not enough circulation.  Likewise, returns are best placed on the wall opposite the supply vent so you're not sucking in newly conditioned air to be returned to be reconditioned.  All the supplies on the first floor are placed high in the walls and use the stud cavity as a plenum.  As such, the floors inside the walls need to be cut or drilled and connected to the return trunks.  On the second floor, the returns are in the ceiling and connect to the return trunk in the attic space.

   Here's one area where the vents needed to be reconfigured due to the ICF concrete beam placement.  It was initially planned that there would be two vents on the big window wall, and one vent in front of each of the side windows.  Because the beams are placed right next to the side walls, we couldn't place the vents there, so we decided to place a vent in front of each window.  This works out since the returns are on the opposite walls, so it creates a good circular airflow to the room.  You can see that they've cut the floor, but haven't removed the light mesh or ICF foam to open to the basement.  It's a little unfortunate that they couldn't get the ducts placed equally in the window opening, but again, that's function of where the concrete beams fall.  In a standard wood construction or web truss, the supports are narrower, so it allows some more flexability, but you still need to dodge them.  If you're very particular about where your vents sit, then you might be able to space the joist, but it would take a lot of fine detail planning before any implementation takes place.

   Here's what a second floor return looks like.  It's in the master bedroom and it's a really large box when compared to the supplies.  The return ducts use this silver jacketed flexible insulated duct that probably has an R6 value, which isn't a ton but it helps.  As long as it's air tight, any additional insulation in the attic space will add to the R-value.  I don't believe this is something that can be spray foamed.  Each room has a return sized appropriately to the space and there's one more in the rotunda to catch the general area air.

   This is how the flexible return ducts look when they attach to the return trunk.  You can see that the return trunk is insulated with Owens Corning Quiet R duct board type 475, which is 1" thick and has an R-value of 4.3.  Again, it's not great, but it's something and I think we can spray foam around the duct to increase the R-value and decrease any air leaks the tape might have missed.  They did a thorough job tape sealing it from a visual inspection.  Since it sits on the attic joists, we would have to have the drywall installed first, then maybe spray foam could be applied in between and around the duct, then blow in insulation could be installed.  It would be a pretty small job, so it shouldn't be too cost prohibitive.  

   Here's what the supply runs look like.  These are the supplies to the laundry room and a black 6" diameter R-8 flexible duct is used.  I'm not sure why they use the silver metalized on the returns and black poly insulated on the supplies, but at least the supplies have a higher R-value.  The number of supply runs to a room is size dependent.  For our laundry room, we have only these two runs.  For the master bedroom, we have three.  Some houses have retro-fit A/C installations that use small 3" holes for vent supplies and really force the air to create good room circulation.  Because of the size of these vents, this more akin to a traditional HVAC installation so the air won't jet out.  It will be interesting to see how even the rooms warm up during the winter since the supplies and returns are in the ceiling.

   Here's what the supply register looks like.  As noted, this is a 6"x8" register and it's one of the two in the laundry room.  The flange on the register accounts for the ceiling drywall thickness and the register diffuser will screw into the register, and looks like a regular floor air distributor.

   In addition to running the supply and returns, Porter & Heckman is also responsible for running the bathroom vents.  Here in the master bathroom, you can see the smaller black poly-wrapped insulated duct in place to hook up to the bathroom vent.  This just goes out to a small round vent in the roof overhang.  It's well protected there and removes the need to cut through the roof to vent the bathroom.  There are actually two in here, one in the water closet and one in the main bathroom.  Since these are in the attic space, we can run across ceiling joists to the overhang.  On the first floor, they'll need to run along side the cement beams towards the back of the house.  The foam between the beams can be cut out to run pipes so these duct lines will still up in the ceiling.

   Here are most of the supplies for the master suite.  From front to back it's one of the master bedroom supplies, then the water closet vent, followed by one bathroom supply, the other bathroom vent, another bathroom supply, and finally the master closet supply way in the back.  Most of the other rooms still need their supply and return runs but I imagine that will be installed this week.  It's much easier than cutting hard aluminum ducts and piecing and taping them together.

   This is the box that the supply duct comes in.  Nothing fancy, just wanted to include it for future reference.  

   It looks like Porter & Heckman is using a two man crew, one is working on cutting on the concrete and another is upstairs installing the flexible ducting for the second floor.  Last week, I installed a wireless trail camera so I can monitor the site to see if we're getting unannounced visitors (haven't caught anyone yet) and I see the P&H guys there every day just around 9 o'clock so another bonus about these guys is that they're punctual and hard working.  
   We'll be meeting up with Margaret tomorrow at the site to run over some design information.  Unfortunately, Pro Brothers backed out of our window installation, but they're still going to deliver and perform a final walk through of the install to ensure the mechanics of the windows are functioning properly.  Because of this, we're trying to scramble to find a window installer so we're meeting with Margaret's general contractor to see if we can take on this job.  It seems like Matt has been busy with other houses since we're still waiting on the garage slab pour and water/sewer trenching.  Maybe getting in another GC will get things done faster.


Monday, July 11, 2016

All that's left is the copper cone.

   The weather is staying pretty hot so it's good that the roof shingle is all completed.  There's a little finishing work to do on the flashing and a good amount of clean up and that should conclude this week.  We're getting a quote on the copper roof turret to determine if it's feasible.  Alternatives would be to either just shingle it or install a copper colored metal roof.
   We actually met with the roofer to discuss the options and do a little walk around of the install.  I again broached the subject of the beer and wall damage and he again denied it was his guys so I think that's a dead end.  To my untrained eye, everything looks pretty well installed.  Sure there are a few odd flashing spaces and I would have like it if the flashing was overlapped a bit more, but everything should be okay.  Probably not the highest pinnicle of craftsmanship, but adequate.

   So here's the roof completed.  There's a little bit up at the turret that needs to be finished, but I think it's because they're going to apply Winter Guard to the entire turret and the copper flashing here still need to be installed.  I walked around the porches on the front and back and the shingle application looks clean and flat.  I don't see any apparent patterns or seams so it seems like they installed them with a good stagger.  From the ground, it looks great.  You'll notice that the waste pile looks a little smaller.  That's because the roofer managed to use a good amount of it on the curved porch section.

   Here's the last section that needs to be completed.  You can see the Winter Guard peeking through the void.  The plywood on the turret has a little sheen on it, so it's easy to imagine what the copper will look like.  I wasn't crazy enough to climb up on the top roof, but the pitch allows me to get a good enough look at the installation.  All the ridge vent has been installed.  I'll probably have to ask Matt to get some house wrap up on the chimney box and install a temporary cap so we can really be dried in.  The scaffolding on the turret will remain at least until the copper is put on the roof.  After that, the overhang on the turret can be completed.

   Here's how they ended up doing the drip edge around the curved porch.  They cut sections of drip edging and overlapped each a bit on the next one over.  Not the best way to do it but again, acceptable.  I would have preferred them to use downspout crimpers and crimp the nailing flange to achieve the desired radius.  This is an illustrated example of an adequate roofer and a good roofer.

   Oh hey look.  Copper nails.  This flashing is exposed to the elements and as such should definitely have copper nails.  I would have preferred copper nails everywhere, but the roofer insists that they're not needed. I'll keep a close eye on the step flashing that has the galvanized nails to see if it starts to corrode before the siding is applied.  If I see any sign of corrosion, I'm having the roofer come back and replace every single zinc nail that touches the copper.  I've gotten too much advice, warning me about zinc+copper contact.  I'm still thinking about hiring an inspector to get some backing.  Again, notice that the overlap of the two pieces is only about an inch.  Two inches would have been better.

   Here's what the gable peak on the front porch.  It looks like a good installation and the copper looks pretty fantastic.  Definitely something that I haven't seen driving around the neighborhood. Most of the roofs around me are ashphalt shingle, with some concrete tile.  Most roofs have a standard dimensional shingle and no metal valleys so this house will have that unique detail.

   Here's where the porch roof meets the curved porch.  They didn't install a copper valley here and when I asked about it, the roofer said that there's a foot of overlap in the shingles so a valley isn't needed.  I guess this is acceptable since there isn't a steep roof pitch between the two sections so I don't expect a heavy driving water force to push under the shingles.  You can also see how they installed the flashing around the curved turret, step flashing with copper nails. The roofer said that the step flashing will also have a copper adhesive to seal the edges.  Sealant will fail in time so I'll have to keep an eye on this area in the future.

   Here's a shot of the turret and front porch roof.  As I mentioned earlier, the roofer managed to reduce the waste pile and use the cut-offs on the curved section, since the curved roof requred shorter lengths.  Because of how this shingle is, there's a bit more waste when compared to other types of shingle.  You can't reuse a section if there's only half a "slate" on the sheet and you don't want to use short sections on the main field of the roof.  Roofing this curved section allowed us to use the short pieces and I think they did a pretty good job with it.  There are some areas where the shingles are too linear, but it's not a glaring issue.  

   Close up of the step flashing installed around the turret.  Again, since this is sitting on top of the shingle, copper nails were used.  I'm not sure if this kind of thing could have been a single piece.  I'm thinking that maybe another roofer would have used a single piece of copper and sent it through a roller to achieve the desired radius.  It would have taken less time for installation since there would be less cutting and fewer fasteners, but it would require some dedicated tools.  More of an aesthic annoyance than anything else.

   Here's the other side of the turret.  There's the same transition from the curved roof to the straight with the same shingle valley application.  The copper valleys are intentionally kept long on inside corners so the water will pour off the roof away from the house more.  I wonder what the noise level will be in a heavy rain storm with all that water running off the valleys.  Probably won't be able to hear it inside the house since it's ICF, but it will be fun to see buckets streaming off the roof.

   So that's it for this week.  When I talked to Matt last week he said that we're looking at getting the water and sewer trenched, pool excavated, and  garage slab poured.  HVAC should be coming in this week to start cutting the floors and I'm getting in contact with Pro Brothers about getting us scheduled for windows.  I got a chance to meet with another couple who are using Ken as their builder.  It was a nice opportunity to compare notes on our experiences and share thoughts.  I look forward to watching their progress to see if my slow experience is unique.

Monday, July 4, 2016

Rooooooof and wood.

   Hey!  Looks like we have a roof going up!  The roofers started work last Monday and got all of the garage, most of the back porch, including gazebo, and pretty much most of the second floor roof completed.  They still need to put copper on the turret, finish off the front porch, and finalize the finishing touches all around.  I contacted Great Oaks last week to inform them to try to pencil us in for the front landscaping completion, but haven't heard back from them so I'll Pro Brothers to tell them they can come and install the windows in a week.  Looks like we'll be closed up soon!

   Here's what the front of the house looks like now.  I think the Certainteed Grand Manor is a pretty good facsimile to slate and I've seen it on some really nice houses.  They give it a lifetime warranty, but they're pretty stringent about the installation procedure, so if anything is off, it nulls the warranty.  Roofers in general give it a 40 year life since it's a 5 layer shingle so I'm hoping that we'll never have to replace it in my life time.  Well, maybe we'll replace it once when we're old and gray.

   Here's the mostly completed garage.  There's still a bit of finishing work to complete at the gable end but it's otherwise finished.  You can see the ridge venting installed already.  Certainteed makes a ridge shingle, which is just a single shingle the roofers can lay on all the ridges.

   All the flashing in valleys and drip edges are copper.  This isn't copper plated either, it's true copper.  Here's the step flashing where the garage meets the house.  All the horizontal flashing is a single piece and all the diagonal is step flashed.  They overlap in such a way so gravity will shed water to the next piece of flashing, similar to how the roof is installed.

   Here's the Winter Guard they use on the first five feet of the roof to prevent leaks from ice dams that could form during the winter time.  Ice dams happen on the edges of roofs because the heat that escapes from the conditioned space inside the house heats the roof, which melts the ice and snow.  That melt refreezes on the overhangs since they're outside the house envelope.  This ice can "creep" back up the roof and make its way under the shingle, causing leaks and damage.  One way to mitigate this is to have good ventilation in your overhangs, so the roof never warms up too much.  Another way is to install this self adhesive membrane so if ice does form, it can't get to the plywood roof deck and cause damage.  It's code to have it installed, but it's always good to verify it was installed.

   Here's the back of the garage.  You can see some airlines and ropes still up on the roof from the roofers.  This section of the house is pretty much completed.  To my semi-trained eye, they did a good job with the install. 

   Here's where the back porch roof meets the master balcony.  You can see the gray underlayment they're using under the shingles where the Winter Guard isn't installed.  There's some copper flashing that will be installed here.  Usually a felt underlayment is installed under the shingles, and it acts as a water resistant material.  This is a synthetic material that purportedly doesn't buckle, allowing a smoother shingle appearance.

   Lower down in this section, you can see the Winter Guard.  Nice to see they flashed it up on the balcony wall, even though it will be copper flashed as well.

   Here's what the copper drip edge looks like.  This will be a nice detail since we won't have gutters on most of the house.  Eventually, the copper will patina to a dull brown, and maybe when my grand kids inherit the house, it will be a nice green.  We're not planning on having it chemically treated to accelerate the patina process.

   All the valleys have this "w" shaped copper flashing, which is kind of neat.  Our current house just uses shingles in the valley, but when you specify metal, they install this.  The "w" shape is nice because any water running down the roof slope with hit the shape and stop or slow it down, preventing it from forcing up under the other roof slope shingles.  These are just overlayed to run water with gravity but there might be some adhesive under the flashing.

   It's a little hard to make out, but there's copper step flashing on both sides of the chimney box.  The lower side will be copper flashed with a straight piece, that sits on top of the shingle since you want the water to shed onto the roof, not under it.  You can also see the ridge vent installed at the peak, and a nice example of the ridge shingles in the foreground.  Also note that the Winter Guard has been installed up against the chimney box.  It's actually installed in every valley as well.

   So here's how the curved porch roof around the turret turned out.  Pretty nicely I think.  The roofers still need to get to this part and it will be interesting to see how they manage the curve both with the shingles and with the drip edge.

   Here's a close-up of the curved porch roof.  You can see the complexity involved with laying out the plywood to conform to the curves.  Really bang-up job with the installation here.

   In most places I've seen around the house so far, the valley copper extends out from the corner.  I'm not sure if they'll come back and trim it into the corner or if this is how it's usually installed.  I think it would make sense if we're getting gutters since this valley will extend down into the gutter, but without one, it kind of just hangs out there.

   Here's the ridge vent that's used at the top of the roof.  It's just a plastic ventilated sheet with a felt material on the underside.  It's designed to cap the roof ridge and close the plywood gap at the peak, while still allowing heat to vent out at the highest point.  Nothing special about this.
   Here's what the back of the house looks like.  We're thinking about putting a copper finial on the top of the gazebo, but that can come later.  They used a bunch of those ridge shingles to form the peak right now.  

   One last shot of the house in its current state.  The roofers should be able to finish the rest of the roof this week if everything goes smoothly.  I do have some reason to believe that thing will not go smoothly.
   Here's the state of the exterior ICF wall as you walk out the kitchen sliding door.  It looks like the roofers decided to make the wall into a dart board and shoot their pneumatic nails into my insulation.  Although there isn't any structural damage, the nails penetrated enough to reach the concrete.  Since the foam isn't self healing, I now have a few dozen holes through my exterior moisture membrane and insulation that leads right to the concrete.  I've already contacted Ken and Matt about this and I'm pressing heavily for some kind of financial restitution.  Not only is this highly unprofessional, but it's blatant vandalism.  Why is good help so difficult to find?  I wonder what could have lead them to do something like this.  Did they think I wouldn't notice?

   Oh hey, this might be why they felt so bold to shoot up my house.  This is after my clean up.  Empty cans were littered all over the front of the house and a few were thrown down the concrete retaining wall, one was upstairs in the master bedroom and one was in the basement.  Looks like a case plus a 6 pack of 20 oz.  Again, did they not think they were going to be found?  Ken and Matt have a pretty strict no-alcohol policy (amazing they even need a policy).  If the work is good, I don't care if they drink, just clean up afterwards.  This kind of stuff puts my whole confidence in their workmanship in question.

   Another major issue I have is that they're using the same galvanized steel nails they use on the shingles, for securing all the copper.  If you remember anything about high school physics, you'll remember that zinc + copper + moisture = battery.  In other words, these two dissimilar metals in contact with each other and in the presence of moisture, will galvanically corrode, specifically, the nail will be eaten up.  This is plain wrong, but holy crap, ALL of the copper is installed incorrectly.  Sometimes I wonder why I'm paying my builder when I'm the one catching all the mistakes.

On to nicer things, I finally got that pile of logs milled up into some awesome planks.  Owner Steve Mixter of MDJZ came to the lot on Saturday  with his portable sawmill and cut up about 6 of the logs I saved from the latest tree culling.  I thought I had a maple marked to save, but all the logs I had in the pile were red and white oaks.  There was one tree that was too crooked to mill, so that might have been it.

   Here's the biggest red oak on the mill waiting to be cut.  They took a few slabs off each side until a square beam was left, then just cut the beam into planks.  I requested 8/4 thick boards so Steve cut them as a heavy 8/4 so when they dry, they'll be a true 8/4.  Watching him work with his son Zack, you can tell there's a lot of experience needed to harvest the best boards from the log.  

   The bark slabs were sometimes placed three on a side so that stickers (spacers) could be cut.  The stickers are used in between the boards when they're in the pile to promote drying.  Also, narrower boards were harvested this way.  Native cut stickers will prevent "sticker staining", which happens when dissimilar wood species are in contact with each other during the drying process. 

   Check out this nice piece of white oak.  The sinewy markings you see are called medullary rays, which are only present when the wood is quartersawn.  If you imagine the cross-section of the tree is made up of layers of concentric rings, the medullary rays run out from the center of the tree.  These rays are valued for their figurative appeal but trying to harvest as many pieces of this type of wood from a tree creates a lot of waste since the tree would need to be cut radially from the center.  As such, you can either waste a lot of wood, or harvest these from the center cut of the tree, which we did.

   More medullary rays in some of the red oak, book matched.  You can see why the figure in this wood is desired in fine woodworking since it adds interest and character to the piece.  I have a good number of boards like this and two of the largest logs were book matched (mirrored) at the center of the tree.
   Some more light figuring in some of the narrower pieces of white oak.  I'm really looking forward to using this stuff.

   Here's the pile that I was left with.  About 900 board feet of 8/4 boards.  I paid Steve $480 for his time.  8/4 red oak goes for $6/B.F for rift sawn and $8/B.F for quartersawn.  I estimate I probably have close to $6000 worth of wood in this pile.

   I covered the pile with the left over stickers, covered by a tarp, then laid the bark slabs on top to keep it all in place and add some weight.  Here it will sit for at least a year to air dry before I can move it into the house to complete the drying process.  The wood is heavy with moisture and I couldn't move it into the basement or I would risk mold.  Under the cover of the trees, there's always a nice breeze blowing through here, so I think they'll air dry nicely.  Here's a Video of how the saw in action.

   So I have some issues to work out with the roofers but they should be done soon.  I hope to get rolling on the windows soon since I haven't heard back from the landscapers, then we'll be dried in for the HVAC to start work.  I'm a little nervous about having the windows in while there's still so much construction happening, but I guess that's how it's done.  The cabinets have been delivered to Cobblestone Cabinets and they can be held for a month without charge.  After that, it's 0.25$ per cabinet per day so it's not a small amount, but it won't break us either.  The clock is always ticking.