Monday, July 31, 2017

Nearing the Finishes

   This week brought about more incremental progress on the finishing millwork both inside and out as well as information about the timeline in the near future.  We got a short visit to the house today before running all our other weekend errands.  The deck installers were working the Saturday, applying more fascia.  More of the porch columns were finished, with an expected completion this week so the painters can come back and paint them.  Millwork on the rotunda is almost done with just a few bead details remaining to be installed.  Parts for the dining room ceiling are on site and will probably be installed and finished in the next couple weeks.  Things are moving forward into August, but I'm getting anxious about meeting the August deadline.  Can all the finishes be installed in one month?  I guess we'll find out!


   The deck installers were just off frame, working on the porch to the left of the front door.  They're working on installing the fascia and have completed the highest part here.  The two lower pieces still need to be installed and the red beam will finally be hidden from the front.  It will still be visible from the lower elevations so I might get under there some day soon and paint it black.  The lower column wraps haven't been installed yet, and I think they're waiting for the fascia to be installed before they finish them off.  They were just about done with the part they were working on, so this will probably be finished this week.


   Mike Perri's carpenter, also Mike finished installation of the post wraps on the side porch completely. including the small cove pieces so these are ready for primer and paint.  They're complete all the way around the corner, so it's just those in the round part and below to finish and all the exterior millwork and woodworking will be done.  I guess the gable pediments still need to be painted and mounted, but that will probably happen once all the interior millwork is completed.


   Here's a close up of the panel detail on the columns.  The sides front and back have one panel, but the sides have two, as pictured here.  I'm interested to see how it's prepped before paint because I'm not sure if all the corners will be caulked, like the rest of the house was.  I think they would need to be, just as the nail holes will need to be filled; a tedious job.  The painter is expected to come back within the next couple of weeks to shoot the posts so hopefully the interior millwork will be completed so he can quickly move on to painting the interior.


   Here's a close up of the corner pillar at the back of the house.  The sides of the pillar are divided so the top rail of the railing has a solid place to attach to.  It was probably possible to keep the single panel design and attach the railing to the flat inside the panel, but doing it this way provides a more refined look and gives more thickness for the attachment hardware to drill into.

   Moving inside, Distinctive Designs started installing the lower pieces of the corner bead to the rotunda paneling.  It's probably easier to install the parts on the stair riser since the radius is lessened due to increasing elevation.  I didn't see any corner bead installed on the panels on the inner radius. That's the area with the greatest amount of curve so how they pull that off remains to be seen.

   Here's a look at the entire panel, first one finished in the rotunda.  Progress is a little slower than I thought it would be in here, but it seems like the slow down is on the most fine details.  There's not much left to complete in the rotunda besides the railing installation so once this is done, the painters can come in.  All the stair components will be stained to match the floor, and the wall panels will be painted white to match the panels in the greatroom.


   The rotunda floor border/halo top was finished further this week with the joints and nail holes filled.  They also laid out the rotunda railing where it will be installed.  I'm not sure if they're planing on doing this soon but it's the first time they had this here so it must mean something.  The three balusters are still in the turret room but I'm wondering if there needs to be some other support as you go around the rotunda.  Maybe the stainless steel balusters will provide enough support.


   The two short sections of railing were installed on the greatroom overlooks.  The same balusters will be installed here as on the rotunda railing.  The floor lip was also installed here, making me wonder how the baluster will be installed.  I didn't think to look at the underside of the railing to see if they pre-drilled for the baluster insertions .  If they did, it might be possible to insert each baluster then secure them down.


   Here's a close up of where the railing attaches to the wall  It looks like there was a hole already filled with a plug and there's still one drilled out.  There's a screw going towards the wall so I'm not sure what that other plug was for, nor am I sure what this hole is for.  Both sides of the rail have the hole, but not the plug.  Hopefully the plug won't be too visible when this wood is stained.

   Here's the floor border/lip that's installed on both of the greatroom overlooks.  Nothing too special about this, other than that it's a piece of wood installed on a concrete floor without any visible face screws.  It's close to the walls on both sides and on the left will be some baseboard molding with the right being covered by the fireplace stone.

   Here's that same lip from below  You cans see the railing doesn't have any holes for the balusters so I'm not sure how they'll be installed.  If I recall correctly, they might be hollow tubes so there might be a keeper that fits inside the tube that can be installed to hold the baluster in place.

   The railing in the basement stairwell has been installed.  It's very solid with no wiggle or vibration so I think it will work out well forever.  I'm not sure how much will be finished on the basement stairs as there's a fairly large gap between the stringer and drywall.  I'm hoping that will at least be finished nicely and we can figure out if we want anything fancier done at a later date.  I'm not sure if the railing will need to be removed to stain or if the walls still require some paint.

   Tile is still slowly moving forward with the grouting of the guest bathroom.  I can't remember if there was supposed to be corner shelves in here.  There are two sitting in the guest closet and the only other shower that might need it is the mudroom shower.  This one is grouted now, so it seems like an odd install sequence to add it now.


    Last week, the floor was covered with a protective piece of cardboard so this is the first time I'm seeing the shower tile installed.  The drain will have a square grate and of course this is a zero threshold shower; the only one in the house.  We'll have to figure out shower curtain/glass after we move in. We'll probably just put up a curtain for now and get glass when we can.

   Here's a close up of the grout color and job that was done this week.  Back when we were picking out tile colors, we also decided on grout colors and I think there were a few different whites to go with.  I couldn't tell you the color now, but it looks white and clean, so I'm happy.  They did a great job with the grout, even with the more 3d tiles.

Here's a look at where the floor tile on the right meets the shower tile on the left, and the slight ramp up into the shower.  This increase in height was needed so that the shower could slope towards the drain, without having to slope the entire room.  Should water escape the shower, it will flow down into the room more, but that shouldn't be a problem since we don't have any wood until the base cabinet.  The pipe is for the toilet water supply.


   A few more courses of tile were installed on the fireplace column, but progress stopped at the fireplace itself.  I'm not sure if they needed more information or are waiting for the metal to be created before moving forward.  A thin piece of wood is sitting where the metal will go, that might be used as a spacer for the tile installation.  Mike said that this tile requires a lot of labor to install since they couldn't miter the corners.  The stone crumbles too much when you cut it too thin, so they are alternating the face edges on the corners and polishing the cuts.  Luckily, most of the other tile in the house is completed, so they can spend some time here.

   I found a piece of the floor tile for the mudroom and mudroom bathroom.  It's a little dirty with drywall dust, so ignore the white streaks.  It's a gray tile that feels similar to slate, and we're using a 2'x2' format, which felt much larger than I anticipated.  There were a few boxes of the tile, so I'm guessing this is next to be installed.

   A piece of wood was mounted on the second floor fireplace.  It's the exact size as the beam will be so don't think it's the actual mounting plate, but rather a place holder for the actual beam.  The tile installers should be able to apply the stone right up to this piece and the beam mantle will mount on another piece.  I think it will be quite some time before the stone gets up here so that gives Lars some time to complete the mantle.


   Left over tile is being labeled and stored in the second bedroom on the second floor.  There are three or four stacks of spare tile for the rooms that have already been completed.  I'm not sure if we get this in the end, since we already paid for the materials.  It might be nice to have a few extra pieces if something should become damaged.  If we do get it, we'll probably just end up storing it in the basement forever.


   The last picture in this update comes from the butlers pantry.  These odd circular pieces of MDF are what will be the ceiling detail in the dining room.  We've gone through a few design iterations for this ceiling, from tray to panel to this.  It's supposed to mimic the old plaster ceilings, but this will look a bit more modern with cleaner lines and fewer profiles.  We've had to also modify the design to accommodate the large mounting plate for the dining room light we wanted.  It is one of the first rooms you'll see when you come in, so we're really trying to dress it up.

   That's it for this week.  I got some dates on upcoming tasks so the next few weeks should provide a flurry of activity.  Old Country Stone has all our bluestone at their yard and they're cutting the seats for the gazebo, so they should be out in a week-and-a-half to two weeks for installation.  Excavation and grading should begin this week, but Great Oaks Landscaping is coming in on the 8th to install two necessary retaining walls.  The porch posts should be completed this week and we're expecting delivery on the last two exterior doors.  Next update should be pretty interesting as we get closer to the beginning of August and the end of the build.  5 more weeks!


Tuesday, July 25, 2017

Continued Progress on All Fronts

   July is starting to wind down, but progress continues on multiple fronts on both the inside and outside of the house.  The painters have completed painting the exterior of the house and continue to apply touch ups for over sprays and nail patches.  All the front porch columns didn't get up as expected, but progress can be seen.  On the inside, it looks like paint or primer was applied in both the basement and garage and millwork continues to provide a finishing touch.  Tile installation has started up again after a short hiatus and decisions were made about the finishes of the fireplace.

   Not much has changed on the front of the house.  The posts up here haven't been wrapped and the porch fascia hasn't been attached yet.  Some of the little missing pieces on the curved porch have been filled in so besides the part in front of the door, the porch is finished.  There were some paint and stain touch ups, which you can't really see since the errors weren't too obvious, and touch up has moved around towards the back of the house.

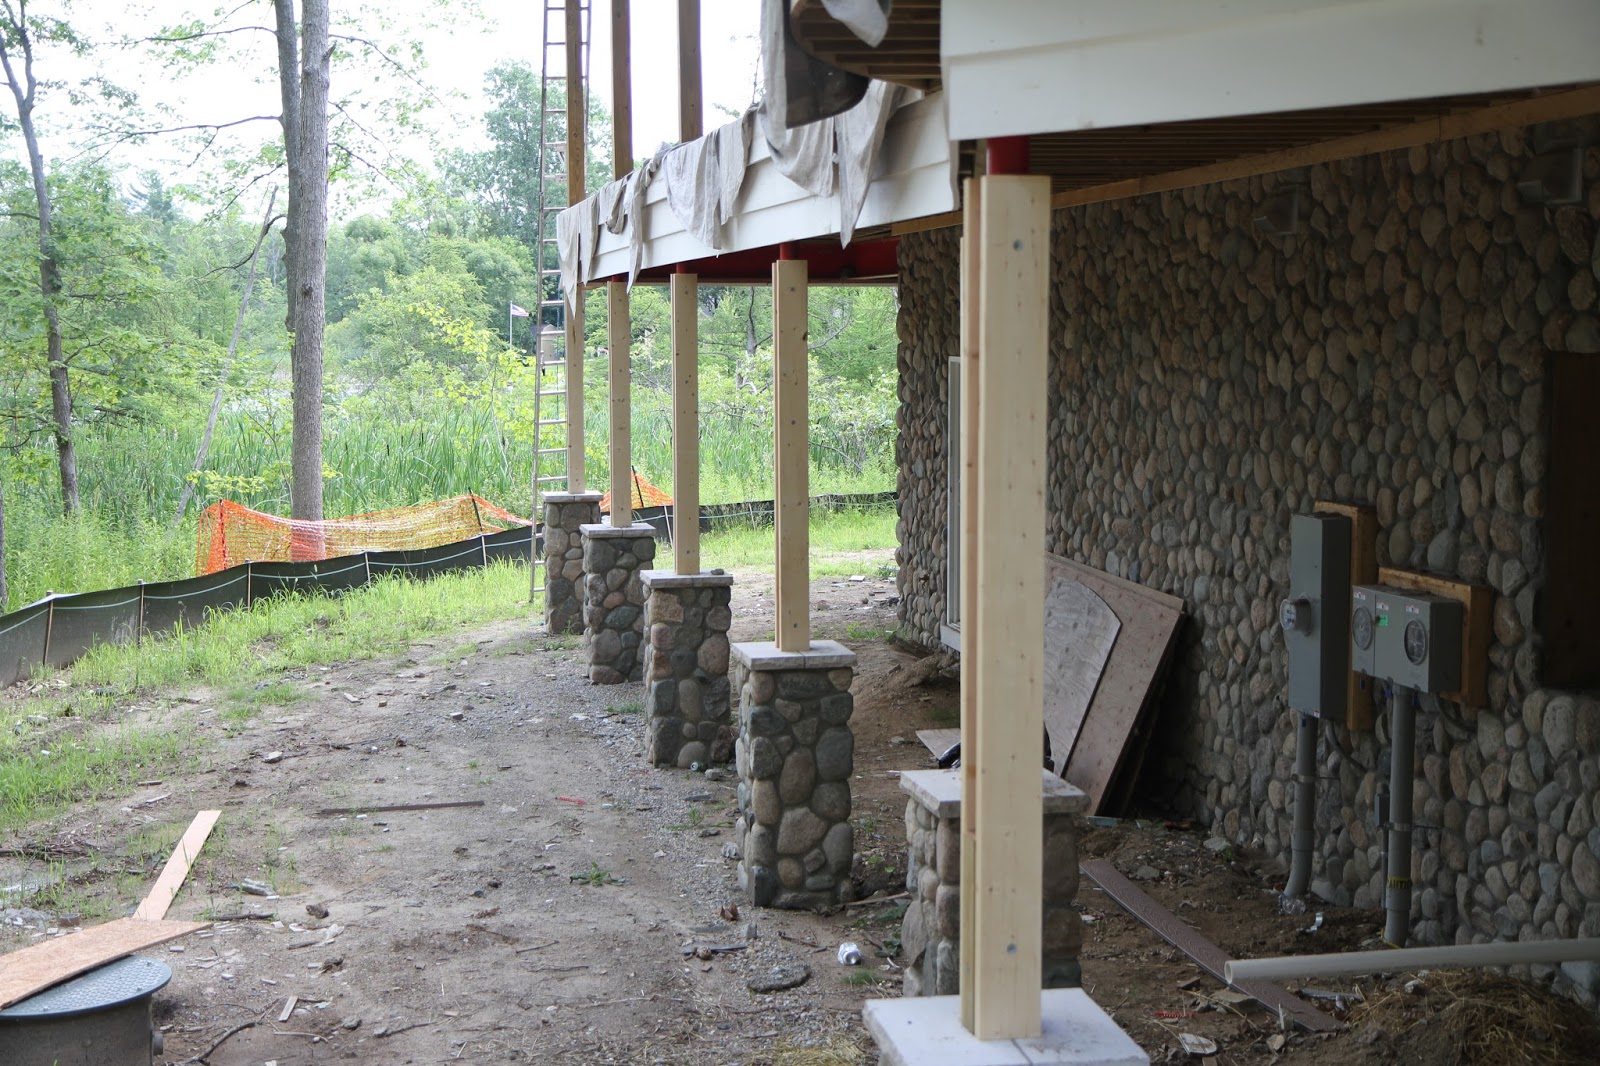
   The side of the house shows some more progress on the posts.  All the posts on the first floor have the primary wrap on, awaiting corners and final trim.  The lower posts remain in the same condition as last week.  Three posts on the first floor and seven on the lower and these will be completed.  two more pieces of porch beam fascia were installed.  These don't follow the curve since the porch beams are straight.  While it would have been ideal to have curved porch beams, I don't think this will be too distracting.

   The first coat of stain and trim paint was applied to the back of the house and I think there's still some touch up to be applied.  It's great to finally get the trim in the gazebo painted so we can get an idea of what it will look like when completed.  The gazebo posts still need to be painted, but that won't be done until all the pieces are on, which happens after the stone floor is laid.  Old Country Stone should be coming back this week to start installing the bluestone tiles in the gazebo and back porch.
   The ceiling of the gazebo remains unstained for now.  The painter was supposed to leave a sample of the stain for us to sign off on, but I didn't see it on site, so I guess they're not ready for it.  It will be the same color as the barrel vault on the front porch.  We were originally going to paint the corner angle and octagon trim at the top white, but later decided that it would be too distracting.  A dark wood ceiling should look really nice.

   Here's a shot of the back, fully painted.  I'm really happy with how this came out.  Even though the mudroom door and upper window trims impinge upon the house trim, it doesn't look too bad when it's all painted the same color.   This will probably be the side of the house that we'll need to monitor most for wear since it's south facing and will bear the brunt of the sun exposure.  The other side faces north and will be beat on more by the winter weather, but it's largely protected by evergreen trees.
   The mudroom door that we had such trouble fitting looks loads better with the trim painted.  There's still a good (filled) gap between the door casing and the door trim, but I think cutting the trim to match the door frame curve was the right move.  Painting the trim and gap filling caulk almost masks the issue and you would be hard pressed to notice anything out of place.

   Here's the back porch on the kitchen sliding door side.  The barbecue top still needs to be installed and we should start to see the bluestone floor soon.  Once the stone is in, the columns can be (carefully) painted and we can figure out what we want to do for railing.  The small vertical piece of trim that was added late makes the transition look more complete.  I really like the slight gloss on the beadboard ceiling.

   Here's a better view of the gazebo, hopefully the last one without the bluestone floor.  The ceiling actually looks pretty nice as is, but we're going for a less distracting darker look.  I think if the gazebo was in a more tropical setting, then the lighter wood color would be more appropriate.  I love how the angle trim comes down on the white just enough to see the "spike".  We still need to pick out a ceiling fan and anticipate it will be difficult to find something outdoor rated and attractive.

   Moving in side, more work was completed on the millwork in the rotunda.  All the panels are laid out and the vertical pieces of corner bead were installed.  The curved top and bottom pieces have yet to be installed.  Also new is the top of the halo around the inner rotunda.  It's the lip to which the wood floor will be installed against and makes a continuous rim.  The rotunda railing will also be installed on top of this as it ties into the stair railing.

   Here's a closer look at the panels on the stairs on the inner rotunda wall.  We decided that we liked the look of the uninterrupted vertical panels, and have no horizontal dividing panel frames.   The baseboard still needs to be applied to this section of the wall, but you can see how it will look around the corner. It sits proud of the panel frame and share the same dimensions as the baseboard in the rest of the house.

   Here's a closer look at the referenced corner.  You can see the short baseboard section and its familiar profile.  The curved part can't be constructed in the same way, so it will be built up in sections with the stepped profile remaining to be installed.  It will probably be made of two strips of wood, each half the thickness of the final.  The back piece will be taller and the front shorter, to form the steps.  These thinner strips can be bent, glued, and nailed into place to fit the curve of the wall.

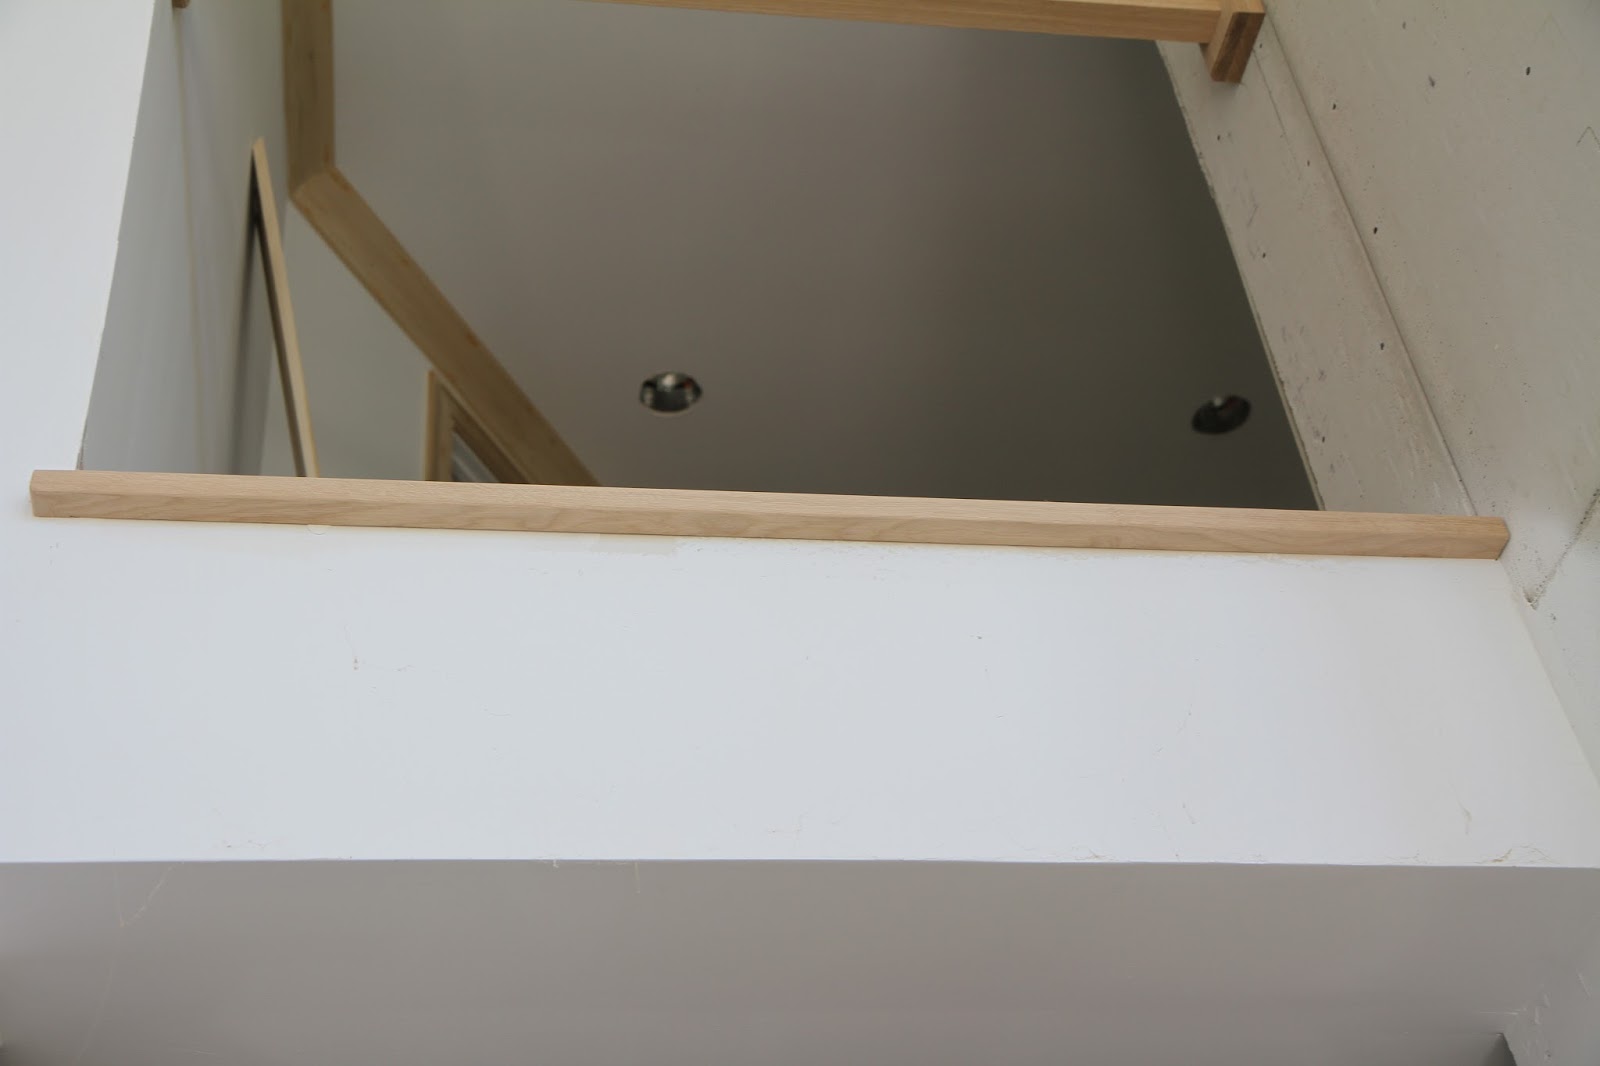
   Here's the top of the halo, or maybe the lip of the floor?  It's made of what looks like red oak, so the woodgrain will closely match the white oak walnut stained floor we're installing up against it.  This should stain up to look the same.  It's neat because although the railing will end into the wall at the last bedroom, the lip continues around the outer rotunda wall.  It provides a good landing at the top of the stairs and will probably see the most wear at this point.  The floor itself will be 3/4" engineered with a wax/oil finish, but I'm not sure we can mimic the same finish on the lip.

   Here's where the stairs meet the lip.  There will be a newel post at this point, where the stair railing transitions into the rotunda railing.  With the lip in place, I'm not sure how they newel post will be attached.  During earlier discussions, I was under the impression that the post would drop down below the level of the floor on the halo, but now that doesn't make sense.  It seems like the newel post will be sitting completely on the floor lip.  How they attach the post to the floor with adequate load bearing capabilities, I don't know.  I would think it would take some steel posts drilled down into the floor or something.

   The fireplace mantle on the second floor fireplace has been marked so the tile installers don't cover where the mounting plate will go.  It's going to be an 8 x 60 inch reclaimed beam, cleaned up and stained.  We got a chance to take a look at some of the reclaimed beams last week, and I'm really excited about how this will look.  The beams come from old barns, probably made of some kind of pine considering our location.  Sometimes, the mortise and tenon joinery held by pegs is still in place, so I'm hoping we can get a piece with that.  The back of the beam has to be hollowed out a bit to accept the mounting bracket, but it will otherwise look like a floating beam.

   Speaking of fireplaces, the first few courses of stone were laid on the fireplace column on the first floor.  Samples of the metal fireplace surround were left on site so the tile installers know how far to space the stone as it returns towards the fireplace and we decided on a finished color for the metal.  The stone is spaced off the floor by the thickness of the wood floor plus a gap.

   I noticed that the plywood blocking the garage doors were off last week from the wireless trail cam and I wondered what they were doing.  Apparently, they were priming the garage, but I don't think paint was applied.  At least, we didn't sign off on any paint colors, but I'm not sure what other color you would want in a garage besides white.  The airless paint equipment as still in the garage as well as some 5 gallon paint buckets, but I didn't think to look on the side to see what it was.

   I believe these are the post wraps for the posts on the basement posts under the front porch.  They're much shorter than the other posts so it's really the only place they could go.  I'm not sure why they're sitting in the kitchen and not in a closer location, like the basement.  Not much else has happened in the kitchen, but not much else needs to happen before the countertops go in.  After that, I think the tile backsplash and floors will round out the finishes.

   The basement was also cleared out of the arch making table jig, now that all the arches are done and a coat of primer was applied, or at least places were cut in with primer.  There were some places that didn't look primed so I'm not sure if they missed it, if it's thin, or if they need to come back  In any case, the basement is clean-ish and should stay this way, or cleaner, until we move in.

   Tile installation started back up again with progress in the guest bathroom.  The subway tie in the shower and wainscoting was installed as well as the top profile detail tile.  It's a pretty simple and classic Victorian look that stands apart from the rest of the house.  The small square tiles in the shower floor were also installed, but covered with cardboard to protect them while the wall tile was installed.  There are two corner shelves that will be installed in the shower and are currently sitting in the closet nearby.  The base tile out of the shower still needs to be installed.  Eventually, we'll probably get a glass wall and door for this shower, but it won't be installed before moving in.

   Here's what the tile at the top of the wainscoting looks like when it's not installed.  The curve goes on the top and makes a little lip.  The wainscoting is on both walls of the bathroom, going behind the toilet and continues as a back splash above the vanity.

   Here's a closer look at the miter detail where the wainscoting meets the shower wall.  The tile isn't grouted yet and I believe a white or slightly gray grout will be going in here.  The profile tile isn't the same length as the subway tile so the grout lines don't match up exactly, but I think that's okay.  This bathroom is one that we needed to bring the ceiling down on in the shower to accommodate for the plumbing in the second floor bathroom above.  The height of the shower is 6 inches lower, so it's still taller than a standard ceiling height.  In this instance, I really prefer the definition of the shower ceiling since the tile frames it in well on the sides.

   The toilet side of the bathroom is unfinished because they can't install the backsplash until the counter top is installed.  Counters have been measured and should be on their way soon so many of these bathrooms will be finished in the next few weeks.  Good thing since we're winding down on weeks left on the build.

   Another area where tile progressed was in the mudroom shower.  This one isn't a zero threshold but the floor tile was installed but not grouted.  This room is dark so I had to take pictures with the flash.  The bottom course of wall tile still needs to be installed but the floor needed to be installed first.  I think the same tile will be used as the threshold tile.

   Here's a closer and less blurry look at the floor tile in the mudroom shower.  It's a tight basket weave since it's missing the small square tiles found in some of the looser basket weaves.  The tile has a light grey striation, but it's not a natural stone, and isn't priced like a natural stone.  This bathroom is utilitarian so I don't think the dogs will mind not being showered in a marble shower.

   That's it for this week.  Good progress all around and much, much more to come.  I'm hoping the rotunda and greatroom millwork will wrap up this week and we can start to see the millwork on the dining room ceiling.  Tile progress is always welcomed but they have a ton of work to do on the fireplace column.  Maybe we'll see some installed bluestone on the back porch in the next update, but I'm not sure when they're planning on coming out.  There's only 5 more weeks until the end of August so I'm hoping we're still on track!

Sunday, July 16, 2017

More Exterior Paint and Interior Millwork

   More details fall into place as we continue the march towards completion.  The past week was rainy and humid, which hampered exterior painting a bit.  Regardless, the front and sides of the house received its trim paint but still needs final touch up on the siding stain.  The back of the house still needs trim paint and touch up, but should be done in the next couple of weeks.  Prep work for the front porch columns were completed and many of the column wraps are assembled, waiting installation.  Millwork progress continued inside with the application of the panels in the rotunda with only the fine detail work remaining.  Exterior carpentry and painting should wrap up around the same time as interior millwork, allowing the painters to move inside before floors and finished plumbing and electrical.

   The fill sand remains unspread, but the stack of Trex is nearly depleted, with good reason.  Besides a few small pieces and the main part in front of the door, the front porch decking is completely installed.  The front trim has received its white paint, Sherwin Williams Duration in Satin.  The painter was actually on site when we visiting on Saturday and commented that the siding will need reapplication before the trim since we already have five coats of paint (1 primer, 2 incorrect gray, 2 white) on the trim.  We'll need to be sure to get his card so we can call him back in to re-stain the siding in what I hope is 10-15 years.

   The first and second floor of the front and side have the trim and porch ceiling recently painted in white.  We decided to have the spaces between the turret painted white to match the inspiration house and make the turret stand alone a bit.  Although the beadboard on the ceiling was primed, it was an off white.  Now that all the crown, ceiling, and siding trim is a uniform color, it adds much more presence to the whole porch structure.  Mike said that the columns should be installed by the end of Tuesday, so the painter can paint the posts starting on Wednesday.  Word from the exterior door maker is that that the master balcony french door is three weeks out so final paint and millwork won't be completed until that and the front door is installed, but it's a relatively small part.

   Painters tarps covered the porch, but I was lucky enough to be able to stick around until they were done for the day so I got a chance to take some pictures after they cleared the tarps.  All the arches have been painted, as well.  Once the columns are fascia trim are installed, there will be a unified white from floor to ceiling, with the deck and railing acting as a color break.

   The lower porch posts on the side of the house are prepped for wrap installation.  There's one steel post above that is prepped in a similar manner to these posts, which are sandwiched between two, 2x6.  It doesn't look like the wood is pressure treated, which should be okay since they'll be completed covered and waterproofed by the MDO wrap.  They're off the ground so we don't have to worry about water infiltration from the ground, and as long as the bottom is caulked where it meets the limestone cap, I don't think we'll have any issue with water wicking and rotting the wood.  All these posts have their wraps assembled and waiting in the kitchen, but I failed to get a picture of them.  I didn't see any assembled posts for the first floor.

   There's some kind of mechanical fastener driven through the wood, into the steel post.  I found a few strips of spent explosive nail set shells nearby on the ground, but I didn't know they could be used to drive into steel.  I've only seen ramset into concrete, but I read that there's no issue with ramsetting into steel.  The nail looks zinc galvanized and I assume they're some kind of iron based metal, so there shouldn't be an issue with any galvanic corrosion.  It's probably intentional that the ramset nails are staggered to reduce the number of concentric penetrations to the post, which might weaken it structurally.  The post wraps will be nailed or screwed into the wood and are obviously not structural.

   The deck fascia has started on the back of the porch and has made its way to the front curve.  It consists of three layers of what I think is Azek, which doesn't require paint.  Whether or not they'll paint it to match the other white is unknown at this point.  The whites are a little different and since they'll be right up against each other, it might make sense to paint it too.

   Here's a look at the fascia on the side of the house, when the painters tarps were still in place for the day.  There's a slight gap at the top board that widens as you approach the front of the house.  This is probably due to issues in the initial construction of the front porch and Mike and his crew is doing their best to hide the flaws.  It might be possible to lay a bead of caulk in that joint but it gets pretty wide.  If they paint it, they could shoot the paint upwards to cover any visible wood structure to help mask the joint.  We'll see how they tackle the issue.

   The paint is satin, so it has a very slight sheen to it when the light hits it at the correct angle.  The sheen isn't as evident in the trim since it's a rough sawn cedar.  The roughness scatters the light a bit, reducing reflectivity, appearing more matte than the smooth surface of the beadboard ceiling.  A glossier surface tends to be more durable and since all this trim is under the porch and protected from the elements, I'm hoping there will be less wear to the finish.  Exterior paints can chalk after enough exposure to UV deterioration and weather.  The painter recommended a light power washing two times a year to remove accumulated dirt and spider webs to keep the surface looking fresh.

   Here's a look at the side porch looking forward.  Now that the trim is all painted, you can really see how high the windows are under the front porch.  Integrating in the top trim to the top siding trim helps offset the height, but for windows that don't touch the brick ledge, the upward placement is more pronounced.  Ideally, there would have been a gap between the top of the window trim and the top siding trim, and a sharp eye will be able to spot the issue.  It's easy to notice the oval window being cut short at the top and I would have preferred it to be separate from the trim, but we did the best with the issues left to us by lack of planning or poor architectural drawings.  If I could impart one piece of wisdom it would be to find a good architect because an expensive but through plan will save you tens of thousands of dollars later.

   Here's a closer look at the Sherwin Williams Earl Gray next to the white of the trim.  It looks like there's some over spray of the white, but it might be white caulk.  If not, the painters go back and touch up the gray in areas where they fill nail holes or have a bit of over spray.  I've seen tape used to mask in most places and paper with tape in others but minor paint incursions can be expected during the painting process.  They'll all be corrected in the end.

   So here's what the finished deck looks like, after the painters removed their protective tarps.  The boards are laid as long as they're made and perpendicular pieces define each section length.  Since we installed the joists 12" on center, there's no deflection or bounce to the surface.  The gaps between the boards are even and spaced due to the hidden fastener system.  The front porch is 8' wide, making it wide enough for both seating and passage simultaneously.  When the square footage is added up, it's actually a very big deck.

   Here's the round part at the corner of the house.  I thought there would be a double border on one of the rays, but it looks like they're all single width boards.  They tried their best to land the borders on the posts, coming close on some, completely missing on others.  They had to make the triangular wedges sized properly so if the border missed the post, it was because it had to be sectioned that way.  Additional supports were added beneath when the deck boards ran closer to parallel to the joists, but there are a few places where I might add some more support.  I've seen pictures of some decks that use curved Trex, and while it's possible, it would have been difficult with our radius and would probably add considerable cost.  I think this is the best implementation we could expect and I like how it turned out.

    Here's the corner of the house where all the borders radiate from.  The angles look equal but I know they tweeked them a bit to try to hit the posts.  If I took a protractor to it, I would probably find deviations of a few degrees, which is unimportant.  The result looks even and clean without any oddly shaped pieces.  There's nothing here leaving me wondering why it was implemented in that manner.

   Here's the view of the side of the deck looking forward.  By next update, all these posts should be wrapped and painted, almost completing the final look.  We''re figuring out railing and Mike said he has something in mind, so that will be the final piece of the deck.  Mike said of all aspects of the house, the front porch was the most frustrating part to figure out and correct.  There were many things that needed to be fixed before the finishing could even begin, so having it turn out this good is a testament to his had work.

  One more shot of the deck for this update.  There are a few pieces on the curve to install, but most of it's there.  The curve makes for some oddly shaped pieces and small jigsaw puzzle parts, but the curve is implemented well.  Curving the railing will be a trick, but it's important to preserve the space and look.  A better plan would have called for a curved I-beam for the main support of the deck.  This would have made placement of the posts easier and more evenly spaced out but unfortunately, the architect didn't plan it out well, the first builder didn't have enough experience or foresight to catch the mistake, and the initial foreman just followed the plan blindly instead of critically thinking about it.  If Mike came on earlier, he would have called for a revision so the deck would be implemented correctly.  He did the best he could and it turned out great.

   Moving inside, Distinctive Designs completed the layout and installation of the panels in the rotunda.  Also completed is the top border halo that goes around the inner and part of the outer rotunda walls.  The bead trim still needs to be installed and it has to somehow be curved and I'm curious to see how they'll accomplish that.  They do cut their own moldings, but the wood seems difficult to bend, especially with the profile of the bead cut in.  They had to do a good amount of work, fitting in the halo at the top, removing the drywall in some places, but all the modifications are invisible now.

   Here's the side opposite the stairs, which are also receiving panels.  Below is the alcove for the powder room and first floor elevator entrance, with the second floor elevator door above it.  They elevator openings are currently covered over with drywall and millwork for final inspection.  When we want to install the elevator, we'll just open up the  drywall and prep the elevator shaft for the hardware.  Some additional millwork will be required and we'll have to have Distinctive Designs come back to trim out the additional doors for the elevator on all three floors.

   Here's the paneling millwork of the stairs from above.   You can see the little shelf they added to the top of the halo, which will tie in perfectly with the lip they need to install that runs the interior perimeter of the rotunda.  It's not currently attached and I'm not sure if they'll stain it walnut before attaching it, but it will be the same color as the stair tread and floor.  The exterior painter is staining the wood in the barrel vault and gazebo ceiling, as well as painting the interior.  I'm not sure if he's also staining all the oak or if Distinctive Design is handling that color matching.

   That's it for this week.  Good incremental progress towards the next big steps.  We still need to think about interior paint colors, which we'll probably need in the next couple of weeks.  We're also looking at interior door hardware as well as cabinet hardware.  The lighting list is set, and due to some additional super fancy fixtures, we'll need to kick in some money out of pocket.  The tile budget is still being reviewed but it's a bit over so we'll need to figure that out.  Finished plumbing hasn't been reviewed yet so we'll need assurances we're not over budget there.  Garage doors are on order, floors don't take long to get in after ordering, so that's on hold.  Not much else besides those punch items and 6 weeks until the end of August.  It seems like it will be a tight finish, but I'm still confident we'll get there.