Monday, March 27, 2017

Drywall begins

   Even though our luck ran out with the nice weather, our luck continues with the progress on both the exterior and interior of our house.  We got a chance to visit the house on a rainy Sunday with the knowledge that drywall had been delivered earlier in the week, but not expectations on what they could have accomplished in the two or three days after the delivery.  We were greeted with stacks of drywall in every room and a nearly completed second floor ceiling with some of the walls up in the master bathroom.  Work continued on the exterior stone with the completion of the gazebo fireplace and front retaining wall parging and the beginning of laying the stacked stone on the fireplace.  Mike expects the drywall to be completed by March 31st, which seems crazy to me, but he's been fairly accurate with his previous deadlines. There's a ton of drywall to hang and taping and mudding is limited by drying time.  I'd be super impressed come next weekend if I'm looking at finished walls.

   Since most of the work was done on the second floor, this blog entry will start there.  Here's the first look at the ceiling on the second floor.  The ceiling will be the first to be completed since the walls will butt up against it on the underside and we need to get insulation blown up there as soon as possible.  What you're seeing is actually the only places that don't have ceiling drywall up, probably due to height.  The only places that don't have drywall ceilings is the great room and the rotunda.  These two areas will be the most difficult to install drywall since special scaffolding will be needed to hold the large panels up there.  I didn't see a drywall lift anywhere on site so unless they're taking it away every day, they're using raw manpower to hold the ceiling pieces up while they're fastened.

   The master bedroom ceiling is completed.  All the recessed lights and speaker holes are of course cut through and ready for final trim.  Each room seems to have many pieces of drywall stacked vertically against the walls, probably the pieces required to complete the room.  Even with all the work accomplished, the debris is kept to a minimum and the dust isn't too thick.  This might be the last look a the studs.


   The master bathroom is the most completed room in the house with all the drywall applied to the ceilings and walls.  The spaces for the Robern mirrors were left open and it looks like all the fixtures and switch boxes were preserved through the drywall.  The curved thing hanging on wall is a flexible drywall corner bead.  Since they don't put drywall bead on the bottom edge, I don't know why they opted for the flexible kind.

   Here's a shot of the other side of the master bathroom.  The curved shower dividing wall has been dry walled as has the water closet.  All showers and tubs will not be drywalled, but will probably use cement board with a water impermeable membrane, in addition to the wall tile.  The drywall installers aren't quoted to install these areas so maybe the tilers will do the job.  Now that the curved dividing wall is done, we can see if the either of the two tile selections we have for the feature side, fits the interior radius.  Now that the drywall is up, there's definitely less light in the room, but it shouldn't be too dark.  It's unfortunate we couldn't implement the stand-alone wall design because that would have kept the natural light level high.

   Most of the master closet drywall has been installed.  I couldn't pop my head into the storage space because of the building materials so I'm not sure what condition that's in.  It's an insulated space, but unconditioned, so I'm not sure what the code requirements are for installing a fire blocking material.  I'm pretty sure it will be drywalled in.  The insulated exterior wall still needs to be drywalled too, but all the material is in there to complete the task.  Since there aren't any exterior openings in this room, it's super dark now so I'll need to start to use my flash more and more.  Lots of the pictures I took on this trip were blurry due to long exposure times needed for low light conditions.

   The other bedroom (room 3) upstairs has the ceiling completed, but none of the walls yet done.  As with the other rooms, all the drywall required to complete the space is in the room, so there isn't a lot of running around to be done.  Just cutting and placing to complete the spaces.  Good organization and install implementation by the dry wall team.

   Here's a closer look at how the drywall is being installed.  As per the contract, the drywall will be "...glued, screwed.  Nail corner bead".  There were definitely many tubes of construction adhesive in the house, but visual examination didn't provide any observable squeeze out between the studs and installed dry wall.  I'm sure Mike will inspect the work, but maybe they're being efficient with the amount of glue applied.  The screws are standard drywall screws and they're driven to slightly below paper level.  It doesn't look like they're using a dimpler, but that should be okay since the drywall screws are going into steel studs.  Over all, it looks like a good installation so far.

   The laundry room ceiling is completed, but the walls have yet to be worked on.  It's a fairly small room that should go up pretty quickly, but there are many openings that will slow the work down.  With the ceiling drywall completed and the sound dampening fiberglass, this room is currently the quietest in the house.  There's no echo, but that might change once the hard surface of the walls are installed.  I'm really hoping the fiberglass works well for dampening, but I'm not expecting complete sound proofness.  There are sound proofing solutions available that we might explore in the basement theater, but it's kind of overkill in this room.

   The turret bedroom (bedroom 4) has all the ceilings installed, save for the turret itself.  The ceiling is spray foamed, so no further insulation is required up there, but the ceiling height increase from the room to turret needs to be completed before the attic insulation is sprayed in.  Both the attached bathroom and the closet beyond it have the ceiling installed, but again, no walls.  You can see the pieces of drywall stacked and ready for install in the bathroom door.

   I have some concern about how the drywall is cut around some of the recessed cans.  The goal is to make the installation as air tight as possible and some of the openings are pretty rough.  We'll need to go back and seal the gaps to make sure we're not losing energy through the ceiling on the second floor.  The recessed cans are rated air tight, which means the inside of the box has fewer penetrations and there are some gaskets on the light baffles.  Mike says the gaps will be taped and mudded so they will be lessened.  I would love to be able to get some spray foam against the back of the drywall but I'm not sure I'll get the chance.  The light baffles should provide enough air sealing, but there's no such thing as over engineering in my book.

   There's a short scaffold in the rotunda but it's much too short to reach the second floor ceiling.  I think they're either build it up more or use some kind of drywall lift on it to get the large drywall pieces to the ceiling.  I'm tempted to make a mid-week visit because progress seems to be happening too quickly.

   Here's the shot of the second floor ceiling from the first floor rotunda, and how much needs to be completed.  The sheets are 4 feet by 12 feet and are brittle, so I think it takes a couple of guys to properly lift a piece up.  They probably mark the approximate location of receptacles, and use a plunge cutting tool to cut out the penetrations.  The cuts are too clean for drywall saws since they tend to tear up the paper a bit.  The plunge cut spiral bits can ride the receptacles to cut an exact shape.

   Moving down to the first floor, no drywall has been hung, but boards are stacked in every room, ready for installation.  The study has a large stack of boxes full of drywall compound.  I found two different types of drywall compound around the house, but at this stage, none of it has been used.  I'm not sure why they use two kinds, but there are probably different applications for each depending on where it's used.


   The black boxes are some kind of general purpose compound.  From professional opinions on the internet, this is best used for taping, but is too scratchy for finish coating.  Some seems to think it's a little more durable, containing larger gypsum aggregate but not great for a smooth finish.  I guess that's why there's the fewest boxes of these on the site.


  The next drywall compound is this "Lite Blue" type that seems to be used for finishing surfaces since it's smoother and goes on easier.  There are the most of these boxes in the stack so it would make sense that they'll use this for a finishing surface texture on the drywall board.


   A few of these boxes were placed around the house.  It's a low VOC adhesive used to adhere the drywall to the studs, reducing fastener pops and reduces sagging in the ceiling.  We don't have to worry about nail pops since we're using screws, but it's nice to know that the drywall will be adhered as well as screwed, making cracks much less possible.

   More of the basement utility runs were boxed in, in preparation for drywall.  Mike priced the difference between the fire blocking paint and applying drywall to the insulated surfaces and found no real difference in price, so we're going with drywall.  You can see all the stacks placed around the basement.  It looks like they'll apply the drywall to the ceiling nailers when possible, and boxed exclusively around the utilities.  This is the storage area, so aesthetics isn't highest priority, but this roughly matches the rooms we'll be implementing in the area.  The space just to the right of the elevator shaft will be a dedicated fish tank room, and will more or less occupy the footprint of the ceiling.  The raised portion on the right doesn't really reflect any particular walls, but I always imagined shelves on this wall.

   They erected a wall to close off the mechanical room in the basement as well.  It starts at the bottom of the stairwell and terminates on the exterior wall.  There will be another wall installed on the other side to block off the mechanical room from the future basement bathroom that has yet to be constructed.  We'll have to consider how we'll conceal the doorway to the storage space now that we're getting a shape of the basement walls.  Ideally this area would have been centered in the space, but the stairs came down a bit more in reality vs implementation so we'll have to figure out how the final space will look.

   It looks like electricians have completed the install for the geothermal and EV charging electrical lines.  The plywood at the top of the boxes is new and the lines run behind this into the box.  There's still a tangle of wires that need to be installed in the right most box, the main circuits of the house.  Since this room will need drywall too, I'm not sure how this area will be finished off.  I'm hoping for a clean install, but I can always adjust it at a later date.

      Outside, work on the gazebo fireplace continues.  Construction of the structure is complete and Old Country Stone has started to install exterior stone.  This stone is different than the rest of the house but has a similar color scheme.  It's a gray and tan mix, which will be used on the fireplace, seating, and barbecue area.  I think there's enough contrast between the two stone colors to set them apart, but not clash too much.  Mike says OCS will be moving pretty quickly new that the weather is starting to cooperate more, so we should be seeing more progress on this front.

   Here's the progress so far on the stone installation on the fireplace.  They've installed the granite cobble on the gazebo, but haven't grouted in between the stones.  They've started at the bottom of the fireplace and will work their way up, probably grouting both surfaces at the same time so they're seamless in the corners.  Since this is a natural stone product, we won't have to worry about sealing it, as with the granite cobble.  These should be maintenance free, save for the occasional power washing.  It will be interesting to see how they manage installing the stone near the top.

   The entire fireplace has been parged so the installation of the stacked stone should happen quickly.  This is the complete progress so far, and I expect that they'll at least be able to finish the fireplace by next weekend.  The product seems to go up quickly and they usually have a three man crew working simultaneously.  We'll see how quickly they can get the gazebo seating done.

   OCS is nearing completion of the granite cobble in the outdoor storage area.  They've completed the exterior of the greatroom wall and most of the wall under the back porch.  One thing that I've notified Mike about is that the light should be above the door, not to the side.  He's already corrected the issue, so OCS must be on site today.  They still need to mortar the joints, but when it's completed, they'll be finished with cobble on this side of the house.  We've talked about what we want to do with this door.  Mike says this is the final door, but it doesn't really fit the design of the house so we'll probably change it in the future.  It functions fine for now, but we'll have to see if we can find a weather proof door to fit this location.

   OCS is nearly finished parging the side of the garage in preparation for granite cobble installation.  The the stone will be installed all the way up to the peak of the roof so there's a bit left to complete near the top.  Once this side of the house is done, they can probably move on to the small sections on the wrap around porch, then finish off the chimney.

   The entire concrete retaining wall has been parged and is ready for stone.  It's nice that they'll be able to install all the cobble in this area at the same time so it will appear seamless to the house.  Usually, landscaping is completed after the completion of the house, so this kind of integration opportunity doesn't always come around.  I think the only thing we're a little behind on is the design of the irrigation and landscape lighting.  We'll just need to make sure to allow for conduits under the driveway where needed.

   The garage remains relatively clear, with a few piles of lumber and two large stacks of garage pertinent drywall remaining.  We might be using this space to store the kitchen cabinets in the interim, slated for delivery this week.  The drywall installers are requesting and additional $600 for the skim coating and texture finishing of garage.  We'll gladly pay that to have a nice paintable, finished surface in there.

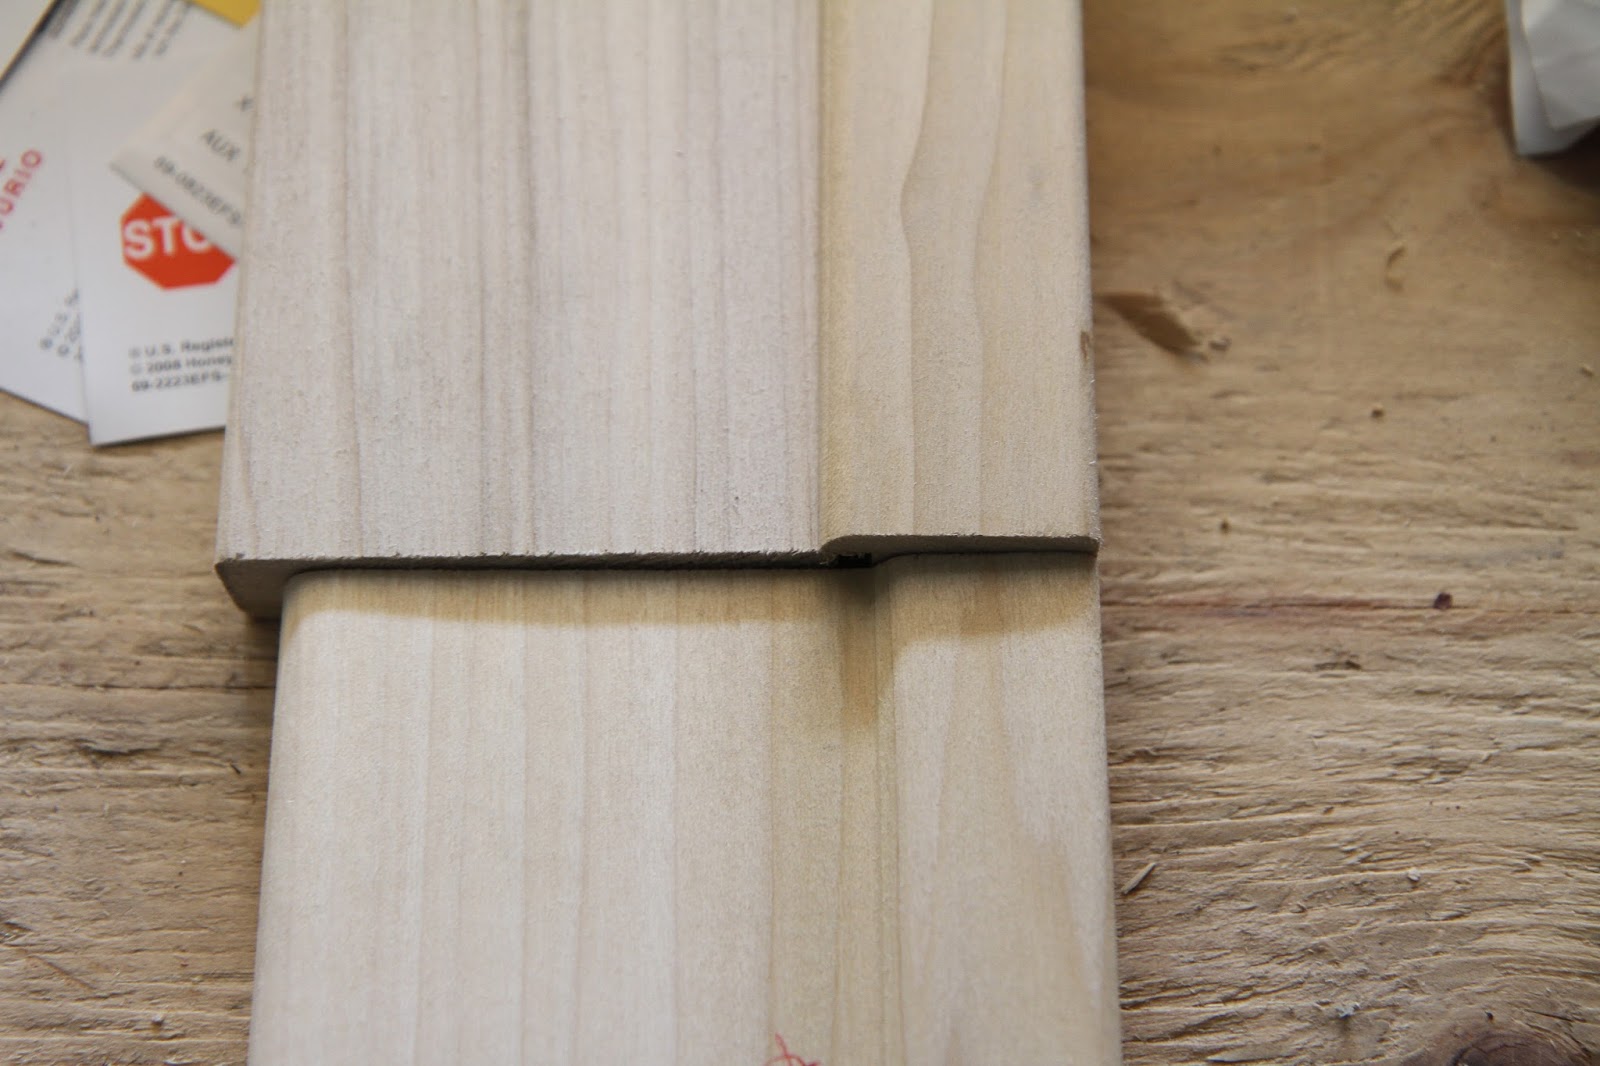
   Here's a close up of some of the stacks of drywall waiting installation.  These are in the garage.  The drywall contract states that 5/8" thick will be used on the ceiling and 1/2" will be used on the walls, which I think this is pretty standard.  The sheets are 4'x 12', which is 150% bigger than the more common 4'x 8' sheets you normally see.  Sometimes you can install 5/8" thickness everywhere, which offers a little more fire resistance of 1 hour vs 30 mins in 1/2" drywall.  It also adds a bit more mass for sound dampening, but it's not code required so it's not often done.  This 5/8" "type x" is the higher fire rated variety you would expect in the garage.  It will probably be installed on all surfaces in the garage since it's code that the garage is fire blocked from the rest of the house.

   So that's about it for this week.  As I said earlier, we'll be taking delivery of the kitchen, master bathroom, mudroom, and butlers pantry cabinets this week, and probably the other bathrooms in a couple weeks.  Installation of the cabinets won't happen until the drywall is finished, but that could be as soon as next week if all goes well this week.  Next update should see the completion or near completion of the interior walls, and more progress on the exterior.  After the walls are done, we'll be moving on to interior doors, trim, and garage doors followed up by floors and tile!  Even though there are still five months left in the build schedule, it's all coming together quickly!


z

Monday, March 20, 2017

Clean house, gazebo fireplace, and trim decisions.

   We were once again lucky with a sunny visit to the house in the end of a snowy/rainy week.  Temperatures are on the rise again with the forecast for the next week more in the spring time temperatures of low 40s to 50s.  The interior of the house has been cleaned and one more inspection passed for the run up to drywall.  Outside, Old Country Stone managed to get in between the freezing temperatures to finish the gazebo fireplace, and it looks like they're prepped to begin again on the granite cobble exterior.  Margaret left some finishing trim samples for us to look at and a small, but expensive, sample of the tile we would love to use on the master bathroom feature wall.

   One more sticker for our sticker book!  The new green tag on the bottom right is for the gas fireplace inspections.  I'm not sure what else needs to be inspected before we can start drywalling, but Mike has said that there needs to be an insultion inspection as well.  Considering they haven't started that yet, I don't know when it will happen, but hopefully it will be soon.

   Small progress in other places around the house.  Two holes were drilled thought the concrete floor and curved stud wall under the first floor stairs.  These are for electrical wires, one for the receptical that will be in the curved wall and one, presumably, for the lights in the basement stairwell.  Even though we've passed electrical inspection, there are still little things to install here and there.  Same with gas and plumbing.  The barbecue gas line needs to be run into the house and hooked up.  Some of the exterior hose bibs still need to be connected to the system.  I don't know if there will need to be another inspection on those items before we close up the walls.

   Some strapping was added to sections of the basement stairwell where the concrete and stud walls didn't make an even plane.  This is all prep for drywall, since you need to have an even surface to attach the drywall to.  It's these little preps all over the house that are time consuming, but result in a much better end result.

   Margaret dropped off a few samples of trim from the trim carpenters so we could have a look and try to decide what we want to do.  There were two pieces labeled "casing" and two labeled "baseboard".  Each baseboard piece had two profiles for a total of four proposals.  In combination with the two casings, would lead to 8 different possible combinations to choose from.  Picture above is the slimmer of the two casings and the round over/bevel baseboard example.  All pieces are made from poplar and milled by the installers.  We're going with a simple two piece trim to keep with the clean lines in the house.


   These are the two casing examples butt together to show their differences.  Both have a round over where the raise edge of the casing meets the flat but the two widths of the flat and raised are different.  The outside edge of the casing is sightly eased off to break the corner.  I forgot to measure the pieces, but I think the width of the larger was four inches and the smaller was three and a quarter inch or so.  From a woodworking prospective, I think the poplar is a good choice over pine.  It provides a smooth surface that takes paint well and it's considered a hardwood but it's not particularly hard compared to oak or maple, but it's harder than the yellow pine we often see used for trim in my area.

   These are two of the baseboard profiles provided.  You can see how the two piece baseboard will be constructed; from a 1/2 thick poplar board on the flat and just under 3/4" for the edge.  I'm calling these two profiles "eased edge" on the left and "beveled edge" on the right.  Despite the alignment of the two pieces in the picture, both samples are the same height.

   Here are the other sides of the baseboard trim samples.  I'm calling these "half round" on the left and "quarter round" on the right.  They're a similar profile, with the obvious difference being how much of the edge is routed off.  IF you think about it, the samples provided basically go from least removed on the eased off edge to most on the beveled with degrees of variation between.  The two things we're considering when choosing our trim combination is look (obviously) and ease of maintenance.  The baseboard with less surface area on top will trap less dust, but I guess if you're vacuuming it, it shouldn't matter much since they'll all be cleanable with a vacuum brush.

   So here's the combination that we've decided to go with: the thicker casing with the half inch quarter round over.  The thicker casing is kind of a given.  We're using eight foot doors everywhere so we need to scale up the trims or they'll look skinny.  We like the half inch round over because it's a good compromise between a substantial trim top and a softer edge.  It's important that the baseboard doesn't sit proud of the door trims and as shown here, there's a bit of a reveal on the casing trim.

   The same thick door casings will be used at the bottom of the windows but the thinner casing will be used on the sides and top.  In our current house, we have the same window molding mitered around the window so it looks like a picture frame.  In the new house, having the thicker casing on the bottom will provide a stronger windows sill look and add weight to the bottom of the tall windows.

   Margaret dropped a sample of the tile we really want in the master bathroom, on the curved dividing feature wall between the shower and the tub.  It's a custom cut mosaic tile from different pieces of marble, and we weren't sure if the grout joints would allow for installation on the concave surface.  This piece came in a thickly padded box, shrink wrapped onto a piece of cardboard.  When we opened the shrink wrap, we found the tile further shrink wrapped together.  The interesting thing about this tile, and I'll have to confirm with Margaret, is that it doesn't come attached to a fiberglass mesh.  If this is how all the tile comes, then there are two implications.  First, it could be installed on our concave curved wall because we can set any grout width we want.  Second, it will be much more expensive for the tile installer to install since he has to set each piece by hand.  It's a beautiful tile, so we'll have to get price differentials before making a final decision.

   Despite the cold and three inches of fresh snow, Old Country Stone finished the cinder block portion of the gazebo fireplace.  The height of the chimney is still below the peak of the gazebo and a little bit of the clay liner is visible under the plastic they're using to stop water.  The entire thing needs to be parged so the stacked stone exterior can be applied.  I'm not sure how the chimney top will be finished, but eventually we'll want a copper box similar to the house chimney installed on top.  It would be good to block water and snow infiltration from the top, but not necessary since it's all outside.

   Here's what the inside of the gazebo currently looks like.  They've started parging the bottom of the fireplace and completed the shoulders.  The benches remain the same and there's a small corner that we'll want them to finish before they move to adding the finishing materials.

   The front of the fire bricks have been covered with parging concrete in preparation for the finishing stone.  We'll have a keystone arch design around the opening but the rest will be covered with stacked stone.  There's still a void in front of the fire box so I'll have to ask what that's for.  It's not deep enough for wood storage and it doesn't go all the way to the floor.

   Copper flashing and roof shingles still need to be installed on the gazebo roof.  This will probably happen after the exterior stone is applied since the roof stops the stone.  The fireplace doesn't extend much past the gazebo roof, so it's very slim and doesn't block any view to the back yard.  I'm not sure if they'll install stacked stone on the shoulders of the fireplace or put a slab of blue stone up there.  I think either would look equally nice.

   Here's a shot of both fireplace chimneys together.  I'm really happy with how the gazebo is turning out.  It will look fantastic when the stone is applied to both, and if the weather holds out, it may happen within the next few weeks.  I can't wait to get some fires burning in the gazebo and anticipate using this space in every season.

   One shot I didn't get last week was the gas pipe exhausts coming out of the chimney.  Since they're gas all that's required is a vent pipe with material to block any critters from getting back down.  We'll be installing a copper chimney top box at the top to hide these two vents, and the entire chimney will be clad in the same granite boulder as the wall.  We'll have to wait until we can get a skytrac on site to finish that off.

   So that's about it for this week.  I know another week has gone by without drywall and attic insulation, but there's still visible prep and cleaning around the house, so I'm not concerned about progress.  We'll be getting a delivery of drywall this week, so next week might see some installed.  Once we reach that step, it's just drywall and exterior work to complete until we move on to trim work and finishes.  Doesn't seem like much, but it's the most exacting part of the build so we have to be very detail oriented.

Monday, March 13, 2017

Gazebo work and Drywall prep

   Even though the temperatures are well below freezing, we got lucky with a shining sun on our weekly visit to the new house this weekend.  Temperatures in the past week have been consistently cold, which isn't the best conditions for exterior masonry work, but progress still moves forward in the gazebo.  Inside, more prep work for drywall installation was visible around the house, which included the installation of our two gas fireplaces.  Even with the second floor ceiling still open to the attic space, it was considerably warmer inside with the basement furnace running and the first floor furnace off.  I'm not convinced we'll need both temporary furnaces when the attic is finally closed up.

   This is what's currently stacked up in front of the house right now.  Three pallets of cobblestone siding that will be applied to the end of the garage and exterior of the retaining wall.  I'm not sure how much they'll be able to work on the exterior since cold temperatures and snow are in the forecast for this week.  At least it will be available once the weather breaks.

   The entire garage is now closed off to the outside.  There's an access door in the plywood of the double opening, but it locks from the inside, fully securing the entire house.  The opening isn't wide enough to get sheets of drywall through, so I'm not sure where those will be stored but at least they have a large, dry area to store and work.

   Most of the material in the garage was moved out to the front and covered with tarp.  Nothing really important since the usable lumber is still in the garage.  It's a good thing there's a large window in there because lights have been prepped, but not installed yet.  This is the first look at what the garage will look like with the garage doors installed.  We'll have windows on all the garage doors so it won't be quite this dark.  We're also planning on installing very adequate lighting so we could move out the cars, open up the back, and use it for overflow entertainment space.  We'll just need to make sure it doesn't get too cluttered.

   The stud wall under the first floor rotunda stairs have been installed.  It still needs an electrical receptacle to be finished, but it's otherwise ready for drywall.  It was kind of neat not having the wall there and we could have entertained leaving it closed off with railing, but decided we would rather have the sound separation to the basement.

   Here's the rotunda with the under-stair wall installed.  I thought the inner rotunda would feel small when it was finally defined by the stairs and wall, but it still feels big enough for everything we would use it for.  We can already see a good sized Christmas tree sitting in this curve, especially convenient with a wall socket on the curved wall.  Even with a big tree, there's still enough space to walk around through the rotunda.  Decorating a tall tree will be much easier here since we can just walk up the stairs and rotate the tree to reach the highest boughs.


   Here's the see through fireplace from the great room side.  The log pile isn't arranged very high, so there's lots of open space above it.  They're currently protected by cardboard and the surrounding bezel is still in the box.  We had to modify the installation slightly since the fireplace column is 36" thick and the fireplace is only 30".  We took in an area surrounding the fireplace by three inches on each side to accommodate for this discrepancy.  We're not sure if we'll use a different material for the depressed surround or keep the stacked stone.

   Here's what the entire fireplace column looks like in the great room.  The carpenter is currently using the great room as his first floor work space so it's not a great shot, but you can see how large the fireplace is.  I'm happy with the over all look and can't wait to see it lit up.  It's an interesting fireplace  because there are two red halogen lights inside that shine on the side of the firebox augmenting the glow if the fire.  Even though the look is augmented, the output isn't,  It provides between 42k-57k BTU of heat, so I'm not sure the geothermal will even need to run when this thing is on.

   The height of the open fireplace isn't too restricted from the front door.  You won't be able to see out the great room windows, but there's no problem seeing into the seating area.  The large opening should help provide light to the rotunda so the center of the house isn't too dark.  We'll only be able to tell when the drywall is up and the front door with the glass side lites are in.

   A neat feature of the rotunda that we weren't expecting is the visibility of both fireplaces from the first or second floor.  Eventually there will be railing installed around the upper rotunda, but that shouldn't block the view too much.  There's also a hanging light in the center, but I don't think we're planning on having it come too far down.  Since both fireplaces are remote controlled, it's entirely possible to stand in one place and simultaneously turn them both on.  

   Mike picked out a different fireplace on the second floor since the one we originally picked wasn't supplied by the same retailer/installer so this is the first time we're seeing the selection.  I think he did a great job picking something nice for the space.  It's much taller than I thought it would be, but still proportioned well enough so we could get a mantle above it.  This one has LEDs that make the embers under the gas logs glow so you can turn those one without the flame to provide a nice ambiance.  The brick refractory is the same color as the one below, but arranged in a herringbone pattern.

   Here's the view of the fireplaces from the second floor rotunda.  This angle provides a much better view of both fireplaces than the one below, but the upper fireplace might be blocked by the hanging light once installed.  The dimensions on both fireplaces look very close, which adds a nice symmetry.  They're all hooked but but I'm not sure if they've been tested or turned on yet.

   Since the second floor ceiling is still open, you can see the exhaust pipes from each fireplace, going up to the chimney box.  They're double walled pipes so they handle both air intake and gas exhaust.  The exhaust goes out the center and the intake on the outer pipe so the incoming air is warmed a bit by the exhausted air.  Since none of the combustion air comes in contact with the inside of the house, none of that matters, but it will help increase the efficiency of the burn.

   I couldn't get a great shot of the gas exhaust pipes up in the chimney box, but you can kind of make them out as they exit the top.  I don't know if these will be insulated in the attic space, but since the fireplace installers installed these, I'm guessing that they won't be.  it shouldn't be an issue other than losing some heat to the attic space, but that was efficiency lost anyways.  The fireplaces do allow for piping the heat to other rooms, but we didn't build that feature into the house.

   The carpenter also prepped the underside of the first floor stairs for drywall installation.  He added 2x4 across the stringers to act as nailers for drywall for a finished look.  There's currently no lighting installed in the stairwell so we'll need to address that deficiency, whether it's lights on the walls or recessed lights under the stairs.  It's a pretty dark space so it will be required.

   The space where the stairs land on the first floor was also closed up, ready for drywall.  This will be an inaccessible dead space that really doesn't have an utility.  It's too high to reach from the basement stairs and too small to build in storage on the first floor.  It's better to just drywall it in.

   They boxed off beams and HVAC ducts in the basement too.  We're still trying to decide how we need to approach finishing the basement.  Original intent was to keep it unfinished and complete it later, but there's a construction code that requires that all insulating materials need to be covered with a fire protection barrier.  Most of the time that can be drywall, but that would mean we need to drywall the basement ceiling and exterior walls before certificate of occupancy and this isn't in the budget.  There are some paints available that satisfy the requirement, so we'll have to look at a cost comparison and figure out what we want to do.  These beams will be boxed in either way, so it makes sense to take care of them now.  There will be some dividing walls under them in the future so they'll provide a good place for the top plate to attach to.

   The first floor HVAC trunks and beam at the back of the house were also boxed in for drywall.  There will be a wall that encompasses the posts to divide the workout room from the general basement space so the ceiling was expected to drop down here anyways.  The area farther back is slated to be the basement movie theater and the boxed in HVAC will have to serve as a soffit for the screen wall.  Most of the make up air duct for the kitchen is encased in the soffit save for the part that ducks under the beam.  I'll have to find a creative way to wall that in on both sides of the space.  Eventually, you won't even know it's there.

   Old Country Stone got all the cinder block structure for the gazebo seating and barbecue installed last week, despite the cold temperatures.  Here's a shot of the barbecue area and cut out for the built in grill.  There's already a gas pipe installed that runs down into the under deck storage space and into the basement.  We decided to not install any openings for storage since we have a charbroiler in the kitchen range top that we'll probably need to use the same tools on.  The surface is at a counter top height and will be topped with a slab of granite.

   The fireplace has reached a height where they needed to cut away the gazebo roof to path the chimney through.  They've completed the built in seating structure, which will be clad in stacked stone.  There's one piece of clay chimney liner installed and almost bricked in, with four remaining.  I think it will take the height of the chimney above the height of the gazebo peak.  The seating is standard sitting height and will be topped with the same 2" thick blue stone that is going on the floor.  A half railing will sit on the seating between the posts and serve as a backrest to the bench.  We're not planning on putting any cushions on the benches, but they could be added if we wanted.  The seats are about 2 feet wide, but with the railing, will be narrower for sitting.  It doesn't seem like there will be enough space to lie flat on your back, which we're okay with.  The seats only flank the fireplace, keeping the rest of the gazebo open.

   The fireplace still needs one shoulder, but the firebox is complete.  You can see the clay liner and cinder block that surrounds it, so the actual chimney will be pretty low profile.  We'll probably need some kind of folding screen or screen doors to popping embers, but that's something we'll have to decided on later.  There's no built in firewood storage since we have enough land around us.  I'll just keep a convenient log pile some where.

   Here you can see the side of the gazebo and where the height of the fireplace is.  I think we'll need to ask OCS to build out the seat a little more to encompass the post because it looks a bit odd the way it currently is.  There's not enough space between the wood post and cinder block to allow for the post covering detail or seat stone so I'm not sure what the design intent was here.  I haven't seen any of the stacked stone on sight yet, so I'm not sure how thick it is, but it's definitely thicker than the slight gap they left.

   I climbed up onto the scaffolding to take a look at the chimney progress.  You can see the section they cut away and removed shingles from for the chimney.  They already constructed a cricket to prevent debris from collecting on the back side of the chimney when the weather cooperates, they'll be able to build up more.  Standard flashing will be required where the chimney meets the roof.  It doesn't look like they're providing clearance for the stacked stone on the inside of the roof so it will probably just stop at the overhand and start up again on top.

   That's about it for this week.  We have a meeting this week to finalize the front door leaded glass design and finish.  Weather isn't cooperating much, so I'm not sure what to expect for the coming week.  Insulation should be going in soon and drywall can start, but exterior stone completion might be put on hold until it warms up a bit.  The area left to finish is difficult to tent and keep warm so there might be weather delay for that.  Hopefully it will warm up again soon so we can finish off the exterior, but interior work should still continue.  We've gotten lucky with the weather this year.