I think this is probably going to be my most significant update so far due to the sheer number of changes I saw on our recent trip to the house. Outside of the sporadic warm days, the average spring temperatures remain in the 60's and work is progressing on all fronts. We're looking at picking exterior colors as the painters prep for paint and stain. Exterior stone work is nearing completion and the front porch deck is prepping for installation. The drywall has been completed and primed, and cabinets are about half way completely installed. We're seeing evidence of prepping for finished woodworking and tile and flooring contractors are being lined up to come in. Progress is moving incredibly quick, and I hope we can keep ahead of the decision making.
Since the weather was so nice, we took the tots out to the house today so they could enjoy the spring. The interior of the house is a little dusty, but nothing close to last week. The drywall installers finished sanding everything and cleaned nearly all of the drywall dust from the surfaces. A very light dusting still exists on the floors, but it's about as much as could be expected considering it's and active build site. Adding to the drywall dust is sawdust, from fitting the cabinets in various rooms.
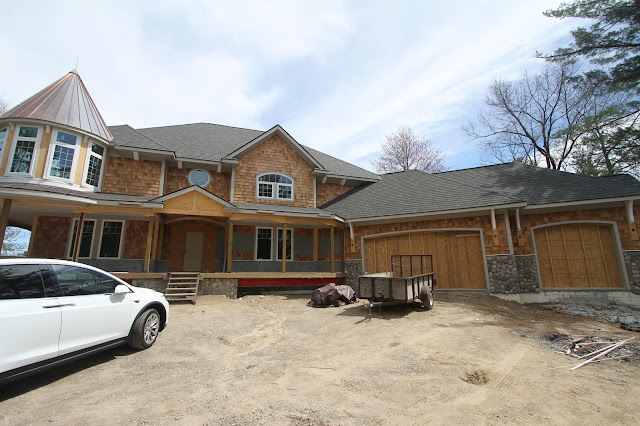
The front of the house shows quite a bit of progress. All the applied granite cobble has been mortared although work remains to be completed above the porch. It looks like we're going to get the decking installed before the stone work is completed.
In the mean time, Mike and his crew got all the beadboard installed on the front porch, minus the barrel vault, which requires a non-primed surface since it will be stained to match the front door and deck. The installed beadboard is only primed right now, but it's a near white primer, so it's close to the white that we'll be using when completed. As expected, the beadboard sits right on top of the top trim and provides around an 8 foot ceiling above the deck.

A white flashing was installed above the previous black flashing, spaced by the thickness of a single deck board. The board shown in the picture isn't the actual product we'll be using, but it's the same thickness. The one on site is a piece of Trex, while we'll be using Azek. When I saw the board, I knew right away that it wasn't Trex since it didn't have the same grain color variation we like in the Azek. No matter since it's just for setup. The black flashing was to prevent any water from getting behind the deck ledger board and stone below. The white top flashing will allow any water to shed from the yet-to-be applied granite cobble directly onto the deck. The stone will cover the vertical part of the white flashing and the horizontal part will be hidden, sandwiched between the deck board and stone. In this manner, it's acting more like a ledge for the stone masons to apply the cobble rather than a flashing.

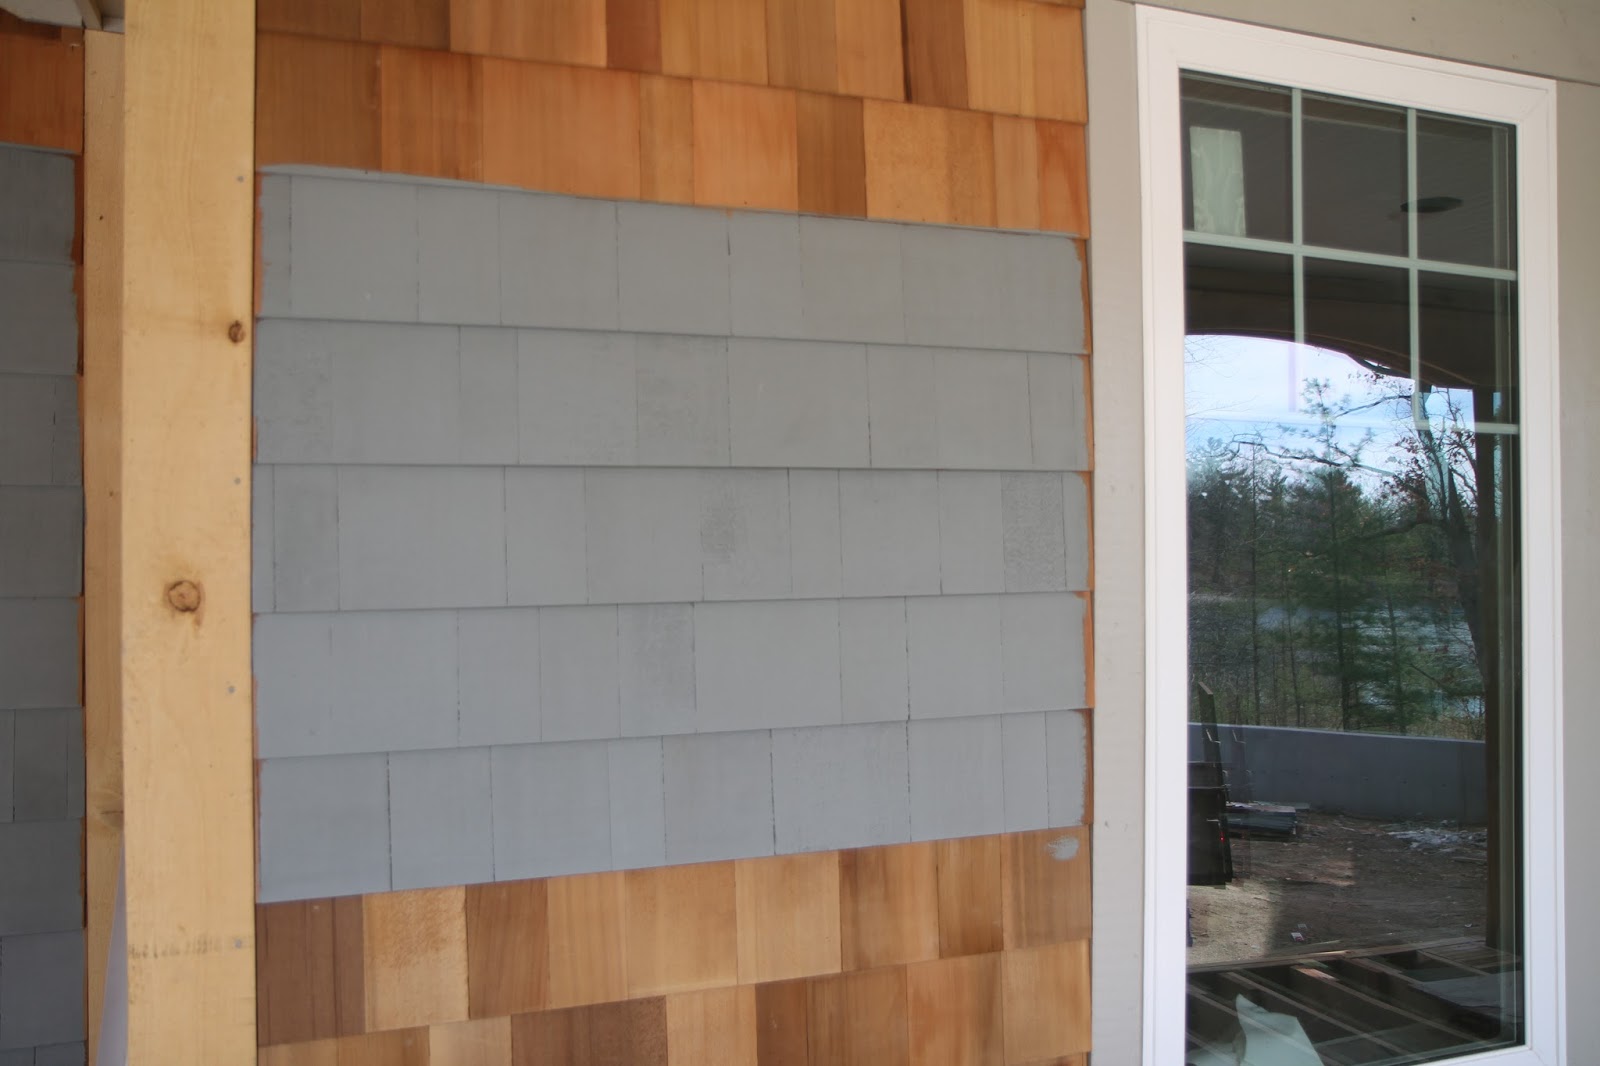
Here's a closer look at the beadboard installation on the front porch, to the left of the front door. There are some minor gaps between the trim and beadboard, as well as some exposed structure at the front of the porch. The gaps between the trim will probably be covered by a piece of trim like a quarter round or step trim. The front of the porch will get one more apron piece to cover the exposed structure wood. Mike got some of the solid stain applied to the front of the house so we could see what it looked like.

The color we've decided to go with is
Sherwin Williams Earl Grey. This color is mixed into their Woodscapes solid stain. The trim was accidentally painted in a Mindful Gray earlier in the year, but it was the first color we considered for the wood shingles. The trim color will actually be painted in Sherwin Williams "Pure White", which should be similar to the window frame. Going through the paint picking process, I'm surprised by how many variations of a color there are. In general, you can find a color warmer, in red influence, or colder, in the blue influence. Earl Grey is more towards cooler, with a slight green cast in some lights.

Here's a closer look at the beadboard to the left of the front door. All the beadboard runs in the same direction, from the front of the house to the back. So on the front porch, the lengths are short while they run long on the side porch. Finished recessed light trim will cover any gaps left around the lights. We still need to finish the arches on the round portion of the porch, but evidence around the house shows there will soon be progress on that front.

The beadboard on the side porch was also completed. All the beadboard installation took place in the space of one week since we didn't see any application during our last visit. The beadboard really gives a different feel to the porch and the exterior of the house is just one more step closer to being finished. It's still a little difficult to walk on the deck since the deck boards aren't installed, and with the twins following in tow, we didn't venture to walk out on it as we have in the past. There are still some details to work out on the front porch, but I think there will be a lot of progress here in the next coming weeks.
Moving to the back porch, all the beadboard has been completed here too. I forgot to take a look at the master balcony, but that would be the last place beadboard would need to be installed if it isn't done already. The barrel vault and gazebo ceiling will both use non-primed beadboard and have yet to be completed.
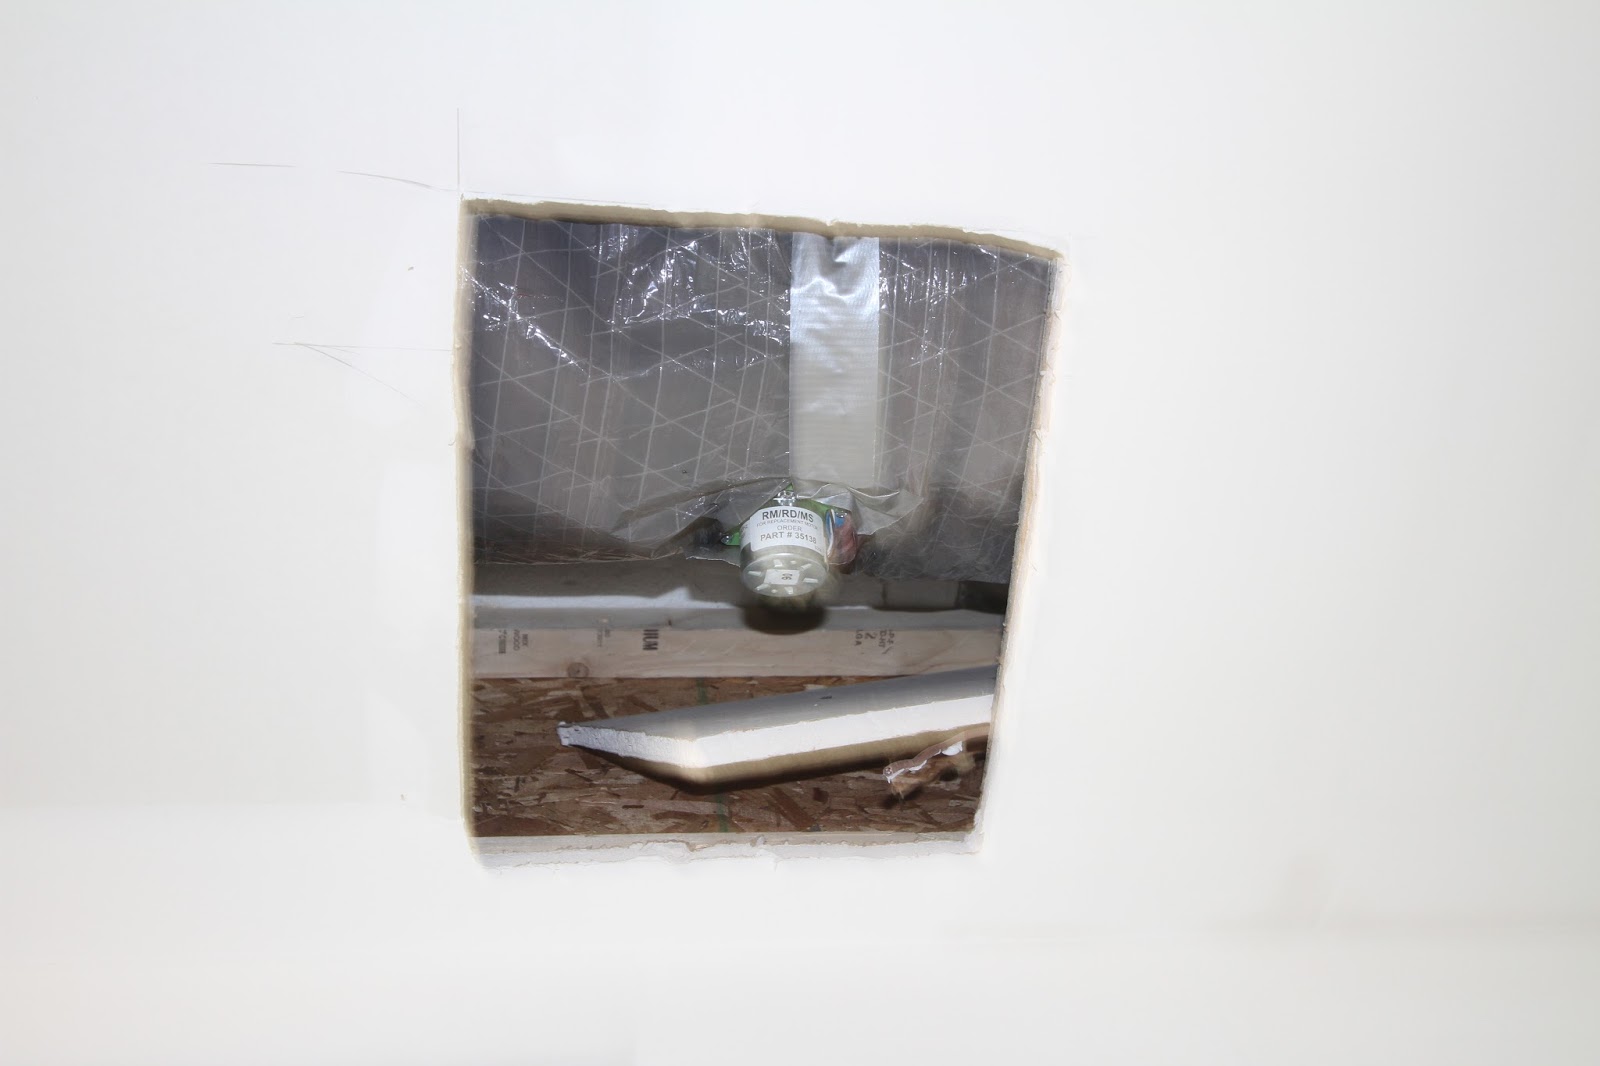
An access hatch for the external blower was left open, but will be trimmed and covered. Access to the external kitchen blower is necessary for service or cleaning and this is the only place we could really have it. There isn't a ton of crawling space up there, so a hatch close to the equipment will make it easier to work on.
Here's a shot of the entire back porch, standing in the gazebo. Two more changes made this week are the installation of the transom window above the sliding glass door, and the installation of three of our five exterior doors. We're still waiting on delivery of the master balcony door and the front door.
We kept a dummy header installed above the sliding glass door since we knew we wanted the transom installed in there. It was made and was safely kept with
Pro Brothers for the past few weeks while Mike lined up installers for the exterior doors. The window is made by Soft-lite windows, like all the other windows in the house. Although the frame takes up much of the space, there's still a nice amount of glass and still offers the open feel we were looking for. Without it, the door opening felt too enclosed and small. We'll be getting a piece of leaded glass made and installed for the interior of the transom.
The three exterior doors installed were in the mudroom, shown here, garage walk out, and greatroom walk out to the side porch. The doors are solid mahogany and provided by
Hardwood Door and Bevel. I don't have a ton of door experience, and we were considering Provia and Thermatru doors when we began this adventure. Both Provia and Thermatru doors come in steel and fiberglass and are high quality insulated doors, but we couldn't pass up the chance for a real, solid hardwood door for about the same price. All the single doors are similar styles, arch top 8 foot doors with five panels. The Mudroom door shown here has the top panel filled with a thermopane glass, providing much needed natural light to the mudroom. There were some issues that needed to be worked out installing these doors in the 12" ICF thickness wall. Hardwood door needed to make extra thick casings to match the wall thickness. The sill plates don't come in a residential application to fit the thick walls so a third extension needed to be installed under the entire sill plate. You can see Mike needed to add another sealing membrane under the sill plate to account for this. The bluestone still needs to applied to the back porch, but other doors will be getting a stone sill under the door as well. We still need to chose a door/lock combo for all the doors, but have some candidates in mind.

Here's what the entire wall looks like with the door installed. As expected, the door trim is right up against the beadboard, and impinges upon the top trim. It also sits proud of the siding trim and offers a nice reveal against the rest of the wall. The height of the door trim was unexpected and unfortunate, but I think it works out well enough.
Here's a closer look at the top of the door trim and beadboard. I think there's going to be one more trim piece installed between the wall trim and the beadboard, so I'm not sure how it will work at the door trim. The mudroom and greatroom doors are the only place we'll encounter this issue.
Another door installed is the rear garage walkout. This remains a solid door since we didn't think we would need anymore natural light in the garage. All the garage doors have windows in them and in addition to the window on the end of the garage, should provide enough natural light. You can see the gap left at the bottom of the door for the stone door sill. These doors are tall enough where, when standing on the sill, I can't reach the top of the door frame.

Here's a closer look at the build up of the door sill for the door. The two pieces of sill plate closer to the door are mortised into the casing, and the last flat piece just sits across the entire opening, under the sill plate and casing. There shouldn't be any issues with water intrusion if we properly caulk all seams, but Mike took the precaution of adding the waterproofing membrane under everything just in case. This door will have the most sun exposure since it's the only door not protected by a porch. Even still, it doesn't have a direct southern exposure so it only gets half a day of sun, and is still somewhat protected by the large roof overhang.

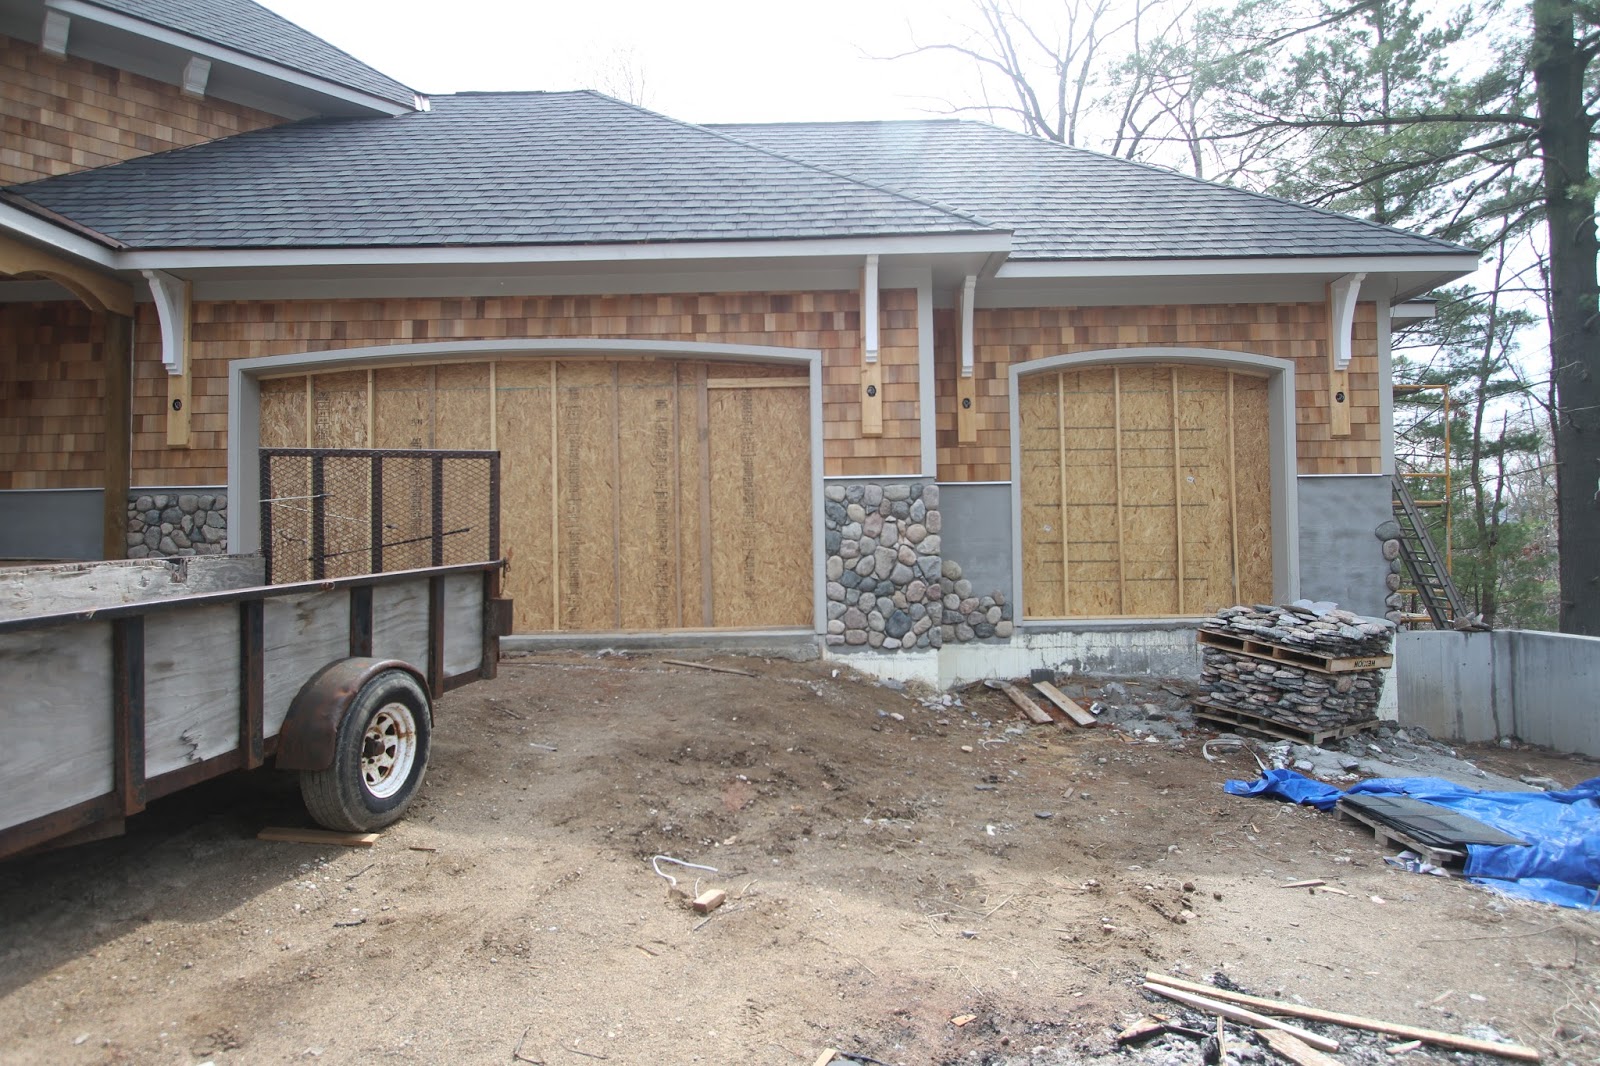
Here's what the back of the garage currently looks like. We're still waiting on the garage doors, but I think they're coming soon. The radius of the arches match very well and I'm really happy with the results. The height of the top of the door is lower than the top of the garage door, which sits at 9 feet so the sense of scale is preserved even with the extra tall door. This picture was taken around noon, so you can see what the spring time sun exposure is like. We'll have one sconce light installed on this door, indicated by the box to the left of the door.
Evidence of exterior prep for painting and staining is visible at all the interfaces between the cedar siding and trim. The painters caulked the seams between the two surfaces with a paintable caulk. I didn't take a look at the second story windows, but that will have to be completed before painting can begin. I'm not sure what the order of application will be, paint first then stain, or the other way around.

On to the interior and the dramatic changes there. We knew the drywall installers were completed, but we didn't know the level of cleanliness they left. The floors are fairly dust free, and while there are still some traces of drywall compound drips on the windows, it's fairly clean. At least it's clean enough to move forward, but there will eventually need to be a final clean up. The surprise is that all the rooms, save the greatroom ceiling, have been primed. Gone are the drywall joint color differences and everything is a uniform primer white. It looks like it was sprayed on since I see some, but very little evidence of over spray in some places. Giving the walls and ceiling a uniform look really provides a finished look and we can really see what it will look like to live in the house now. Also, as shown in the picture of the study above, cabinets are being unpacked and sorted. I think these are the later delivered
Homecrest cabinets for the other bathrooms and laundry room. We saved some money on cabinets by using Homecrest, but they're far from budget cabinets. Constructed from plywood carcasses, and still using dovetailed drawer boxes and slow close doors and drawers, the only differences between Homecrest and the Omega kitchen cabinets are the carcass thickness and customizability of the wood species.
Well look at this! The kitchen cabinets have been set and are waiting the final trim application. With only the center island missing, the kitchen is nearing completion. Final trim includes closing in the space between the top cabinets and ceiling and the crown that sits in front of it. The doors still need to be leveled but nearly all operate properly. From left to right, clockwise around the kitchen, the features are as follows, cooktop, garbarge, sink, dishwasher, double ovens and warming drawer, then freezer and fridge.
Here's a little closer look at the rangetop area. The Wolf 36" rangetop will sit on top of that center cabinet and is flanked by two vertical pullouts. We're expecting to use the left pullout for oils and spices while the right has storage for spatulas and spoons. Both drawers under the rangetop are functional and deep enough to store all our pots and pans. The Cheez-Its were left by the installers, but I guess it's technically the first food in the kitchen.

We decided to get drawers for almost everything. The island has one double cabinet door, but contains a sliding drawer insert. I think drawers are better for organization and ease of access. Doors with static shelves make it hard to stack pots, and stacked pots are difficult to access anyways. You have to bend over to reach down inside and it's difficult to reach far back. While the drawers might be deep enough for only one layer of pots, at least you can easily reach the very back if you get full extension slides like we have. I'm also not worried about banging the contents of the drawer upon closing because all upper cabinet doors and drawers are slow close. I tested them out and it's really nice. You just push the door and walk away as it slowly closes shut.

Corners are usually problematic when it comes to utilizing the space efficiently. Most times you'll see a hinged door front and hopefully a lazy susan shelf inside so you can stash bottles or cans. More often than not, you'll just see a dead corner with no access. Some manufactures have created compound
sliding basket drawers that all you to access the dead space in a corner cabinet. Since we weren't hurting for space, we decided to go with these interesting corner drawers. They don't utilize all the corner cabinet space, but what is available is very useful. Being in the corner makes the length of these drawers very long so we can store long spatulas and spoons, rolling pins, baking mats, and other long odd items in these drawers. They don't always need to be accessed, but the narrowness of the drawers can easily tame these odd items.

The corner cabinet above can also be a difficult one to design. In our current kitchen, we have an extra deep corner cabinet with a door that sits diagonally between the two walls. Not only does this make a cavernous cabinet, it also makes the counter top below it very deep. This cabinet has be come somewhat of a catch all for various plastic containers, vitamin and medicine bottles, food processor blades, and rarely used kitchen tools. It's difficult to organize, and near impossible to reach the back of the top shelf. The solution that Eric Johnson of
Cobblestone Cabinets provided is a corner reach in cabinet. It uses a double hinged door held in place by magnetic catches. The face of the cabinet doesn't occupy more than the flat cabinets around it, and prevents the counter top below it from becoming difficult to access. Since the cabinet is a standard depth, it's easy to access all of the "L" shaped shelves. Some care needs to be taken to close these doors since they don't slow close as nicely, but maybe after use, the hinge action will lighten up a bit.

To the left of the sink is our double, pull out waste basket cabinet. We've always had a garbage can out in the open, but because of the way the traffic patterns work in this kitchen, there wasn't a great place to put one so we opted for this. I'll probably get a motorized cabinet pusher like the
Ikea Utrusta or
Blums Servo-drive so we can bump open the garbage. The Ikea Utrusta looks a little easier to install so I'll have to research to see what works. The kitchen sink will be a soapstone farmhouse apron front created by our soapstone counter top provider/installer. The cabinet front will be cut out to accommodate the sink. There's an HVAC duct located under the kitchen sink, and I don't see any vent grates, so Porter and Heckman will have to come back again when it's time to for the HVAC finishes. I'm hoping that the furniture style legs of the sink cabinet don't throw things off for them.

We have another of the corner drawer cabinets on the other side, sandwiched between a pull out knife block on the left and some narrow general purpose drawers on the right. It's still not decided which drawers we'll use for every day flatware, and I suspect we'll only be able to tell when we're moved in and using the space. As of right now, none of the drawers have utensil organizers, so once we decide what goes where, I can make some to fit the drawers.

To the left of the doorway to the mudroom sits the cabinet for the double wall ovens and warming drawer. We're going with a Viking double electric oven with the french doors on the top, and I think a Wolf warming drawer. We really liked the french door since it makes getting items in and out of it so much easier. The bottom oven is still the traditional pull down door, which makes sense to have on the bottom. We have plenty of space in this location to accommodate both door opening styles, even with the top of the kitchen island. Our current slide in range/oven has a warming drawer on the bottom and we've found it useful enough to get one in this kitchen. It makes timing the presentation of dinners much easier. The space above the ovens is a natural location for baking sheets and cooling racks. Four sections should be adequate for all our pan storage needs.

Since all the doors and drawers are inset, as opposed to partial or full overlay, the door stops and catches need to be mounted to the inside of the cabinet box. This is an example of the cabinet stops on one of our double door upper cabinets. They're also magnetic, so they pull the door shut at the end of the slow close travel, and hold the doors shut, rather than relying on the spring action of the door hinge. They're fairly unobtrusive considering the take up a small bit of cabinet space and I don't think we'll have any trouble with damaging them or hitting them with plates.

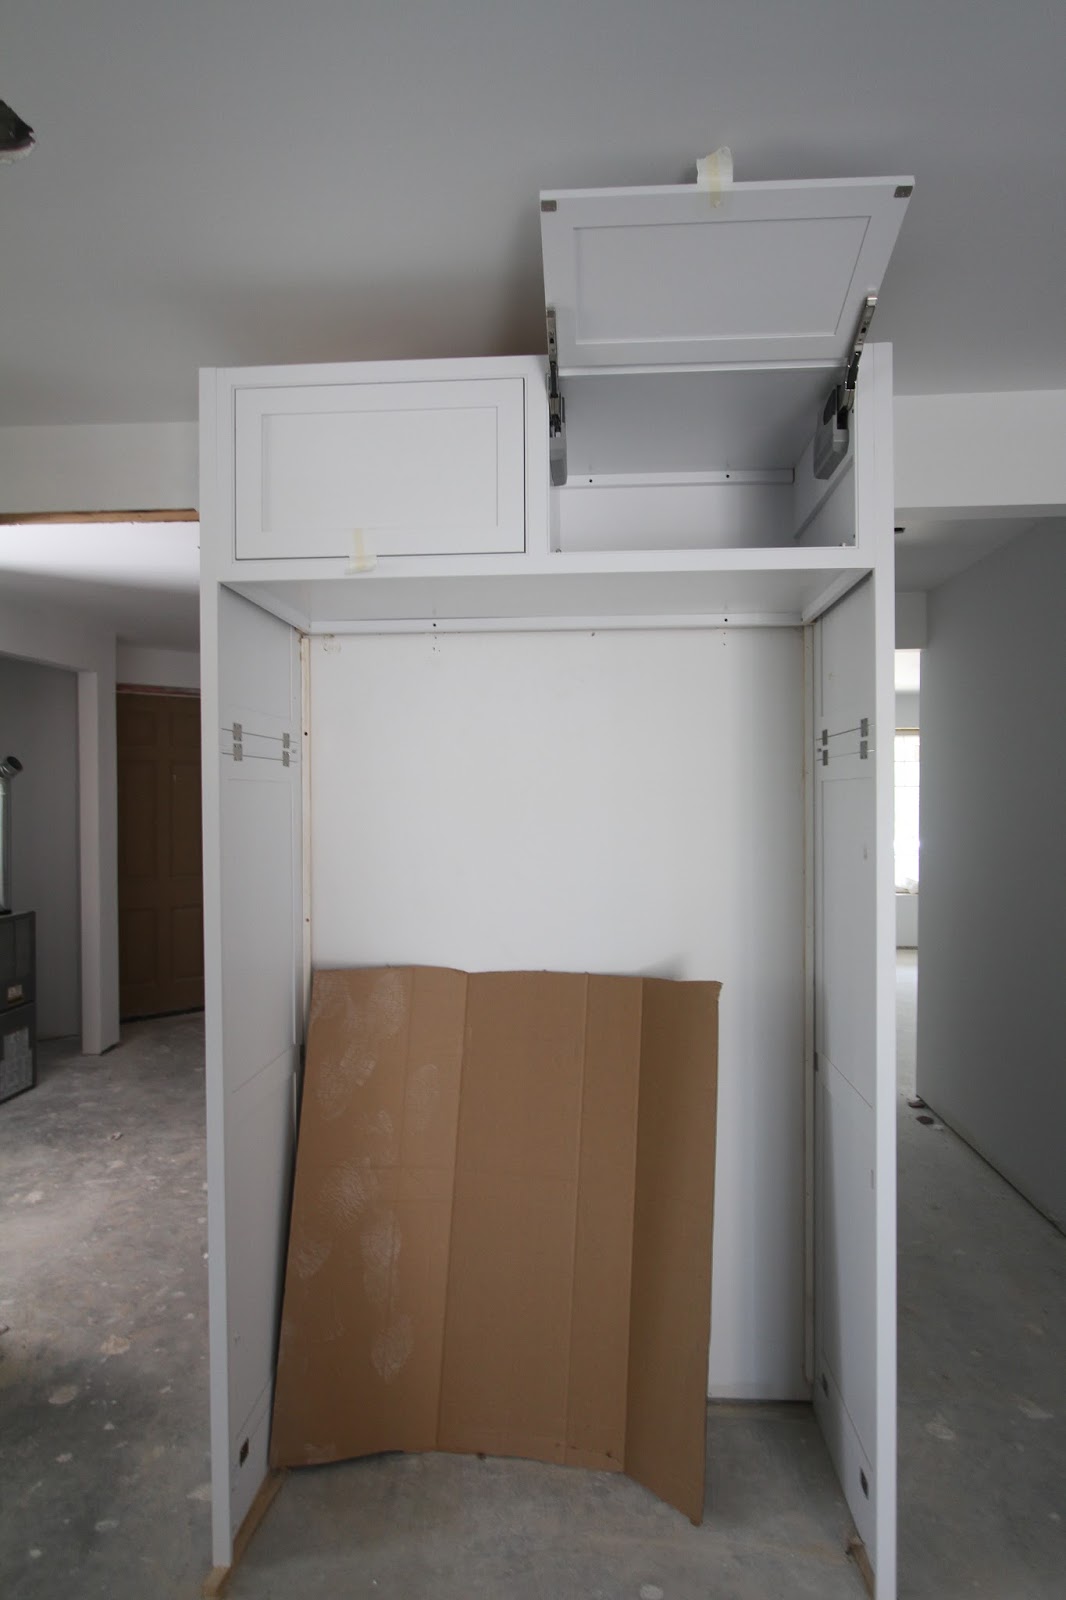
The wall space between the mudroom door and the butlers pantry walk-through is reserved for the freezer and fridge column. Omega provided the side panels and cabinet above the fridge/freezer and it was designed so we have 54 inches of space to accommodate a 24" freezer and 30" fridge, both built in. The cabinets on top of fridges are usually only cabinet depth, which make them difficult to access, but the ones we ordered are full fridge depth and have doors that lift up. The lift mechanism is spring open and slow close so you only need to initiate the opening and it will open to full extension. As you can see, when open, it nearly touches the nine foot ceiling height. While I can jump and close the door, allowing the slow close to buffer the swing, it's not a great solution, so I think we'll need to attach a string so we can pull them closed. This space will probably be used for seasonal storage since it's still a little difficult to access. I had some concern about having the fridge and freezer in such a high traffic area, but hopefully since there's an alternative path around the island, it won't be an issue. There wasn't really a better place to put the two units.

The side panels of the fridge, as well as all the decorative side panels on the exposed ends of the cabinets are really just made of face frames and actual doors, held in place by brackets. There was some separation of the pocket screw on this panel, but it can easily be fixed. There's a slight gap between the frame and panel, which really gives it the illusion that it's an actual door.
Finally, around the corner in the butlers pantry, the lower cabinets are in place. The upper cabinets still need to be installed, but are prepped in the garage. We'll have a bar sink in the far corner and a beverage fridge in the middle. All the wall cabinets above will be glass front and will probably be used to store specialize beverage glasses, like pints, flutes, and wine glasses. We don't drink much at all so these will be seldom used, but when you have company over, they can be necessary. We'll probably use the storage space for bar implements and formal dining room linens.

An interesting piece of wood is sitting in the dining room. These pieces have been back cut, allowing them to be flexible enough to make large radius curves. I believe these will be used to trim in the round and oval windows around the house. I didn't have the time to read the paint bucket when I was there, but present in this picture is a 5 gallon bucket of Kilz PVA drywall primer, which is what the painters used to prime the walls.

Seen enough of the kitchen yet? Here's another one of the exterior doors, installed in the greatroom. This one is also eight feet tall, but has a full glass thermopane insert. All these doors have four brushed nickel, ball bearing hinges so despite the door weight, should swing smoothly. The nice thing about living in the middle of the woods on a peninsula is that you don't really have to worry about window coverings. This door would have been difficult to obscure so I'm glad we don't have to worry about it. I can't wait to get hardware installed on these so I can test out the swing.

Here's the interior look at the mudroom door and the light it provides. Even through it's a bit set back, between the adjoining kitchen wall and mudroom closet, it still provides more than enough natural light to the room. The only rooms without natural light access is the pantry, mudroom bathroom, powder room, and bedroom closets. Not too bad for a house that's three rooms deep. This will be the primary door for coming in from the future pool since we have a full shower and all tiled surfaces in the mud room. The door between the mudroom will be a dutch door, so when the kids have friends over, we'll be able to keep the lower door closed and still be able to give them drinks and snacks while they drip pool water all over the tiled mudroom floor.

On the side opposite of the mudroom exterior door is the locker we had made by Homecrest. It's built up of various cabinet-like pieces but comes together well. We had an additional piece added on top of the cabinet so we could use it for shelf space. The tops of cabinets aren't generally finished well and the face frame creates a lip that would make sliding things on and off the shelf difficult. All that still needs to be installed is the hook mount that runs across the beadboard. We left the bottom open to the tile so we could store wet boots there without damaging any cabinet. I'm not sure if this piece is attached to the wall or if it's just currently floating in the space. I would think it would still need to be mobile since tile should be installed under it. Since it should be self supporting, the tile installers could probably just move it, or jack it up off the floor for their install.

The garage has become a graveyard of cabinet boxes and packing material, and I'm completely okay with this. The drywall remains unfinished, and I'm thinking that they'll come back in when the cabinets are moved out. There's one pile of cabinets remaining in the garage which consists of the master bathroom cabinets, mudroom wall cabinets, and some vanities that I believe are for the other bathrooms. There's also still a large stack of cabinet finishing trim pieces since they have yet to be installed.

Here's one of the two master bathroom towers that will flank either side of the floating vanity. The towers touch the floor but stop well short of the ceiling and will be used to house most of the extra supplies in the doored portions and extra towels in the open. In our current house, we have a small closet in the master bathroom that takes care of this function and since we don't have a closet in this master, we needed to come up with a solution. Since we have medicine cabinets and additional drawers in the floating vanity, we won't need to store everyday use items here. The cabinets are Omega and are slab full overlay. The wood grain was specified to all run the same direction, rather than running vertical on the towers and horizontal on the vanity. They're a walnut veneer, stained natural.

Here's the wall cabinet for the butlers pantry. These, as with the base cabinets in the butlers are Omega Dynasty, a slightly lower price point from the Omega cabinet company. The glass overlay matches the Omega cabinets in the kitchen, but we went with a natural walnut finish rather than a painted to tie in with the walnut kitchen island. We still have to purchase glass for all the glass doors, and will probably do that near the end of the project to protect them from damage. These will have the same trim treatment as the wall cabinets in the kitchen and will be internally lit on both levels.
Distinctive Designs installed a small example of what the window trim will look like. They'll be using a high quality plywood for the internal window casing and leaving a small reveal before the trim. The bottom trim is basically the same profile as the side and top, but flipped to create a better window sill effect. The top corners of the trim will probably still be mitered. I think if we flipped the top trim too, it would create an older style look and I'm okay going with a little more modern look.
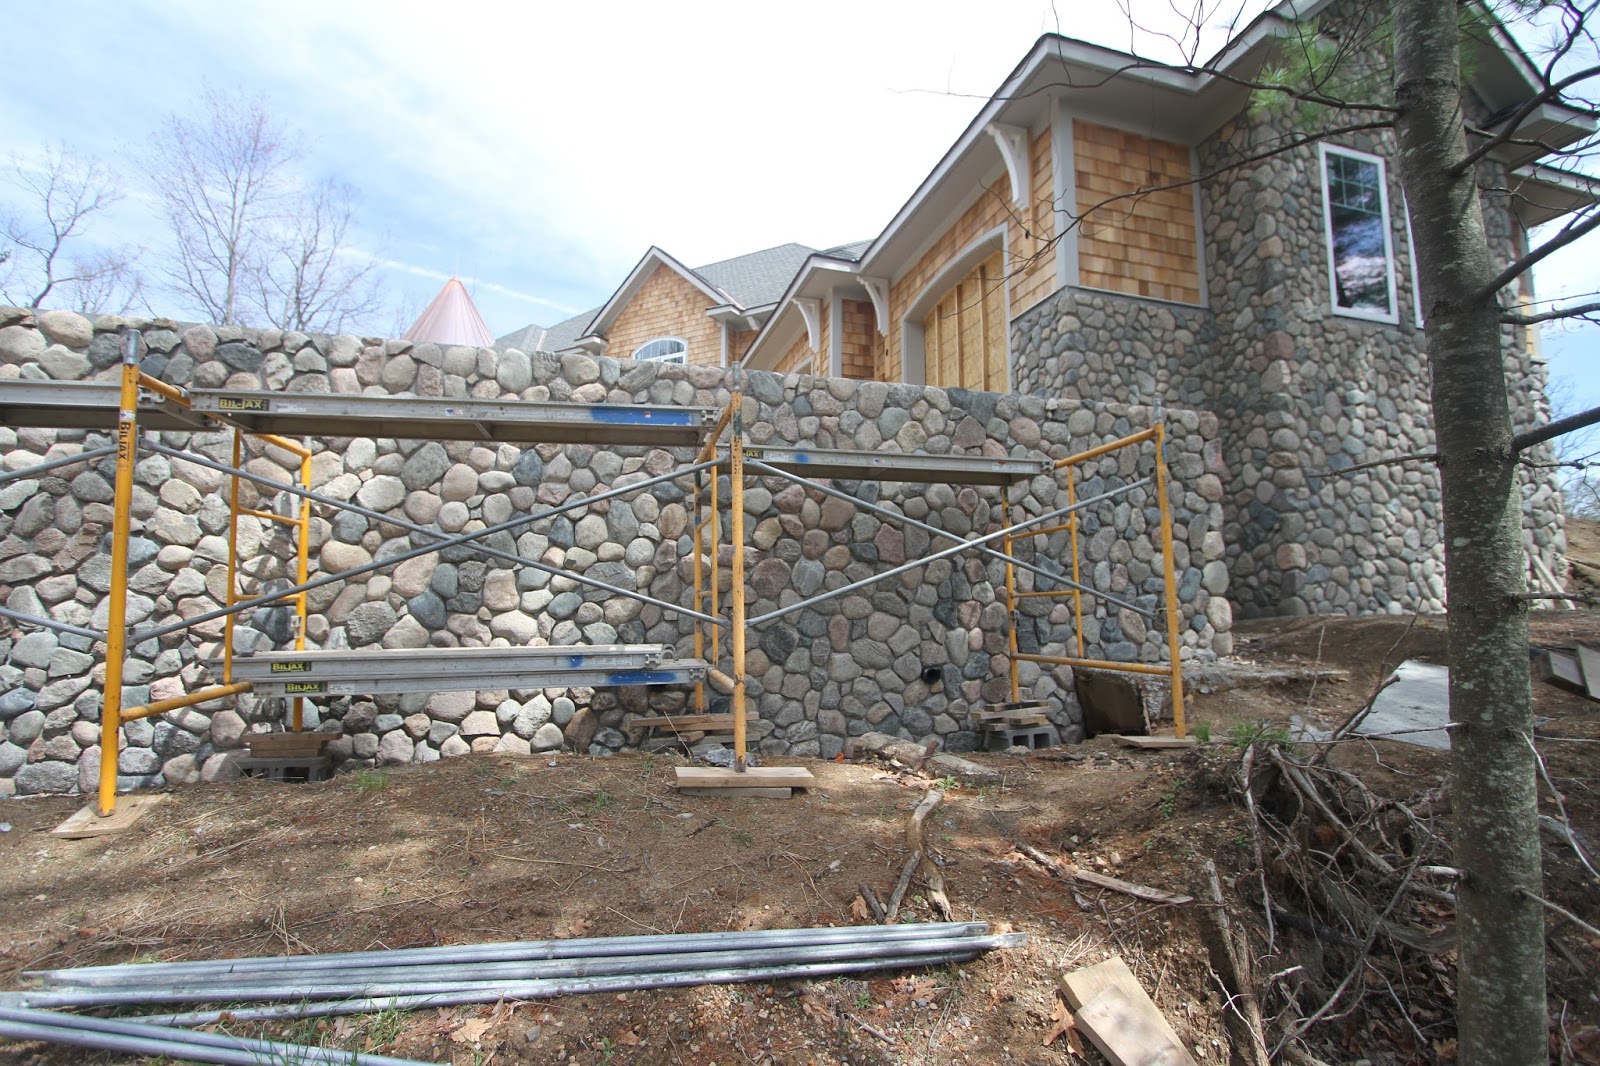
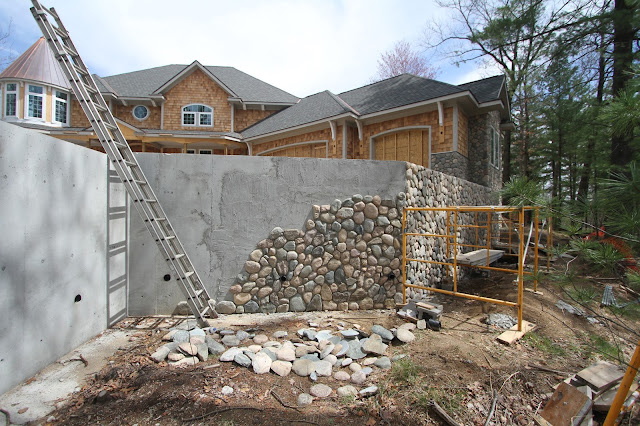
Old Country Stone has completed the granite cobble installation on the end of the garage, mortar and all. They've moved on to completing the concrete retaining wall and are making excellent progress. The stone sills still need to be placed under the windows, but they usually do that last. I really like how this side of the house turned out. While the side of a garage isn't going to be viewed most of the time, we're going to have a catwalk deck with a little sitting area installed here so this side will be highly visible.

OCS completed this section of the wall, but still have yet to mortar the joints. This will probably happen after they're completed with the entire length. I wouldn't be surprised if this was finished by the end of the week. The wall is really imposing right now, being about 8 feet tall, but once the final grade is applied it will probably only be around 6 or 7 feet tall. The grade will be taken up to the drain tile weeper holes and bushes will be planted at the base of the wall. The wall will also be topped with a bluestone cap and a black fence installed as a safety requirement. The catwalk deck will come off the wall near the garage doors, and will not be attached to the house at all.
Here's how far OCS got so far, but with nice weather in the forecast for this week, I'm sure they'll make quick work of the rest of it. It looks like they need to parge a bit more to complete the rest of the wall. I'm, hoping they'll get some larger stones on the wall as they approach the boulder wall, but these stones don't get that big. We don't have formal plans for a walking path on the low side of the wall so much of the detail will be lost. We'll probably clean up the deer path so we'll be able to enjoy the forest, so then the wall will be visible.

Mike added some extensions to the weepers so OCS could build out the wall. I'm not concerned about animals getting in there since it just terminates in the large aggregate stone buried at the base on the other side of the wall. There shouldn't be a ton of water pouring out of these weepers, and are there to drain water just in case there's some accumulation behind the wall. We might install a screen cap just to keep out debris, and these will largely be hidden by plantings.
In front of the house, the beadboard stack is almost completely exhausted and a new pile of lumber has been added. Since the beadboard is complete, I'm not sure what will happen to the leftover. The new pile has some 1" thick boards of rough-sawn cedar, which is traditionally used for the trim, so maybe this is for the remaining porch arches which will need to be completed before paint.
Also present in the stack is the unprimed tongue and groove bead board for the barrel vault on the front porch. It has a more narrow width to allow the bead to make the radius of the barrel vault. I don't think this will be the same product used in the gazebo ceiling since there isn't enough of it. Completion of the barrel vault will be a nice addition to the exterior.
The stone on the front of the house has been mortared and is awaiting the stone ledge installation. All that remains of the cobble stone installation is the rest of the retaining wall, the short portion above the front and side porch, and the chimney on the top of the house. The bluestone and counter tops will also need to be installed on the gazebo for full stone project completion. I'll probably send a request for quote for the entrance pillars to see if we can get that completed too.
That's it for this week and what an update it was. Progress on multiple fronts with more progress on the way! Next update might see the start of the front porch deck, more of the cabinets installed, tile prep, and maybe even some trim woodworking completed. 18 weeks until the end of August!