Another spring-like week provided the perfect weather for progress on the exterior stone and helped move the insulation prep for the attic space forward. Since all the rough inspections passed last week, we're in a prepping stage on the inside and a finishing stage on the outside so there's a little bit of calm before the flurry of activity that will happen this week. This pause is nothing like the work stoppages we experienced earlier in the build with the previous crew because lots of progress is still being made. There's just clean up and prep for the next phase happening now and it's exciting to know that we'll soon be looking at solid walls in a warm house.

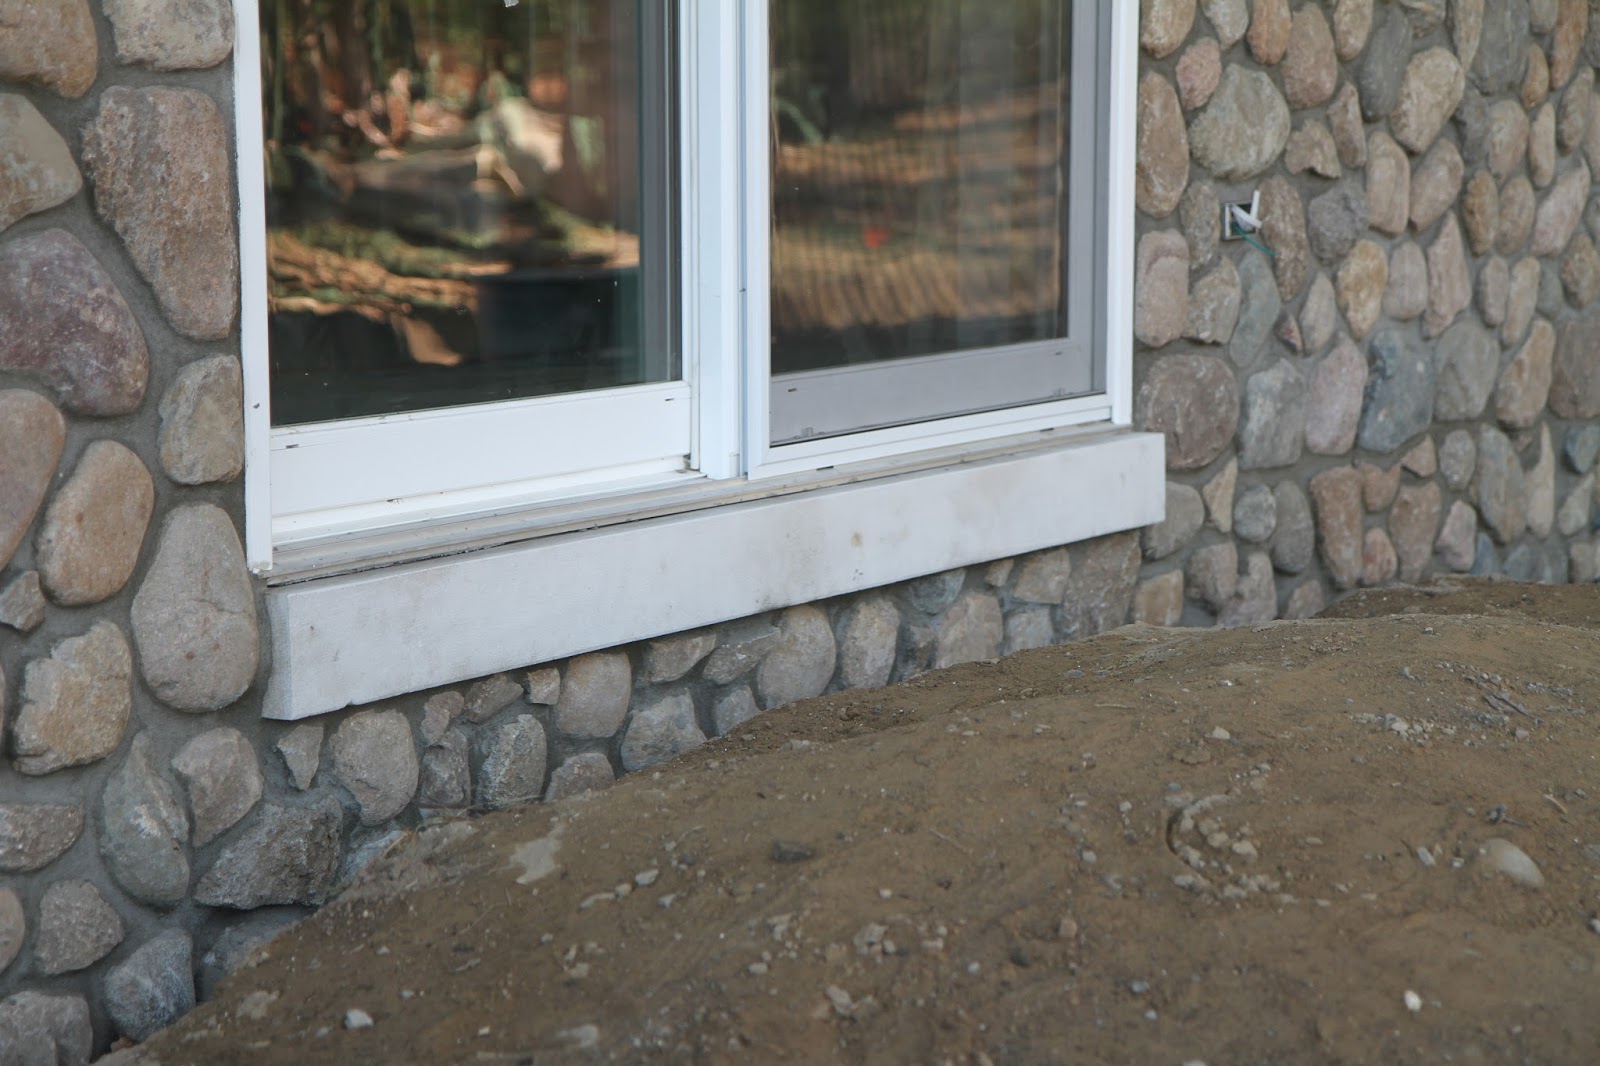
Here's what the front of the house currently looks like. There's still some stone work to be finished on the front wrap around porch and garage, but Old Country Stone is getting there. They're currently prepping the end of the garage and outer retaining wall and I think once they're finished there, they'll move on to the front of the house and chimney.
Now that we're moving into insulation and getting up the drywall, Mike is ordering the garage doors, but closing off the garage openings so they can use the space as a work space. The installers previously just used the interior as a work space but all the floors will need to be cleared to navigate the large panels of drywall throughout the house. Scaffolding will be needed for the taller spaces and drywall lifts will be used for the ceilings so a clear floor space is required.
A header and footer installed across the double garage bay door with some studs in place makes it seem like the entire door will be closed off. I would think they would want part of this door open so they could move material into it for storage, so maybe it will only be partially closed. Good thing we have a large garage. It makes the perfect space for working in and we've thought about how it could be used for larger scale entertainment in the future.
Both single garage doors on the front and back of the house are currently closed off so access to the back of the house isn't possible through the garage any more. If the exterior doors come in, maybe that can be installed for the rear garage walk out, but I'm not sure when those will be coming in. They'll need to get some lights in there once the garage is closed. Since the ceiling drywall is going up, maybe we'll get the surface mounted LED work lights up there to give them some light.

Electrical came through one more time to finish off some of the things that were missing around the house. They ran the cables for the NEMA 15-40 50A circuit and the dedicated 100A charging circuit. Both are connected to the EV panel for a reduced electrical rate. There will be cut off switches in the garage for both so I don't have to worry about a constant on high amperage/voltage connection being live when not in use. We placed it on the short wall between the single and double bays for maximum garage coverage, and in the expectation that we might get one more battery vehicle in the future.

One nice surprise is this very large, orange dumpster, parked in the overflow parking space a bit up the driveway. Since the normal construction waste dumpster was still in place in front of the house, I wasn't sure what this was for at first. Upon a closer examination, we saw lots of roots and stumps! Looks like Mike took the initiative to remove the pile of stumps from the back yard, and clean up all the other stumps around the property. There was some question as to if we could just bury them, but the best location to do it has a pretty high water table so digging a deep hole would be problematic. Most of the times, people don't want to take stumps since you can't easily grind them down due to the rock content. It takes a strong grinder with carbide teeth to chew through stumps. Looks like Mike found someone to take them.

This dumpster is about as big as the one I rented when we had to clean up the house before we hired Mike. It's a 40 yard dumpster with one side that swings completely open. Even still, it's filled to the top with stumps, with little air space inside. I think I saw one small stump left near the front of the house that we could just move off into the woods to naturally decay. Good riddance to the last vestiges of the land clearing two years ago. Should have been done a long time ago.

One more green sticker to our sticker collection. Maybe I'll get the chance to cleanly remove them and put them into a binder to preserve the memory. The fourth sticker is the rough construction approval, meaning the roof trusses and general construction of the exterior and interior walls passed inspection. Since that's out of the way, we can now move to insulate and cover up all them rough stuff with drywall. This visit may be our last glimpse at an open house. Every time something closes up, we get a little nostalgic about the view we'll be losing, but quickly get used to the changes. First, we missed the view of the sky from the basement, then the view of the sky from the first floor, then second when the roof went up. Now we'll be missing the view of all the windows from every room. Supposedly, the house feels bigger when you start to close in rooms. We've been waiting for this for years so I think this transition will be as easy as the previous.

The Sound Vision completed their rough install last week with the installation of speaker brackets in all the appropriate locations. Here's one of the locations for the sub-woofer in the great room. I say one of the locations, because there are apparently two sub-woofers being installed in this room, one on each side of the fireplace column. The wires have been in place since the first floor electrical install, but the rectangular brackets are new. The subs are self contained and wall depth so besides the grille, will be not very noticeable.

The left and right rear speaker brackets are in place in the back of the great room. These are even lower profile than the sub-woofers since they'll be only occupying the space of the removed ICF foam (2") and drywall (1/2"). It's pretty amazing that we'll be able to get enough sound out of such a small package, but I trust Jonathon's selections. The front speakers will be take care of by a sound bar that will sit under the TV. The speakers will be installed after the drywall is completed so the drywallers need to make sure to cut openings during installation. It's also good to have a picture record of where these locations are in case they get covered up.

The prep for attic insulation is evident in the placement of the cardboard ventilation baffles in the roof gaps. Since the entire attic space will be insulated with blown in insulation, baffle are needed to preserve the air flow channel coming from the soffit vents, up to the ridge vent in the roof. If ventilation baffles weren't installed, the blown in could get down into the soffits, blocking the airflow. Ventilation baffles come in different materials like foam, plastic, wood, and cardboard, and for our application, the installer saw fit to use cardboard. I haven't read a good comparison of the products, so I think cardboard is good enough for our application.

I couldn't get up on the wall to get a closer look at the baffles, but here's a closer look. They're currently just placed in but will be stapled into the trusses closer to the roof decking for final installation. They'll form a channel from the soffit space and block down to the top of the wall so foam can be blown in right up against it. This is one of those things that I'll only see if I get up in the space after the insulation is complete, but when the job is done, an insulation inspector will come in to add another green sticker to our collection so I have confidence it will be done correctly.

The insulation installers also came through and spray foamed the interior of all the door templates. I'm not sure why they did this, but it does make a difference. This might be an indication on the expected timing of the final exterior door installation. Mike might be anticipating that we won't install the final doors until after drywall, but they obviously have to be installed before final trim, which should be coming up next. One of my tasks from our last meeting with Mike was to give Craig at Hardwood Door and Bevel a call to make sure everything is lined up for delivery. We still need to finalize a leaded glass design for the two side lights on this door.
After some consideration and fruitful discussion on the
Houzz forums we decided that we should probably get a doorbell installed. Even though we'll have a driveway gate, and anyone approaching the house should have already communicated over the gate intercom, there might be situations where we'll keep the gate open and people will still need to announce themselves at the front door. The doorbell wire installation is trivial at this stage so we might as well do it. We have the option to either use a traditional low voltage chime, or integrating it into the Control4 system, so the announcement will be played over select house speakers. I'm leaning towards the later since it would allow us to hear the doorbell when we're all out on the back gazebo.

Speaker rings have been installed elsewhere, in the study pictured here. This is all in preparation for the drywall installation. For the first floor, I'm not sure if the ceiling is installed before the walls, but I'm guessing it is so the ceiling pieces can sit on the wall pieces. The house was in a pretty clean condition, but there was still some small foam debris in the wall cavities. I'm hoping they'll clean them out before drywall installation, but I guess if they move fast enough, we'll never know if they do. If I get the chance this weekend, maybe I'll devote some time to vacuuming that stuff out.

We were greeted by this surprise when we went up to the second floor. Pink insulation in the walls of the laundry room! We're having this installed to help mitigate sound and vibration from the washing machines. The laundry room shares walls with the 4th bedroom closet, rotunda, master bath and master closet, so it's not right up against any sleeping spaces. With the floors being concrete, we're hoping that machine vibration will be kept at a minimum. The insulation isn't a great sound blocker, but it will help a little. I'm not expecting sound proof, just sound attenuation.

Since all the walls of the laundry room are insulated, this is our first taste of a closed in room in our house. With the fiberglass exposed, there's definitely a difference in sound reflection but that will all change when the hard surface of the drywall is installed. I can't say for certain if the room feels bigger or smaller yet because the ceiling isn't on. It's definitely a nice feeling to have some kind of visual barrier up, even if it's just pink fiberglass
Here's the wall shared by the bedroom 4 closet (turret room). It's a long path for sound to get from the laundry room, through the closet and bathroom, into the main sleeping space so I'm not too worried about noise propagation here. The bathroom is full of hard surfaces to reflect sound, but the closet should be filled with hanging clothes. With two doors in between, I'm sure the sound will be attenuated well.
The insulators also spray foamed the turret cavities, which blocks both air infiltration, and provides a thermal break from the exterior. I'm a bit worried about the thermal efficiency of this space since there are so many windows, but I think we're doing everything we can to make this a well insulated space.
The ceiling got the same treatment and it will also have blown in insulation in the above attic space so this ceiling will be double insulated. It's important to have extra insulation and air sealing in this space because there aren't any soffit vents in the turret roof soffits. Any heat escaping to the unconditioned space would melt snow and have the potential to cause ice dams. Having the entire roof covered in snow and ice barrier will also help prevent this as well as the copper roof, so I'm confident in the construction of this space.
As with the front door, the master balcony walk out template door was sprayed with foam. I'm not sure why they chose to insulate the template doors but not the header across the top or the gaps in the arches. Maybe they'll come back later to spray those cavities. The fiberglass insulation will be inspected, and is probably code, so the situation will resolve itself.
The master closet was spray foamed to block the space against the unconditioned space behind it. We'll insulate the storage space, but there aren't any HVAC ducts going into the space but the cavity will act as an air gap against temperature gradients. This kijd of closed cell foam has double the R-value of fiberglass insulation at 6.5 per inch, so we're seeing an R-value of about R-36 on this wall. Compare that to the R-19 that comes with an equivalent thickness in fiberglass, plus air and moisture proofness, sprayfoam is a clear winner.

The electricians have run the EV charge supply wires to the panel but have yet to connect it to a breaker. The panel on the left is for the geothermal system since there are also lower rate incentives for power used in energy efficient systems. Both of these panels still need their meters installed so I think that once these panels are finished, I can call Consumers Electric to come and install the meters. I'll bring out the dedicated car charger once the drywall is up so the electrician can install it, and maybe soon I can charge my car during the trips to my house, even if I don't need to.

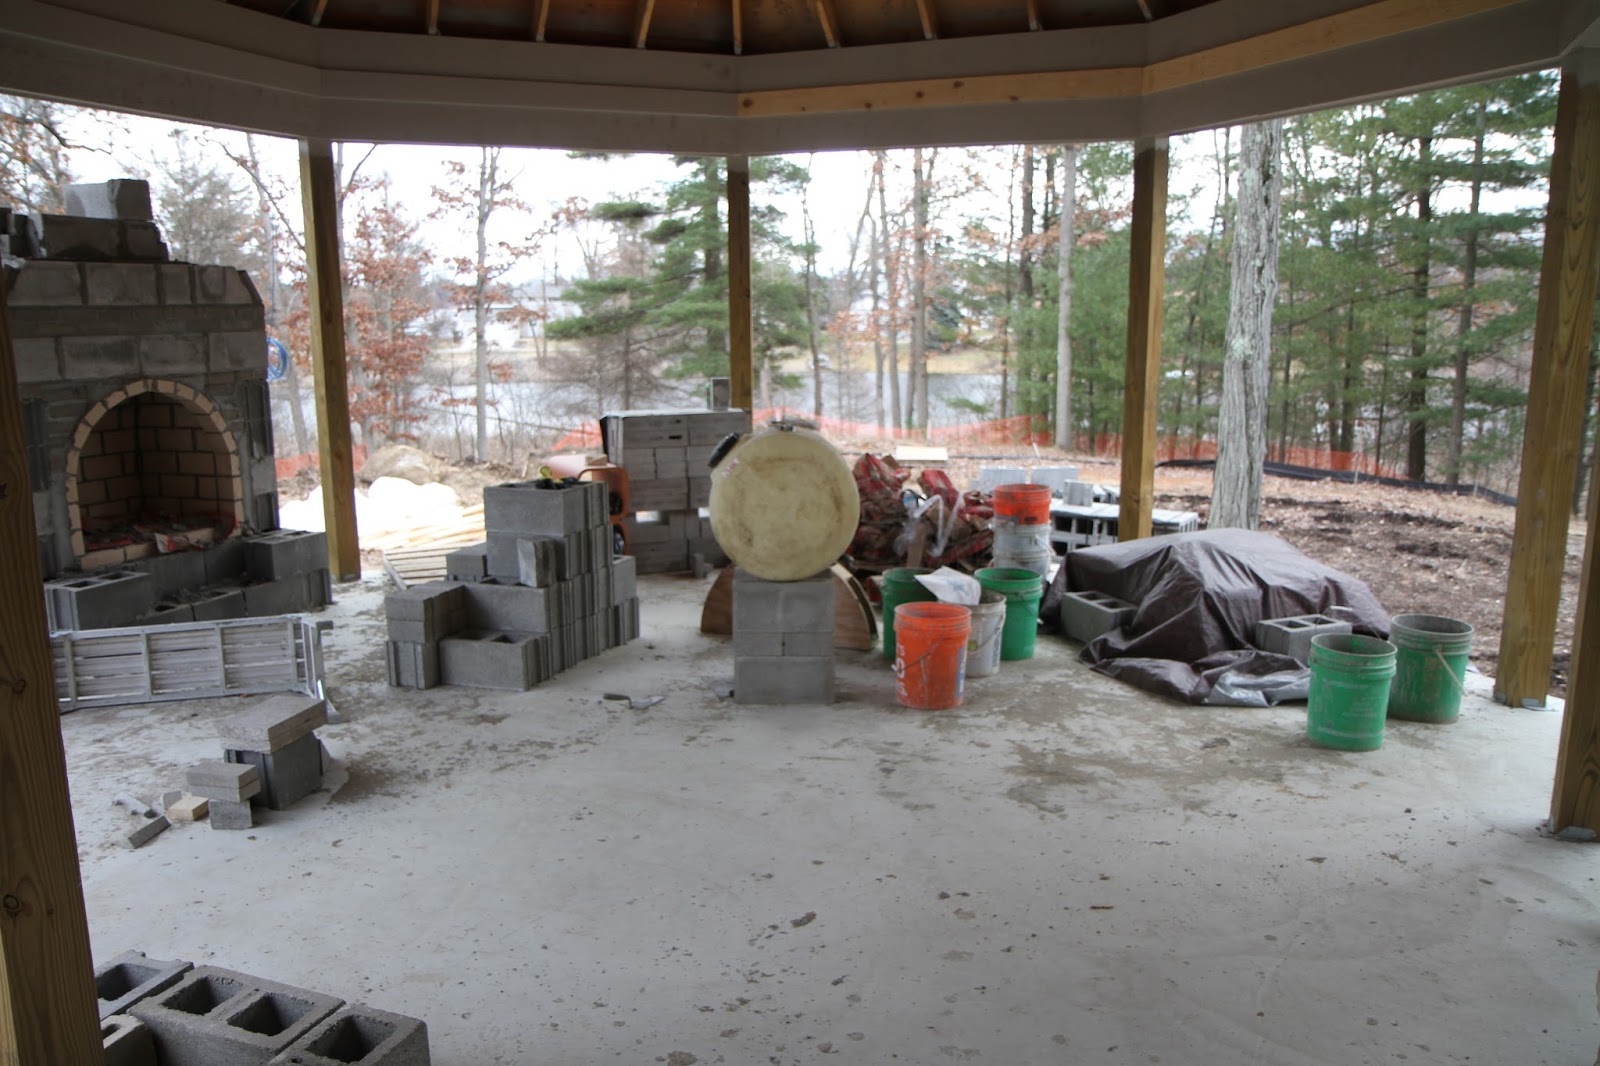
Out on the gazebo, OCS is charging forward with building the fireplace, seating and barbecue area. Now that the weather is expected to stay warm for at least the next week, they've removed the tent to reveal the full beauty of the installation. There's more and larger cinder blocks on site now that will probably go into the construction of the seat and barbecue. The fireplace is built up to the taper and the process of installing the cinder block structure and clay chimney liner is underway. After this work is completed, they'll be able to install the blue stone deck.

Here's what the fireplace looks like right now. All the fire brick in the box is installed and there's one piece of clay chimney liner in place. They'll need to remove some of the roof decking to allow the chimney to continue up, but at least they're dodging the main beams now. There's a code height for the chimney, and it's usually at least the height of the tallest peak, but we'll see how high this one goes. I think the chimney is narrow enough that, even if it goes to the peak of the gazebo, it won't be too much of an eyesore. I took a look at side of the fireplace when viewed from the great room and it's low profile enough to not block a lot of view. I think when completed, it won't protrude much past the overhang of the gazebo roof so it's all very well contained. I'm not sure what the cavity in front of the firebox is for but as far as I know, there aren't any plans for a wood storage space there. I gave OCS some free license for design so maybe they're planning some kind of profile change there.

Here's what the clay chimney liner looks like. They come in short sections and are about 8 inches across. Since this is an outdoor fireplace, there's no need for any damper to seal against infiltration of exterior air. I'll probably pick up a chimney brush so I can clear out the creosote and soot accumulation annually since a large part of my firewood pile is the white pines we cut down on site.
Here are the other sections of chimney liner that are on site. If I'm guessing on the height of the chimney based on the availability of these liners, I'm guessing that they're about 15" long so 5 would only be 75" or just over 6 feet. I'm not sure what the height of the roof is, but my guess is it's around 8 feet tall. It's all speculation so I guess I'll just have to wait and see what the final height is, maybe next weekend will tell me.
Here's a peek up into the fireplace. I think the interior where the brick is still stepped will be smoothed out like it is closer to the fire box, but it probably won't be perfectly smooth. Most of the wind on the property blows across the peninsula so we don't have to worry about too much air flow into the fireplace. I haven't thought out a fire grate to block sparks, but we'll most likely have to get something.
Here's the form they used to support the fire bricks on the arch. It was most likely made on site and specifically for this fireplace. The rest of the fireplace design seems pretty straight forward after the taper is completed. We're considering using the same chimney cap that's we have on the house chimney, scaled down of course. Something needs to block rain from coming in the top.
Here's the gazebo fireplace from the side. You can see they stopped installing the granite cobble and will finish the install when the fireplace is completed. As I mentioned before, the profile is pretty low and almost flush with the overhang of the gazebo roof so it doesn't block much view from the great room side window. The fire place will be clad in the same stacked stone as the benches and barbecue so visually, there will be a break in the cobble stone going around the gazebo.
As with other places in the house, the speaker rings in the gazebo made their way up, ready for the finishing bead board that will cover the ceiling. The Sound Vision wired the gazebo for data in case we want to expand the outdoor entertainment to video as well. There are also provisions for a wireless access point here since there's low probability that we'll get a good signal from inside the Faraday cage that is our house.
Here's a shot of the completed rear great room with the gazebo in progress in the back ground. This side of the house will have a three tier retaining wall with steps, to tame the grade a bit. For some reason, there's one piece of stone ledge missing near the left corner of the house, but the scaffold is there so I'm assuming they still have yet to install it. We'll probably have to plant the hill next to the gazebo to keep it from eroding since we won't have the retaining walls installed for some time.
Mike installed a steel door on the storage space under the back porch. It's a new door, but it's not the same style as the rest of the house so I'm not sure if it's permanent or what. Now that the space is opened, we can run gas, water, and electricity through it for the barbecue, hose bib, and lights.
Mike removed the molding 2x4 supports from the inside of the storage space, but left the supports under the gazebo. I'll probably remove those at some point so I can further use that space for extra storage. It's not as tall as this space, but there's still a good amount of large storage in there. I could easily fit any pool furniture we want to seasonally stash away. The main storage space is almost big enough for a small workshop, but the width of the door and narrowness of the space (8 ft) prevents me from bringing my table saw in here.

Here's the storage space under the gazebo. There are three rows of temporary supports in here that I'll be taking out at a future date so I can use the space for storage. There's about four feet of headroom under here, so while it's not enough for tall storage, it's very long and wide. The space continues around to the right under the rest of the porch, but that's mostly filled in too. I'm still not sure what I want to do with the space, but I could put long unwieldy items in there that I don't need to always access, like ladders or pole saws.

Here's the view of the back of the house from the newly cleared backyard. I'm standing where there used to be a large pile of stumps. We haven't been able to stand on that spot for two years while the stumps were stashed there, so it's kind of nice to be rid of them. We can now more clearly see what we need to do for landscaping and try to envision the pool area in its entirety. The plan is to excavate as much fill as we can from the pool area and use it in the front of the house so we can save on trucking in fill. Although we aren't planning on implementing the pool for a few more years, we can still have the location excavated since it will be open to the lower grade and not just a pit. In the mean time, we'll probably seed it to prevent erosion.
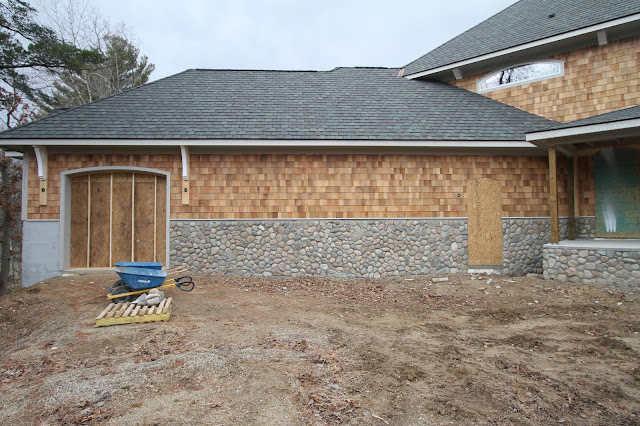
The stone on the back of the garage is nearly complete. OCS started parging the corner and end of the garage after the dirt was pulled away from the corner foundation. I think they're balancing the work between this and the construction in the gazebo so both should progress well.
The end of the garage has been partially parged in preparation for the application of the granite cobble. You can see the expanded metal sheets they attach to the house to hold the parging up. The cobble stone will cover the entire garage bump out so there's still some prep to complete
some of the concrete retaining wall has been prepped for the application of the granite cobble. This will probably be the least seen side of the house but we're still covering the wall as per HOA rules. The final grade will be somewhere close to the weepers and there will be plantings down here, which reduces the height of the wall to around eight feet. It's still tall enough to require the installation of a railing on top of the wall.
This is the concrete slab that was cut out of the ICF wall under the porch to gain access and install a door. It's an amazingly clean cut and I'm sure it's quite heavy. We'll probably just leave it on site and use it as part of the fill in this area.
Great Oaks Landscaping also returned this week to repair and replace the stones in the wall that were removed to aid in the application of the stone siding. They had to repair this corner anyways since the stones appeared to have heaved a bit and weren't laying flat anymore. The work they did to rebuilt this section is perfect. They chipped the wall stone to match the cobbles on the wall and everything is installed nice and flat. Once again, great work by Great Oaks.

They also repaired the broken step in a creative manner. I was wondering how they could do it since it was the bottom step, but if you'll recall, soon after they installed the steps, but before they were done, with the wall, a corner of the step was broken off, revealing the concrete aggregate beneath. It appears that they removed the step and rotated it around so the broken end now sits under the step above. I really like this repair because not only does it reuse the broken step, it provides a larger landing on the last step. Creative repairing and good execution.
One more wide angle shot of the back corner of the house, showing the gazebo and wrap around front porch. It almost looks completed from this angle, but there's still a lot of work to do on the front deck. If the weather stays this warm (it probably won't) we'll be able to complete the deck while the drywall and finish carpentry continues inside.
That's it for this week. We have a meeting at Cobblestone Cabinets this week to order the remaining cabinets for the smaller bathrooms and laundry room. I hope to swing out to the house since the first floor stairs will be coming in that day. Insulation should be going up and more progress will be made on the exterior stone, so next week should see a nice update.

 A header and footer installed across the double garage bay door with some studs in place makes it seem like the entire door will be closed off. I would think they would want part of this door open so they could move material into it for storage, so maybe it will only be partially closed. Good thing we have a large garage. It makes the perfect space for working in and we've thought about how it could be used for larger scale entertainment in the future.