Tuesday, June 20, 2017

More progress on the fine details.

   The weather remains dry and in the 80s to 90s with the occasional thunderstorm that does nothing to water the grass or alleviate the heat.  It cools down just enough at night to keep the inside of the house cool during the day, which is great for the trim carpenters working on the interior, but not much relief for the deck installers.  At least their work area is in the shade of the porch roof.  While the deck installers first said they were working exclusively on the weekends, it looks like they came in on the weekdays too, to complete all of the side of the house and start on the front curve.  The rough carpenters are also hard at work in the same area finishing off the arches so they're ready to paint.  Post wrap will still need to be installed before the painters can come through, so there's a bit of work left.  Lots of fine woodworking going into the house before the final push with paint, floors, finished electrical, and finished plumbing.


   From a distance, the appearance of the front of the house hasn't changed much, but if you look closer, you can see some new details.  Every trip, it's getting harder and harder to find where all the weeks changes are.  It takes two sets of eyes to spot all the new installs and I'm even spotting changes in my pictures rather than in person.


   Signs of the final finish on the front porch are becoming more evident if you look closely.  While I still don't know the final design of this curved section of the front porch, there are hints to how it will be finished.  A piece of white Azek was curved to fit the fascia hiding the angular beams that support the curved roof porch.  There's also a shorter piece of cedar trim that will sit above it to add to the profile.  There's a piece of trim that sits proud of the flat underside, installed on the inside of the beam cover.  This implies that we're not going to try to carry the arches into this area, but I don't know for certain.  It seems like there needs to be something at the top of each post since there are arches between the posts on the straight sections.

   The three arches on the front porch to the right of the front door are completed so all that's left is to finish the deck fascia and install the post covers.  After the post covers are constructed, railing can be installed.  We're going with a composite top rail that matches the deck color with black powder coated round balusters.  The intent is to make the railing as subdued as possible so it doesn't become much of a visual feature.  To that, we avoided white and lighter colors since the posts will be painted white.  I hope it works.


      The crown molding in this section was also completed.  This is one of those details that are easily overlooked if you're not keeping a mental note that they need to be completed.  For some reason, they didn't get this done right away, so the painters didn't get a chance to caulk it with the rest of the trim.  It will be caulked before paint since there are a few exterior doors that still need to be installed and caulked.  Since the rest of the crown has already been installed, this completes this design element.  There are some trim places on the back porch that need to be revisited, but for the most part the ceilings in the porches are completed.

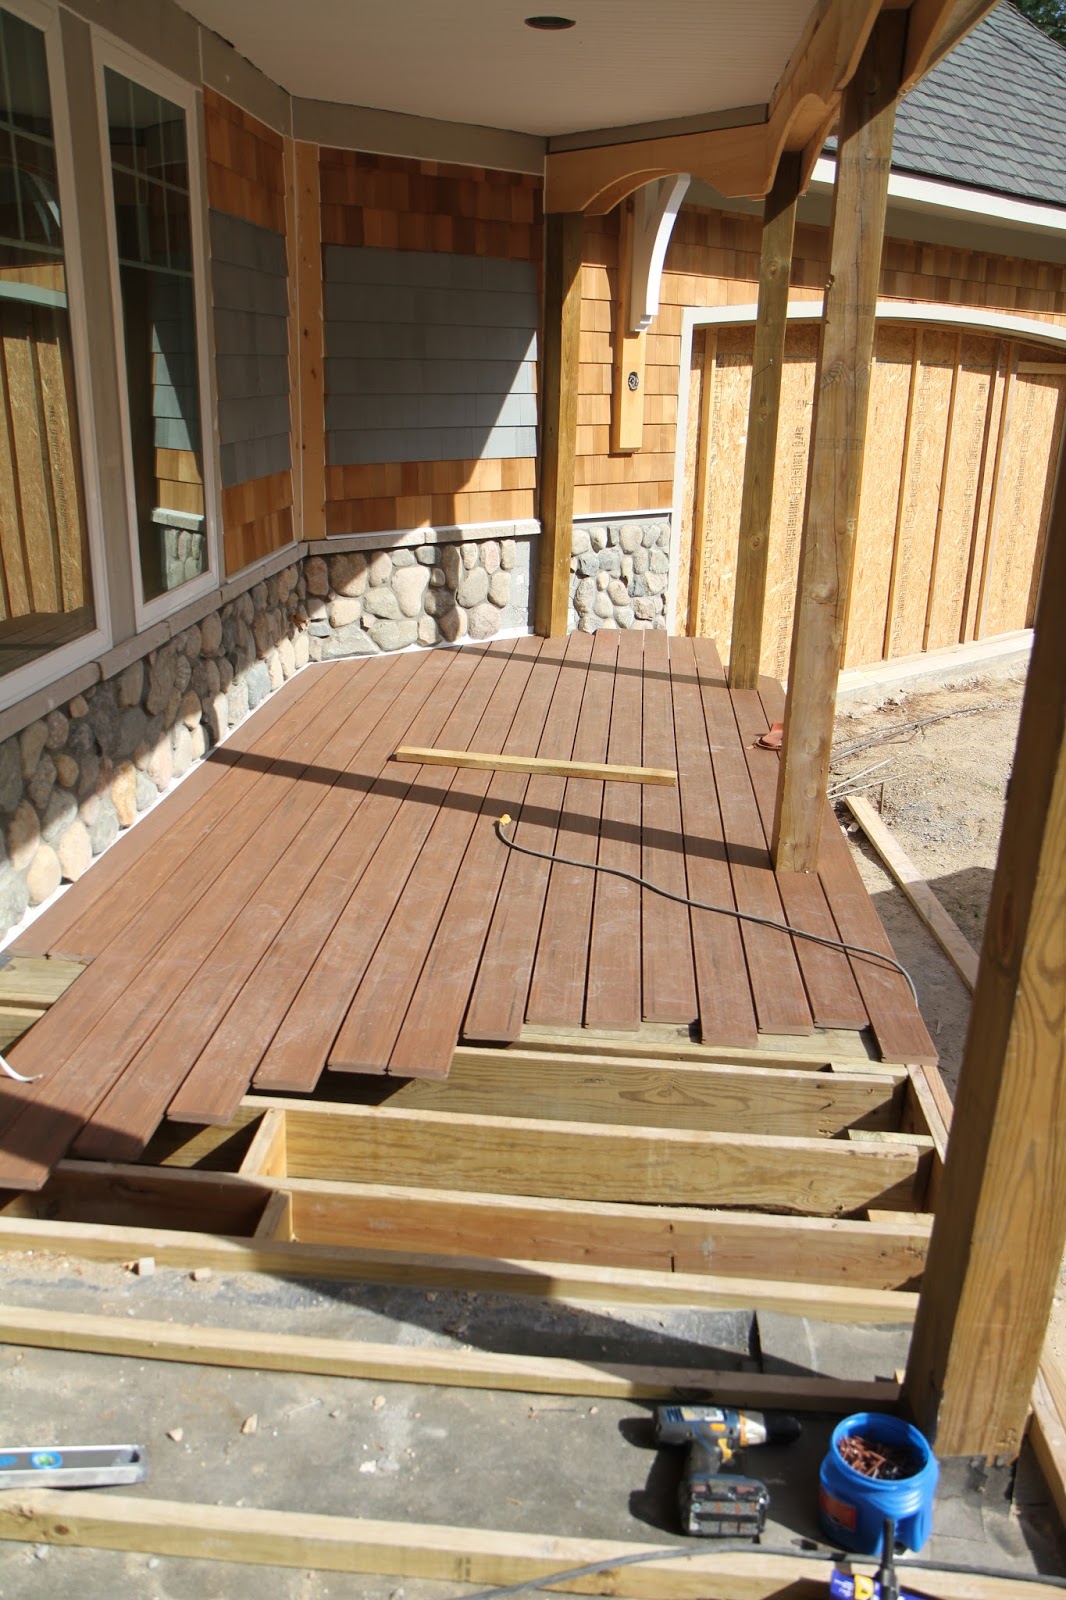
   A large portion of the front porch was completed, as well as the pie slices that go around the curve.  Due to either the errors in design or errors in implementation from the previous build team, the posts on the round part of the front porch aren't spaced evenly.  We even had to add a post later to make the spacing appear more distributed.  Last visit, I made a design decision with the porch installer to make the pie slices adhere to the position of the posts rather than having them all be the same size around the curve.  I was beginning to second guess this decision because I was worried that the unequal slices would look more obvious than not having the divisions land on the porch posts.  Now that I see this in person, I'm happy with the decision I made.  The slices seem to be close enough in size to no detract from the appearance, and it's much nicer to have the partitions land on the posts.

   This is close to what the final design will look like.  The borders of the slices run from the corner of the house to the posts and sit atop of some additional 2x6 supports added to the framing of the deck. Because we spaced the deck framing at 12" on center, the Azek feels very solid with little to no bounce.  There are some parts around the curve where, due to the diagonal installation of the deck boards, there's more space between supports.  If the deck installers don't address these places, it's an easy matter to add additional support underneath.

   The division that bisects the curved porch is getting a double dividing deck board for appearance.  This is how all the other slice dividers meet at the corner of the house.  You can see in the upper part of the picture, the deck installers attach the boards oversized and later score and cut the section dividers in place. This ensures the most accurate installation and cleanest final appearance.


   Here's a close up of how the border fits against the long boards when it's completed.  Very clean lines and near invisible fasteners.  The "invisible" fasteners space the deck boards about 1/8" apart for water shedding.  Since all the boards are the same thickness, you don't have to worry about the butt joints causing snags.  Even milled dimensional deck boards will encounter some swelling and thickness variations during processing, and the uniform Azek makes for a very clean looking deck.

   Here's a closer look at the double border boards that comes off the corner of the house.  The double board border will nicely split the post and provides a nice symmetry to the two slices.  The post covers will sit on top of the deck with the railing attaching to the posts.  We've discussed making the railing curved to follow the deck, which will have to be sent to a special fabricator, so before we commit to it, we'll need to double check the radius of the curve since using a template isn't feasible.

   Here's what the side deck looks like from the back, looking forward.  The boards are installed in full length sections, unstaggered, and each section will be delineated by a border board, which is why you see a gap.  The boards will be trimmed so the width of a single board can fit the gap, creating the same tight gap that the round part has.

   More of the water channeling materials were purchased and sit ready to install.  There's one more short section around the corner, close to the greatroom exterior door.  Once that's installed, the deck boards in that section can be installed.  A limestone sill still needs to be installed under the door, and it looks like it will impinge upon the deck boards, so I think that needs to be attached so the deck boards can cut to length.

   Here's a closer look at the hidden fastening system.  The black cleats screw down into the deck joists and small tongues engage the grooves in the sides of the board.  This is done every deck joist, so in effect, the board is mechanically attached to the joists, similar to a conventional installation of a face screw through the board.

   Moving inside, the french doors were installed in the study/foyer.  There's plastic sheeting applied to the glass panes on each side, which were painted opaque with primer.  The plastic will remain on the glass until the final paint is applied.  There's a strip of hardwood applied to the "non-functioning" door on the right and a hole drilled on the functioning door on the left.  Non-functioning is a bit of a misnomer since they can both open, but the left must open before the right, and there's a locking astragal that's only accessible when the left door is open.

   Here's what the door looks like with the operational door open. The light switch in the room is on the left, next to the non-functioning door.  We have a good idea what hardware we want for all the doors, but haven't put it down on paper yet; something we'll soon need to consider.  There's already enough space under the doors, all doors for that matter, to fit the wood floor.

   Here's the edge of the non-functioning door and the hardwood that will be cut to accept the strike plate.  Pictured is also the locking astragal that will keep the door stationary without the use of a door handle.  Some french doors will have a functioning door handle what will actuate a rod at the top and bottom of the door.  This is a simpler mechanism. The lever can swing vertically and actuates a short rod up into the top of the door frame to lock the door.

  Distinctive Designs have started plotting out the design for the paneling in the great room.  There are some samples areas mocked up, showcasing ideas around the window, and a few trim profiles.  The baseboard remains in place and the panels are created to fit on them.  The panel flats will form a grid in line with the windows so the layout kind of creates itself.  The devil is in the details.

   Here's a close up of how the windows will be trimmed.  Rather than using the stepped window trim like the rest of the house, there will just be a narrow bead detail, then the flat of the panel frame sandwiched between another narrow bead.  What comes after that, on the inside of the panel, is still being decided upon.  Shown here is one idea, a bevel that adds two shadow lines providing a clean look.

   One of the other examples is to use the same step that's on the baseboard and window trim, to transition down to the flat panel.  Although this uses the same element as the rest of the trim, we don't think we like how this one looks.  For some reason, it's a bit distracting and makes too many shadow lines.  While it has clean lines, it looks too busy.

   The last idea is to just have the narrow bead and no other transition to the panel.  I kind of like this look, but I always tend to stray more spartan, so it's not always a good idea to go with my preference.  I think that since the coffered ceiling has some cove molding detail, it's probably best to add some more detail to the wall panels, even if it is just a little bevel.

   I don't think I showcased this detail in the blog yet.  It's the modified trim on the door between the kitchen and mudroom.  Because of the cabinets, we weren't able to use the full width of the door trim, so Distinctive Designs modified the trim to include the two steps, but removed much of the flat portion.  This retains the look, but fits the space.  I think the top trim piece was scaled down to fit below the crown molding of the cabinets as well.

   The top door trim comes up just shy of the cabinet crown so if it wasn't intentional, it was super lucky  You can see that the miter between the side and top trim isn't on a perfect diagonal since the width of the side trim is narrower.  Despite that, the step details line up as much as possible and I think this offers a good solution to a difficult space,

   The fire rated garage entry doors aren't installed yet, but are moved into position so I think they're going to install them soon.  Much of the carpenters tools, both rough and fine are moved out into the garage now that the primary drywall mudding is completed.  We still need a coat of primer and paint in here, which will probably be shot when the rest of the house is painted.  Garage doors should be coming soon and my next, delayed, update will hopefully include them.

   All the baseboard molding has been installed in the upstairs rotunda and some progress was made on the crown, but there's still some sections left to complete.  The baseboard molding made it's way into the elevator alcove up here, which will need to be removed after inspection so we can open up the drywall and install doors to use it as a closet space until we install the elevator.  The stair railing is resting on the stairs and all the rotunda railing is in the turret bedroom, so I'm hoping that will be completed soon.

   We decided to bring out the laundry base cabinets by a couple inches to reduce the amount of space the washer and dryer will protrude.  It's just a perception between the cabinet and machines, but the little change can make the room feel different.  The base cabinets aren't so far out as to make reaching the wall cabinets difficult and the washer and dryer alcoves are the same depth.

   The machine alcoves will be painted to match the gray cabinets so everything will look uniform.  It's sized to fit a front loader with pedestal.  While the top of the alcove is pretty high, it's still functional as a temporary shelf for laundry related goods.  The upper cabinets above the machines will be mostly inaccessible due to the depth of the machines so opting for an open face will allow us to just use baskets up there.  A board was also added to the underside of these cabinets and will also be painted to match the rest.

   All the baseboard and crown was installed in the turret and turret bedroom, completing the space.  All that's left for this room is paint and flooring.  The baseboard really highlights the continuous bottom window trim and the crown ties it all in together.

   The rest of the turret bedroom is also completed with baseboard trim.  It's a pretty straight forward install, save for the small section of curved wall.  Distinctive design just used the standard baseboard and managed to curve it to fit the radius of the walls.  The rotunda rails are in the bathroom, as well as other pieces of the final stairway trim.

   The basement had it's last interior doors installed under the stairs and in the future bathroom.  There will be other doors in the future once we get around to finishing the basement space, but I'm hoping I'll be able to do a lot of that labor myself.  In the mean time, we'll probably use the basement for storage and workout, in its intended spaces, and use the rest of it for a play space.

   The ceiling of the rotunda has been applied and is awaiting stain and paint.  I'm really liking how this turned out.  The current color gives it a sauna-like look, but I think the final dark stain will lend the space a more outdoorsy feel.  Now that this part is completed, All the outdoor ceilings have officially been installed.  We're planning on painting the dividing trim pieces white and staining the rest of the cedar beadboard a dark mahogany to match the exterior doors.

   The additional corbels have also been installed on the greatroom exterior.  We decided to add five more, three on the back and one on each side corner, since it just seemed too bare without them.  I'm glad we did because it really ties in the look to the rest of the greatroom.  A paper wasp queen was also staring up a hive on our overhang, but it looks like it was taken care of during the corbel installation.  The hive remains, but I didn't see any activity on it.

   Here's a longer shot of the back of the greatroom with the newly installed corbels.  I didn't see any scaffolding set up so they must have climbed some really long ladders to get up there.  Some of the siding needed to be cut away to accommodate the corbel blocking, but it looks like they took care of it well.

   That's about it for this week.  I'll be taking a short break from updates and will miss two weekends worth of progress, so the next update should be a big one.  This will be the first updates I'll miss in years, and I hope it's the last.  The next update will put us into July, a mere 8 weeks until the end of August, so I'm hoping we're still on track for an August completion.  There's still so much that needs to be done, but I'm hoping it won't take long.  Painting, wood floors, the rest of the tile, finished electrical, finished plumbing.  The list might be short, but the minute tasks are plentiful.


Monday, June 12, 2017

Front Porch coming together and more interior trim progress

   Summer continues its steady march towards us with temperatures in the 80s and 90s with very little rain in sight.  Despite the hot weather, the house is a cooling respite from the "city" heat with the near constant breeze and shade providing forest.  Our eagerness to move in pushed us to visit the house twice this weekend, once with extended family and once late on Sunday to eat dinner in the gazebo and hang on to the weekend as long as we could.  A short walk up our cul-de-sac to another house construction yielded a pleasant conversation with a neighbor a street over, who moved in a year ago.  They confirmed our observation about the local area providing an "up north" small town feel, something we greatly look forward to.
   Progress continues well on three fronts; exterior stone, front porch, and interior trim.  The exterior cobble stone application is completed, with only the gazebo blue stone application remaining.  The front porch is about 40% completed and the interior trim has moved onto the baseboard installation stage and is already about 80% done.


   The pile of building material in the front of the house is quickly diminishing now that the front porch installation is under way.  The installers come in on the weekend to work and say that it will take about 6 weekends to complete.  I don't doubt Mike did some wheeling and dealing to reduce the price of the install with the stipulation that it be performed as a side job.  It fits in the time table and saves us money so I'm okay with it.  Both the Azek deck boards and cedar beadboard is being exhausted from installation progress.


   A large section on the front porch, to the right of the door, was partially completed.  The final section in front of the door will be installed near the end of the build so the multitude of installers working on the interior of the house won't damage and add wear to the boards.  You can see the double header in the fourth joist gap where the deck installers secure a flat 2x10 into.  This is so the natural length of the boards have a place to end on, providing a solid place for the deck boards to butt up against each other.


   One more section has been installed on the side of the house as well.  It looks like they'll be installing the boards in the full 20 foot sections, rather than staggering joints across the entire deck.  At first I wasn't sure about the aesthetics of this kind of installation, but then I realized that this will reduce the number of additional blocking required to support the butt joints of the deck.  It will provide a much more uniform look, less traditional deck look, but I think it will be good.


   The Trex RainEscape system is mostly installed under the completed portion of the wrap around porch.  This will divert any water that falls between the Azek boards on the back corner of the house at one of the basement walkouts.  The final landscaping plan calls for a paver patio under the walk around porch so adding this water diversion system will help keep the area dry and useable when it's raining out.


  The flexible troughs are attached to the deck joists from above with mechanical screws and a waterproofing adhesive.  The troughs are then adhered to the downspout funnel pieces, which will all be connected to a gutter and with a single downspout, to divert the water to a single location.  I'm not sure how necessary this will be since the upper wrap around porch has a roof covering it, but some water is bound to trickle down through the deck boards, and this will help keep you dry.


   Old Country Stone completed the mortaring of the granite cobble on the main chimney and cleared out their scaffold.  This completes the granite cobble installation on all parts of the house. I'm not sure if they'll come back and mortar a bit more once the deck is completed, since there are some gaps that remain between the stone and the white aluminum flashing that sits on top of the Azek deck.  They also need to come back and install the blue stone pavers on the back deck, so we'll see them on site again.


   They close to finishing the ceiling of the gazebo with the installation of the cedar bead board.  All the sloped areas have been filled and the flat center section still needs installation.  This part is a little slower since they not only need to cut the ends of each piece to the correct angle, they also need to cut openings for the lights and speakers once the pieces are in place.  These boards will be stained dark to match the garage and exterior doors, but the butt joints between the sides will be covered with a white strip.


   Here's another angle of the gazebo ceiling.  Some of the tongue and groove bead board was damaged, so they'll have to be returned and new material delivered.  I think this is the only thing holding up the completion of this ceiling.  Once this is complete, then the ceiling for all porches will be finished.  There might be a few trim pieces that still need to be installed, but the majority will be done.

   Moving inside, Distinctive Designs delivered, but has yet to install, the french door to the study, so here it sits in the room it will enclose.  There's a protective film on the glass that will be removed after it's installed and painted.  If I remember correctly, the right side will have the door handle and the left will be openable with the astragal bolt but looking at this picture makes me double guess that.  I'll have to look and see where the light switches are in the room, then I'll know which door is operational.

   Baseboard installation is near completion in the master bedroom, as with the rest of the second floor.  There are some curved baseboards that still need to be installed on the curved wall sections, but this phase of the woodworking trim is nearing completion.  After this is done, they'll move onto the special installations on the rotunda walls, greatroom walls, and dining room ceiling.

   The half door to the seasonal storage space in the master closet had its door installed and trimmed.  It's not really going to be secret room since the door isn't going to be concealed, but it will have to be worked into the closet system, and my end up being concealed by hanging clothing.  The door will be insulated since the storage space beyond is insulated, but not conditioned.  We'll mostly use it to store off season clothes and maybe bolt down a small safe.

   The curved crown molding in the rotunda is taking shape.  There's one box left in the entry way closet, and probably over half the rotunda to complete, so I'm not sure if they need to get more or if there was some material stashed in a place I didn't look.  I confirmed that the material is some kind of wood resin material.  The dulled the knives pretty quickly when they tried to put it through the cutters, so it's a hard material.  Mike of Distinctive Designs said that he doesn't like to use the rubber molding, and this is a good substitute.  I think it will look good when painted, and you probably won't be able to tell the difference, even if you touch it.

  I had some friends visit the house after a birthday party for my girls and it came out that I'm running a build blog of the progress.  He requested to be put into the blog, so here you are.  They're standing in the turret, showcasing the completed window trims.  All that's left for the room is baseboard and flooring.

   The window side and top trim pieces were installed, completing the window trim.  I think the top pieces were cut from the wood composite material since they're very uniform in color with no discernible wood grain from where I was standing.  The crown molding in the turret was completed with the same composite material as the rotunda.  The trim in the turret really turned out great, especially with the continuous molding at the bottom of the windows.

   Here's the two supply vents in the turret.  The crown molding overlaps the openings a bit, but once we get the vent trim up, you shouldn't be able to notice it.  I don't think this will affect the performance of the air supply much, but we'll have to make sure we have a clean finish to this part.  You can see the filler they use to smooth out the nail holes and seams, but once you paint it, they'll disappear.

   The basement had its three doors installed for the mechanical room, future bathroom, and under stairs, completing the door installation in the basement.  There's no trim installed here yet, and I don't think we'll be getting baseboard trim.  I'm not sure what's happening with the door trim since the basement wasn't supposed to be a finished space.  We just need it to pass code right now, and we can worry about finishing the basement at a later date.

   That's about it for this week.  Lots of progress all over the house, but it feel slow because we're starting to get into the fine details.  As I mentioned, the front deck is slowly progressing but will remain unfinished until near move in.  Woodworking trim should move to the special walls and ceilings, and once completed, we should be getting paint up on the walls.  After paint is complete, we can order the wood floor for the rest of the house and start considering the finished plumbing and electrical installations.  Not many more steps to complete before move in, but it all takes a lot of time to do correctly.  11 more weeks!


Monday, June 5, 2017

Door-stravaganza

   Summer isn't officially here yet, but it's starting to get hot enough to feel like it with temperatures in the high 70s and humidity rising.  We got to squeeze in a quick visit to the house between busy work schedules and social functions but there was a lot of progress to look at.  There seems to be a little pause on the progress of the tile work while we work out budgeting for the more expensive foyer and bathroom tile.  Progress is nearing completion on the exterior stone with the granite cobble going up on the chimney and nearly every interior door has been installed and trimmed in the last week.  Deck installers have been sneaking in on the weekends to put in some time, but nothing monumental at this point.  Finished carpentry continues on the front porch and more evidence of painting prep was seen in the front of the house.


  Gratuitous car shot.  Not much difference on the front of the house as most of the front porch arch work is on the side.  We'll put in to Distinctive Designs to fabricate the gable pediments this week and hopefully they can get them done before the painters come in.  The new dumpster has some rubble in it, but no where near full.  The dark ash you see to the right of my car is the remnants of a burn pile where they dispose of wood cut offs from time to time.  Not visible in this shot is the caulking the painters applied to all the cracks between the various materials.

   Old Country Stone completed the concrete retaining wall by applying mortar to all the joins and installing stone and mortar to the small returns caused by the elevation drops.  Completion of these two parts fully completes this retaining wall.   We'll get the safety fence that will be installed on top of the wall, put in after the completion of the driveway.

   The mortar that fills the joints of the limestone blocks are cleanly applied.  You can see where some of the moisture from the mortar is absorbed into the limestone, darkening the surface.  This darkening will fade in time so I don't expect it to be an issue.  The safety fence will be bolted down into the limestone, and perhaps even down into the concrete wall itself.  It's not meant to stop a car, but it will be strong enough for a person to lean against.

   It looks like all the joints were caulked, strongly defining the areas that will be painted.  It's a paintable caulk that will be covered with the white trim paint, so there's no issue with the joint definition against the gray solid stain of the shingles.

  On the side of the wrap around porch, all the interior arches have been installed and the process of installing the exterior arches and filler pieces has begun.  There's some additional trim work on the curved porch part that has been plaguing completion of the porch, but I'm not sure what the final product will look like.

   As expected, Old Country Stone finished the installation of the lower porch pylons, completing this section as well.  I'm pleased with the finished product and can't wait to see the steel posts finally covered with the wood decorative posts.  the posts are about four feet high from current grade and will probably only be about three feet high from final grade.  There's still a good seven feet of post above the pylons, so it would be difficult for someone to gain access to the wrap around porch by climbing up on the pylon and climbing to the deck.

   Here's how the final pylon against the house turned out.  The smaller stone chips that were used to fill the wall after the limestone top was installed still need to be mortared.  There are a few places around the house where electrical receptacles are installed that have small stones installed, but not mortared, so there will probably be one more walk around with the mortar bag to finish of these parts.  We'll have to also perform an inspection to make sure the small details aren't missed since the scope of this install was huge.


   Here's how the side of the house looks on the driveway approach.  I can't wait to get all that red steel covered with wood and Azek.  The glass block for the mechanical room still needs to be installed as well, and I recall Mike affirmatively confirming with OCS if this is something they can handle.  There will be a mulched bed where the three pine trees stand and the rest of the flat space will be our front lawn with planted beds closer to the house.


   Here's a closer look at the side of the house, probably the first with the completed pylons and above porch stones installed.  I saw the decking installing crew at the house for a few hours on Sunday through the security camera, but I couldn't see what their progress was.  I just saw them moving some material to the front porch, so they're either staging up for installation or beginning the installation of the deck itself.

   Walking around the back of the house revealed a very tall scaffolding that reached from the basement walkout level all the way up to the roofline.  OCS is using this scaffolding to reach the chimney to apply the stone.  There's a pulley with a 5 gallon bucket attached to a rope to move mortar and stone to the top, and the top platform has a small pile of the granite cobble staged for installation.  There are a few roof supports and boards up there for them to stand on, but not much else in the way of comfort.  Definitely a job I wouldn't want to do.

   A good amount of progress on the chimney, considering all the other work they completed during the week.  I didn't take a good look from the other sides of the house, but it looks like they installed all the corner stones first and are filling in the rest.  They also parged the entire chimney so all the prep work is completed.  I figure they'll be able to finish this off during this next week if the weather cooperates.  We're already in a windy area, so a little more increased wind can make it pretty scary up there.


   A long shot of the back of the house finally hints at what it will look like after completion.  Once the stone on the chimney is completed, the only remaining task for OCS to complete is the application of the blue stone to the back porch and gazebo.  We obtained a quote for the completion of the front gate pylons, but we would need to know what gate is being installed, a detail we haven't figured out yet, so that's something that will have to wait a bit longer.

   OSB plywood was applied to the ceiling of the gazebo to prep for the installation of the stained beadboard.  I guess the trusses were a little too spaced out to apply the beadboard directly to, so this is the solution.  They'll probably apply the OSB to the flat part of the ceiling too.  There's currently a mourning dove nesting in the eaves, so they're giving her some time to finish up before they continue work back here.

   Moving inside, installation of the interior doors is nearly complete.  I found the dutch door that will be installed between the mudroom and kitchen, in the study, so hopefully it will be installed soon.  It's made of the same materials as the other doors, the only difference being that there's an extra horizontal rail between the upper and lower panels, which separates the two doors.  I can't remember if we opted out of having a small shelf on top of the lower door as is traditional with dutch doors, but when I measured the height of the two pieces, it was close to the height of the door openings, so I'm guessing there will not be a shelf.  There's no door handle hole in the top door half so I think there will be a surface mounted throw bolt that will lock the two halves together when we want it to operate like a single door.  We'll have to accommodate for another wall protection bumper for the top half.

   Here's a closer look at the internals of the door on the bottom half of the dutch door.  You can see the laminated layers of the LVL inside the door that provides a strong attachment point for the door hardware on the hinge side, and a solid material to drill and mortise the door hardware into.  The rest of the dividing rail is made from a solid wood that looks like pine or poplar, and both of these are sandwiched between two thin layers of MDF.  The MDF is an acceptable material for this application since it takes paint really well and should any damage occur, can be patched with Bondo and repainted.  Our current hollow core doors have a wood textured MDF skin which would be difficult to replicate with a patch so the smooth surface of our new doors will provide better longevity and repairability.

   A curious stack of boxes currently sitting in our entry closet is filled with these.  They appear to be some kind of hard resin material, maybe wood composite.  I believe them to be the material for the curved crown molding that will be installed in the second floor rotunda and turret.  It's not the rubber material once spoken about since it has a hard surface, but it's obviously flexible.  The 45 degree angles on the profile support my theory that it's for the crown and there are five boxes there, which is a significant total length.

   Although it might not be as strikingly visual as a complete coffered ceiling, it's still exciting to see the completion of most of the interior doors. It's a ton of work considering all the steps involved with each door.  You have to set and install the door casing, ensuring that the sides are plumb, the top level, and the frame, which doesn't have a threshold, is square when installed.  Then you can hang the door, ensuring that it is cut to the correct height, accounting for the floor that hasn't been installed.  Lastly, you can install the door frame trim to the appropriate level of finished carpentry expectation.  Overall, 19 doors were installed last week with maybe 3 remaining.

   Despite all the work Distinctive Designs is putting towards installing all the interior doors, there are signs of preparation for the installation of all the other final trim.  Staged in the greatroom is a stack of wide, pre-primed boards that I think will be used for the paneling in the around the greatroom windows, and perhaps in the rotunda.  These boards range in width and I think they're all half-an-inch thick, so the depth effect of the panels considerable. Half an inch will provide a good shadow line, and even though the flat of the panel itself is just going to be the drywall (I believe), once painted, will provide the look we're going for.

   The big mudroom closet gets two swing-out doors to enclose our family coat and shoe storage.  This closet is interesting because the shape of it is bigger than planned on paper.  The original blueprint had a blind triangular corner walled off into an inaccessible chase, but the final implementation kept all the space.  As a result, the closet can be defined into two spaces, a large flat wall for hanging items, and a smaller area that seems appropriate for shoe shelving.  The closet was supposed to be a reach-in, but has turned into a small walk-in.  Usually, you would see some kind of bi-fold door on a closet like this, but the double doors give the closet a little more gravitas.  While you might thing it would be a nuisance, opening both doors just to access items, in practice, you only need to open one at a time, depending on what you want to get.  I think we'll use the lockers for every day items; season appropriate jackets, daily use bags and shoes, reserving this closet more for storage.

   The door installation is prevalent throughout the house.  Here's a shot of the second floor room, slated for use by a potential future child.  Just like the guest room below it, this room had three doors installed and is completed in that respect.  Even though there's a curved wall on the hinge side of the door, the door opens to at least 90 degrees, with hardware installed.

   The doors to the master bedroom and master bath are in place as expected.  We don't have any operation hardware on any of the doors yet but I think that's more of a final finishing thing.  Currently, the doors stay where you put them, without swinging due to any imbalance.  Although you can feel the heft of the door when you move it, it swings easily on the ball bearing hinges.  Some strength would be needed to slam these doors, and they feel like they could do some damage if you got caught in them.  We'll have to be sure to hammer home door safety with the little ones.

   Here are the doors to the master bathroom and master closet beyond.  I think the decision to reduce the master bath door down to a single door was a good choice and made it easier to decide here to install light switches.  While it would have looked more impressive, in practice, only one door would be used on a daily basis.  I measured the door widths after the door installation and we're hovering just around the ADA recommended 32" on all the bedroom and bathroom doors, and close to 36" on the passage way doors.  I can't get over the optical illusion that they're narrow because of the 8 foot height of the doors.

   The laundry room, which is still the most completed room in the house, got its passage and closet door.  We'll need some careful selections on door stoppers because I'm not sure if the standard spring stops will be strong enough not to collapse under the weight of these moving doors.  Once pushed, they swing freely through their arch, losing very little energy to friction.  The laundry room closet will house the second floor cleaning supplies, vacuum, and probably the ironing board.  We looked into some kind of integrated ironing board solution, but it seems like there was always a compromise.  They look great, but don't perform as well as a full sized stand alone board.

   The turret bedroom has all three of its doors installed as well, with some unexpected results.  The bathroom door had no choice to open to cover the open closet area since the opposite side has the vanity.  There's no way around it and it shouldn't cause much issue.  The walk in closet door beyond is a little concerning.  The laundry room wall that is shared by the closet was implemented a little differently than on paper, so the closet actually lost some space.  The door opens close enough to the expected shelf space on the back wall to cause some concern, but we won't know until we have a closet system in there and clothes hanging.  There's no good way to cut down the door width so we'll just have to adapt when we attack the storage.


   This is the kind of product you get when your builder is awesome enough to closely coordinate the tile installers with the trim carpenters.  The other side of the shower wall in the turret bathroom has a finished bullnose tile, but this side would come to close to the door trim.  The tile installer coordinate with the trim carpenters and installed the last course of tile to a width that perfectly complimented the door trim install.  If we had this level of coordination from the beginning, I doubt we would have run into any of the issues we dealt with later in the build.  Lesson is: get a good builder from the beginning.

   So that's about it for this week.  It's hard to predict what exciting new things we'll see next weekend, but we will have friends and family visiting the site, many for the first time.  I'm happy to have something nice to show off, and can't wait to have lots of family gatherings in the future.  I'm guessing that the stone work will be completed on the chimney, baseboard trim and maybe some panel work completed in the house.  Besides that, I don't know what else to expect.  Maybe more completed tile work or complete front porch.  In any case, we're still on track for an August completion. 12 weeks to go!