The weather is staying pretty hot so it's good that the roof shingle is all completed. There's a little finishing work to do on the flashing and a good amount of clean up and that should conclude this week. We're getting a quote on the copper roof turret to determine if it's feasible. Alternatives would be to either just shingle it or install a copper colored metal roof.
We actually met with the roofer to discuss the options and do a little walk around of the install. I again broached the subject of the beer and wall damage and he again denied it was his guys so I think that's a dead end. To my untrained eye, everything looks pretty well installed. Sure there are a few odd flashing spaces and I would have like it if the flashing was overlapped a bit more, but everything should be okay. Probably not the highest pinnicle of craftsmanship, but adequate.

So here's the roof completed. There's a little bit up at the turret that needs to be finished, but I think it's because they're going to apply Winter Guard to the entire turret and the copper flashing here still need to be installed. I walked around the porches on the front and back and the shingle application looks clean and flat. I don't see any apparent patterns or seams so it seems like they installed them with a good stagger. From the ground, it looks great. You'll notice that the waste pile looks a little smaller. That's because the roofer managed to use a good amount of it on the curved porch section.

Here's the last section that needs to be completed. You can see the Winter Guard peeking through the void. The plywood on the turret has a little sheen on it, so it's easy to imagine what the copper will look like. I wasn't crazy enough to climb up on the top roof, but the pitch allows me to get a good enough look at the installation. All the ridge vent has been installed. I'll probably have to ask Matt to get some house wrap up on the chimney box and install a temporary cap so we can really be dried in. The scaffolding on the turret will remain at least until the copper is put on the roof. After that, the overhang on the turret can be completed.

Here's how they ended up doing the drip edge around the curved porch. They cut sections of drip edging and overlapped each a bit on the next one over. Not the best way to do it but again, acceptable. I would have preferred them to use downspout crimpers and crimp the nailing flange to achieve the desired radius. This is an illustrated example of an adequate roofer and a good roofer.
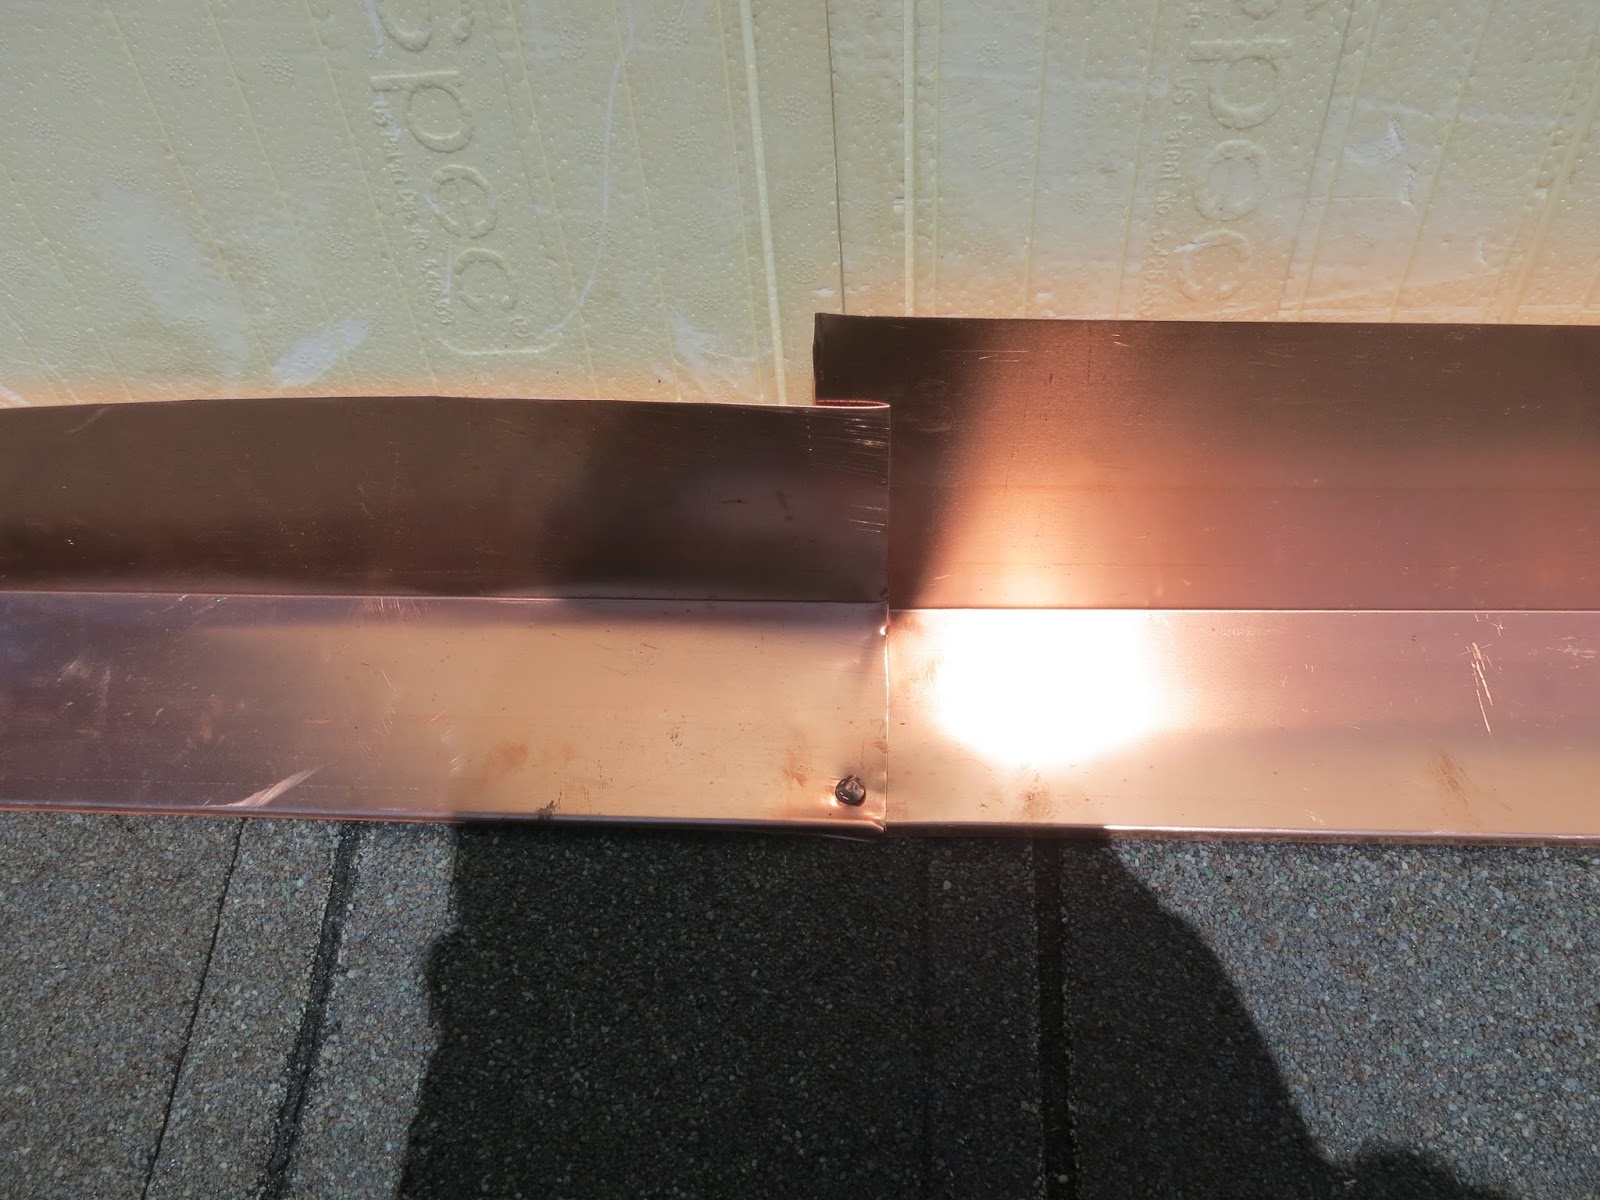
Oh hey look. Copper nails. This flashing is exposed to the elements and as such should definitely have copper nails. I would have preferred copper nails everywhere, but the roofer insists that they're not needed. I'll keep a close eye on the step flashing that has the galvanized nails to see if it starts to corrode before the siding is applied. If I see any sign of corrosion, I'm having the roofer come back and replace every single zinc nail that touches the copper. I've gotten too much advice, warning me about zinc+copper contact. I'm still thinking about hiring an inspector to get some backing. Again, notice that the overlap of the two pieces is only about an inch. Two inches would have been better.

Here's what the gable peak on the front porch. It looks like a good installation and the copper looks pretty fantastic. Definitely something that I haven't seen driving around the neighborhood. Most of the roofs around me are ashphalt shingle, with some concrete tile. Most roofs have a standard dimensional shingle and no metal valleys so this house will have that unique detail.

Here's where the porch roof meets the curved porch. They didn't install a copper valley here and when I asked about it, the roofer said that there's a foot of overlap in the shingles so a valley isn't needed. I guess this is acceptable since there isn't a steep roof pitch between the two sections so I don't expect a heavy driving water force to push under the shingles. You can also see how they installed the flashing around the curved turret, step flashing with copper nails. The roofer said that the step flashing will also have a copper adhesive to seal the edges. Sealant will fail in time so I'll have to keep an eye on this area in the future.

Here's a shot of the turret and front porch roof. As I mentioned earlier, the roofer managed to reduce the waste pile and use the cut-offs on the curved section, since the curved roof requred shorter lengths. Because of how this shingle is, there's a bit more waste when compared to other types of shingle. You can't reuse a section if there's only half a "slate" on the sheet and you don't want to use short sections on the main field of the roof. Roofing this curved section allowed us to use the short pieces and I think they did a pretty good job with it. There are some areas where the shingles are too linear, but it's not a glaring issue.

Close up of the step flashing installed around the turret. Again, since this is sitting on top of the shingle, copper nails were used. I'm not sure if this kind of thing could have been a single piece. I'm thinking that maybe another roofer would have used a single piece of copper and sent it through a roller to achieve the desired radius. It would have taken less time for installation since there would be less cutting and fewer fasteners, but it would require some dedicated tools. More of an aesthic annoyance than anything else.

Here's the other side of the turret. There's the same transition from the curved roof to the straight with the same shingle valley application. The copper valleys are intentionally kept long on inside corners so the water will pour off the roof away from the house more. I wonder what the noise level will be in a heavy rain storm with all that water running off the valleys. Probably won't be able to hear it inside the house since it's ICF, but it will be fun to see buckets streaming off the roof.
So that's it for this week. When I talked to Matt last week he said that we're looking at getting the water and sewer trenched, pool excavated, and garage slab poured. HVAC should be coming in this week to start cutting the floors and I'm getting in contact with Pro Brothers about getting us scheduled for windows. I got a chance to meet with another couple who are using Ken as their builder. It was a nice opportunity to compare notes on our experiences and share thoughts. I look forward to watching their progress to see if my slow experience is unique.
My husband and I recently built our own home and I can empathize with what you all are going through. The hardest part of the build had to be the roof. We also used copper on our roof and could not be happier. It was challenging to get the copper just right on our roof, but in the end it was worth it.
ReplyDeleteThanks for reading! The roof turned out well and it remains to be seen if there will be issues with the galvanized nails securing the copper flashing. We found a much better copper installer for the turret and we couldn't be happier with the result.
Delete