I'm posting a late mid-week update because drywall is finishing up quicker than I can document weekly, and to share some information about the design meeting we had. We had a meeting with Mike, our interior designer
Margaret, and Mike and Mike (so many Mikes!) of
Distinctive Design, the carpenters that made the rotunda stairs and who will be providing interior doors and all the trim. We also met with the deck installer for the front porch, and a wood flooring installer, who was just measuring to calculate quotes.
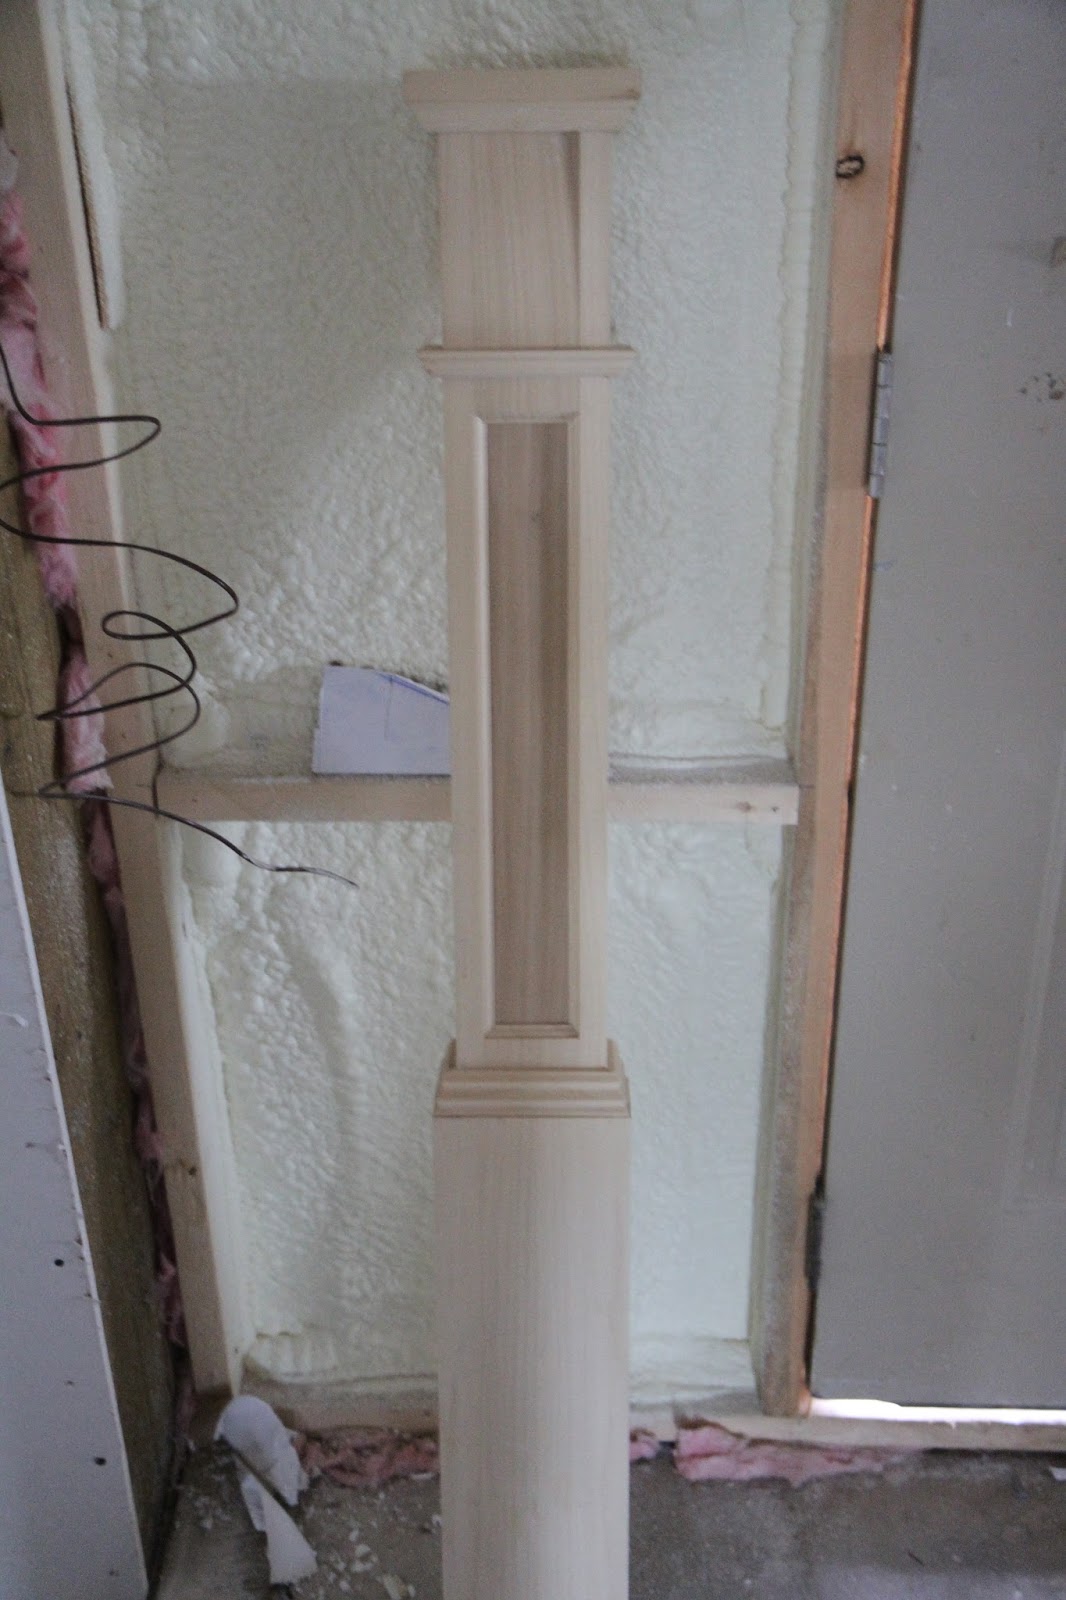
Distinctive Design brought some samples for a great show and tell so we could get a final decision on what we're going to implement around the house. Here's the newel post we'll be using on the stairs. We'll have one at the bottom of the stairs, one at the top of the stairs so the diagonal railing can transition to the rotunda railing, and one at the end of the upper rotunda hall near the turret room. We need that additional one because the railing will turn 90 degrees and terminate in the wall. The newel post will be made from oak, but is prototyped in poplar here, and will be stained dark to match the floors, stair treads, and hand rail.
Distinctive Design also brought one of the highlight balusters that we'll be using in our railing. These will be sparsely spaced among the other metal balusters that will go up the stairs, around the upper rotunda, and at the great room overlook. The come from a company in Canada called
Prestige Railings and Stairs and by the heft, they're solid stainless steel. The other balusters will be just a straight stainless steel bar, so I think these will add a nice amount of flash to the foyer without looking too visually intrusive.
One of the main reasons for the visit with Distinctive Designs was to finalize the baseboard, door, and window trim. The samples left at the house last time were deemed too chunky, and this is something that DD made in the shop to replicate a trim we saw much earlier in the design process. Here's what the door trim will look like against a piece of baseboard. The window trim will use the same as the door, but the bottom piece will be oriented to provide a window sill look rather than a picture frame look.

Here's the profile of the baseboard. The older one was a two piece design with a thick top and flat bottom. This new one thins out the top with a wide rabbet and rounds off the top profile with a slight ease on the second profile. This will break up the thickness of the baseboard and add a shadow line a little farther down from the top. Cleaning should be about the same since you're just taking the width of the vacuum brush across the top and face of it. As with before, they'll be milled from poplar at the Distinctive Design workshop.
Here's a look at the profile of the window and door trim. The only difference between the prototype picture here and the final product is that the final product will be a one-piece design while the prototype is made from two pieces. This profile offers one more step on the molding, thinning the profile out more towards the door opening, but retaining the thickness at the edge so it stands proud of the baseboard molding.

Distinctive Design also brought along a mock up of the coffer ceiling they'll be installing in the great room and it's an impressive display. The only changes to this design is that the intersections of the coffer beams won't be segmented as they're shown here. We had to finalize the placements of the coffer beams and decide how they would be laid out on the ceiling. It's a little difficult to describe without a graphic, so maybe I'll try to render something up, but suffice to say, we came up with a final working design.
We also talked about wainscoting panels in the rotunda and in the great room. We've had the intention of implementing the panels in the rotunda to dress up the first floor a bit and tackle concealing the construction errors in the exposed ICF floors. We added panels on the great room window walls to deal with the lack of space between the ceiling and the tops of the windows, and with the narrow spaces that will be left between the windows when the trim was installed. This will make the windows all look like one unit, which is kind of the intent of the window design.
Elsewhere, drywall hanging has completed and the drywall installers are applying the tape and first layer of mud. This application just lays down the tape with some mud directly on the drywall seams and screws. Another application of mud will follow that will smooth out the transition between the wall board and taped areas, blending them into a smooth surface.
The tape and mudding crew consisted of two guys while we were there, but they quickly moved from finishing up the second floor, down to the first floor. I think they finished the first floor by the end of the day. They assembled scaffolding to reach the highest places, and walked around on stilts to reach everywhere else. It's impressive how proficient they were on the stilts, more than once walking on the upper rotunda without any railing. I get nervous up there on my own two feet, so I can't imagine walking on sticks up there. For tape application, they used a
drywall banjo, which quickly lays tape that is drawn through a reservoir of drywall compound. A flat trowel is scrapped across the tape to further set it and scree off excess drywall compound. This extra is used to fill local screw holes.
I'm not going to post many pictures of the drywall progress because by my next weekly update, I'm sure they'll be farther along with a nicer visual effect. This is what the drywall looks like with the tape and the first application of mud. The compound is still a little wet, but even when completely dry, you can see the difference between the seams and boards. I think even with the final application of mud, you'll see a difference, which will be covered with primer and paint. Roughly cut openings are repaired in this stage, sometimes using tape to close up the holes. Not the best solution if you're trying for a tight house, but not bad.

They drywalled under the first floor stairs, so the basement stairwell has a completed look. The two sconce locations in the well should provide enough light to make the stairs safe. The area under the basement stairs will not be drywalled, but it will have a door so it can serve as another storage space. Maybe we could make it an additional pantry storage space for dry goods.
Speaking of the basement, it's fully drywalled, soffits and all. The only remaining space is the mechanical room, which will be tricky due to all the wires and pipes. The walls are easy enough, but the ceiling is a well organized tangle of HVAC, electrical, and plumbing, none of which are on the same plane. The easiest way would be to drop the ceiling down with rigid support and drywall the whole thing in. A fire retardant spray is also available if we just want to blast everything up there.
Our make up air powered baffle arrived and is ready to install in the basement. This will open when the hood vent in the kitchen is turned on, and prevents any air leakage when the hood is not in operation. It's a 10" diameter baffle to match the MUA pipe diameter. Not much else to say about this I guess.
Despite the cold,
Old Country Stone pushed forward with finishing the gazebo. They've started installing the face stone on the inside seats and barbecue space and filled many of the voids in the cinder block seating since they'll need a solid surface to adhere the bluestone to. I noticed a little pooling of rain water on the gazebo near the seats. I'll have to ask Mike if he thinks we'll need some weep holes through the seats.

Here's the seating to the right of the fireplace. It looks pretty much completed. It's interesting that OCS is installing the stone all the way down to the cement decking considering they installed it with a gap for the blue stone with the house cobble. All that's left for this section is the mortar and bluestone seating. Once this is completed, we'll have our first official seating in the house.

OCS finally added this last little corner. They stopped short of the post before, which wouldn't work because we still need to apply the finishing wood to the post. The gap between the cinder block and post provided no room for stone and post finishes. The solution was to enclose the post base so the post finishes will sit on the bench like it does on other places.
Most of the exterior of the gazebo seating is completed, as well as the fireplace. Grout still needs to fill the spaces and the blue stone edging needs to be applied, but that will come later. If you look closely, you can see large flakes of snow falling. Yes, winter hasn't let us go yet with one last (hopefully) cold day complete with snow. Looking at the house camera today, snow accumulated on the roof, so it was considerable. Weather forecasts for this weekend are in the high 60s. Typical spring weather.
The back of the fireplace has been completed, save for the top of the chimney. You can also see that the back of the barbecue needs completion as well. I think they can bang this out pretty quickly if we can get some warm weather. It should warm up enough next week for them to put in some good days. They've distributed pallets of cobblestone around the house so it looks like they're staging up for a final installation push.

We contacted Jeff at OCS because the implementation of the stone surrounding the fireplace opening wasn't quite what we envisioned. Early in the design process, we sent him a picture of what we wanted, but it might have gotten lost along the way. Luckily we caught it soon enough where they could easily implement the change. Here's half of the opening completed how we wanted. We really like the staggered keystone arch rather than a straight edge they had originally. They had a little test burn in there to see how the chimney was drafting. Good thing they did it because they were getting a little back draft down the chimney due to the wind interaction with the gazebo roof. Mike had them increase the height a bit to counter that effect. A taller chimney will increase the amount of warm air in the column, which will have a greater pulling effect at the bottom of the chimney.

Here's a side shot of the new chimney height. I'd say it's only three cinder blocks higher, so probably one clay liner in height. It's still not quite to the peak of the gazebo, and our finial will be taller, so it doesn't look imbalanced. Stone was applied on top of the roof but I didn't get the chance to go up there and take a peek at how they did it, so I'll have to make sure to grab that picture next time.
So that's about it for this update. I'll post more pictures of the drywall progress but with only two working days between updates, I'm not sure how much progress there will be. Drywall can be pretty boring so I'll try not to fill the update with pictures of blank white walls. Next step after drywall will be cabinet installation, some exterior doors, interior doors, and trim. All these changes should make a big difference in the appearance, but will probably take a long time. There's a surprising amount of woodwork that needs to go in but I'm really happy with Distinctive Design so far. Being an amateur woodworker, I can really appreciate their build quality and techniques. Co-currently, work will complete on the exterior of the house with the deck installation, beadboard on the porch ceilings, and paint on the trim and cedar shingles. I think when the exterior is finished, we can call in Great Oaks to finish up the front landscaping and get started on the driveway and steps.


No comments:
Post a Comment