We were once again lucky with a sunny visit to the house in the end of a snowy/rainy week. Temperatures are on the rise again with the forecast for the next week more in the spring time temperatures of low 40s to 50s. The interior of the house has been cleaned and one more inspection passed for the run up to drywall. Outside, Old Country Stone managed to get in between the freezing temperatures to finish the gazebo fireplace, and it looks like they're prepped to begin again on the granite cobble exterior. Margaret left some finishing trim samples for us to look at and a small, but expensive, sample of the tile we would love to use on the master bathroom feature wall.

One more sticker for our sticker book! The new green tag on the bottom right is for the gas fireplace inspections. I'm not sure what else needs to be inspected before we can start drywalling, but Mike has said that there needs to be an insultion inspection as well. Considering they haven't started that yet, I don't know when it will happen, but hopefully it will be soon.

Small progress in other places around the house. Two holes were drilled thought the concrete floor and curved stud wall under the first floor stairs. These are for electrical wires, one for the receptical that will be in the curved wall and one, presumably, for the lights in the basement stairwell. Even though we've passed electrical inspection, there are still little things to install here and there. Same with gas and plumbing. The barbecue gas line needs to be run into the house and hooked up. Some of the exterior hose bibs still need to be connected to the system. I don't know if there will need to be another inspection on those items before we close up the walls.

Some strapping was added to sections of the basement stairwell where the concrete and stud walls didn't make an even plane. This is all prep for drywall, since you need to have an even surface to attach the drywall to. It's these little preps all over the house that are time consuming, but result in a much better end result.
Margaret dropped off a few samples of trim from the trim carpenters so we could have a look and try to decide what we want to do. There were two pieces labeled "casing" and two labeled "baseboard". Each baseboard piece had two profiles for a total of four proposals. In combination with the two casings, would lead to 8 different possible combinations to choose from. Picture above is the slimmer of the two casings and the round over/bevel baseboard example. All pieces are made from poplar and milled by the installers. We're going with a simple two piece trim to keep with the clean lines in the house.

These are the two casing examples butt together to show their differences. Both have a round over where the raise edge of the casing meets the flat but the two widths of the flat and raised are different. The outside edge of the casing is sightly eased off to break the corner. I forgot to measure the pieces, but I think the width of the larger was four inches and the smaller was three and a quarter inch or so. From a woodworking prospective, I think the poplar is a good choice over pine. It provides a smooth surface that takes paint well and it's considered a hardwood but it's not particularly hard compared to oak or maple, but it's harder than the yellow pine we often see used for trim in my area.

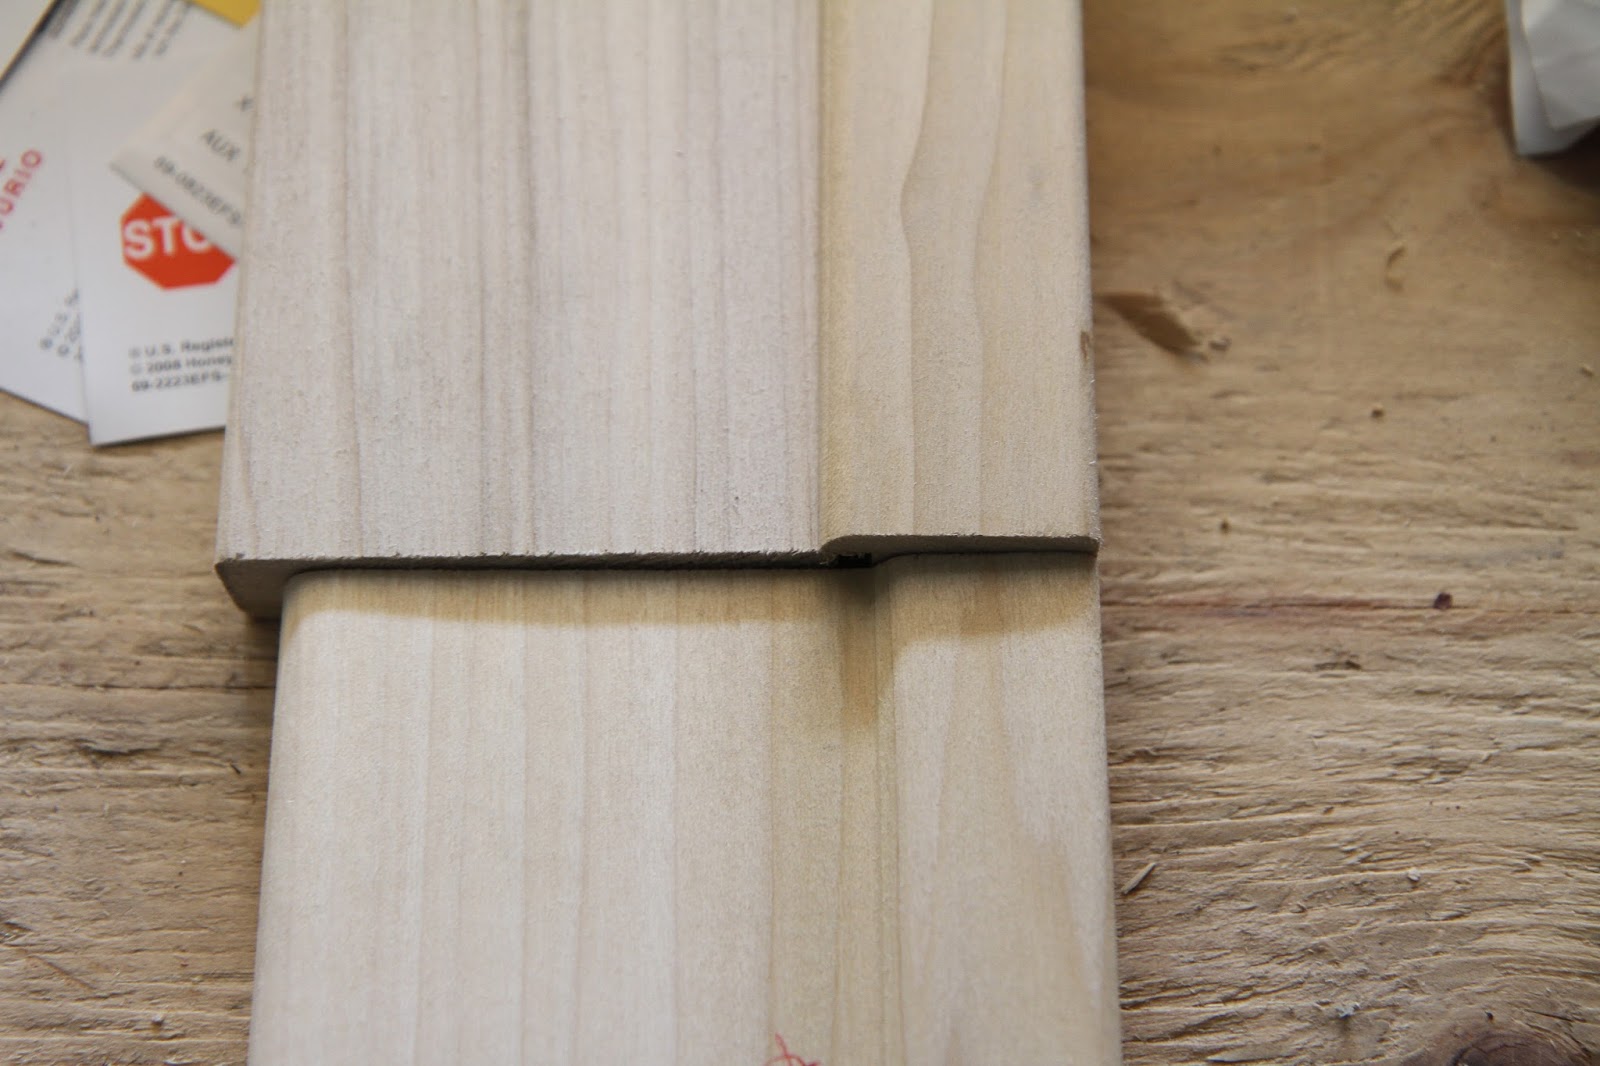
These are two of the baseboard profiles provided. You can see how the two piece baseboard will be constructed; from a 1/2 thick poplar board on the flat and just under 3/4" for the edge. I'm calling these two profiles "eased edge" on the left and "beveled edge" on the right. Despite the alignment of the two pieces in the picture, both samples are the same height.

Here are the other sides of the baseboard trim samples. I'm calling these "half round" on the left and "quarter round" on the right. They're a similar profile, with the obvious difference being how much of the edge is routed off. IF you think about it, the samples provided basically go from least removed on the eased off edge to most on the beveled with degrees of variation between. The two things we're considering when choosing our trim combination is look (obviously) and ease of maintenance. The baseboard with less surface area on top will trap less dust, but I guess if you're vacuuming it, it shouldn't matter much since they'll all be cleanable with a vacuum brush.

So here's the combination that we've decided to go with: the thicker casing with the half inch quarter round over. The thicker casing is kind of a given. We're using eight foot doors everywhere so we need to scale up the trims or they'll look skinny. We like the half inch round over because it's a good compromise between a substantial trim top and a softer edge. It's important that the baseboard doesn't sit proud of the door trims and as shown here, there's a bit of a reveal on the casing trim.
The same thick door casings will be used at the bottom of the windows but the thinner casing will be used on the sides and top. In our current house, we have the same window molding mitered around the window so it looks like a picture frame. In the new house, having the thicker casing on the bottom will provide a stronger windows sill look and add weight to the bottom of the tall windows.

Margaret dropped a sample of the tile we really want in the master bathroom, on the curved dividing feature wall between the shower and the tub. It's a custom cut mosaic tile from different pieces of marble, and we weren't sure if the grout joints would allow for installation on the concave surface. This piece came in a thickly padded box, shrink wrapped onto a piece of cardboard. When we opened the shrink wrap, we found the tile further shrink wrapped together. The interesting thing about this tile, and I'll have to confirm with Margaret, is that it doesn't come attached to a fiberglass mesh. If this is how all the tile comes, then there are two implications. First, it could be installed on our concave curved wall because we can set any grout width we want. Second, it will be much more expensive for the tile installer to install since he has to set each piece by hand. It's a beautiful tile, so we'll have to get price differentials before making a final decision.

Despite the cold and three inches of fresh snow,
Old Country Stone finished the cinder block portion of the gazebo fireplace. The height of the chimney is still below the peak of the gazebo and a little bit of the clay liner is visible under the plastic they're using to stop water. The entire thing needs to be parged so the stacked stone exterior can be applied. I'm not sure how the chimney top will be finished, but eventually we'll want a copper box similar to the house chimney installed on top. It would be good to block water and snow infiltration from the top, but not necessary since it's all outside.
Here's what the inside of the gazebo currently looks like. They've started parging the bottom of the fireplace and completed the shoulders. The benches remain the same and there's a small corner that we'll want them to finish before they move to adding the finishing materials.
The front of the fire bricks have been covered with parging concrete in preparation for the finishing stone. We'll have a keystone arch design around the opening but the rest will be covered with stacked stone. There's still a void in front of the fire box so I'll have to ask what that's for. It's not deep enough for wood storage and it doesn't go all the way to the floor.
Copper flashing and roof shingles still need to be installed on the gazebo roof. This will probably happen after the exterior stone is applied since the roof stops the stone. The fireplace doesn't extend much past the gazebo roof, so it's very slim and doesn't block any view to the back yard. I'm not sure if they'll install stacked stone on the shoulders of the fireplace or put a slab of blue stone up there. I think either would look equally nice.
Here's a shot of both fireplace chimneys together. I'm really happy with how the gazebo is turning out. It will look fantastic when the stone is applied to both, and if the weather holds out, it may happen within the next few weeks. I can't wait to get some fires burning in the gazebo and anticipate using this space in every season.
One shot I didn't get last week was the gas pipe exhausts coming out of the chimney. Since they're gas all that's required is a vent pipe with material to block any critters from getting back down. We'll be installing a copper chimney top box at the top to hide these two vents, and the entire chimney will be clad in the same granite boulder as the wall. We'll have to wait until we can get a skytrac on site to finish that off.
So that's about it for this week. I know another week has gone by without drywall and attic insulation, but there's still visible prep and cleaning around the house, so I'm not concerned about progress. We'll be getting a delivery of drywall this week, so next week might see some installed. Once we reach that step, it's just drywall and exterior work to complete until we move on to trim work and finishes. Doesn't seem like much, but it's the most exacting part of the build so we have to be very detail oriented.


No comments:
Post a Comment