Winter is back for one more go at us with temperatures in the high 30's and low 40's for the week. We may have gotten a light dusting of snow, but progress still moves forward! Seems like the flood gates have opened (with cash just pouring out) and work is progressing at a great pace from week to week. Most of the roof now has decking with only the junctions and greatroom remaining. The turret continues to take shape and more interior walls have been added. We're hitting our fifth bank draw now pulling money for all the roof and rough lumber, plus kicking some in out of pocket to cover costs not anticipated in the initial budget.

Here's the front of the house now. The turret has a real roof structure and almost all of the front of the house has roof decking. The laundry room roof planes are connected to the main house plane but the extended plane near the turret still needs to be constructed. I imagine it will happen similar to the one over the garage, once they figure out how to connect the main roof to the turret roof.

Here's the laundry room (above) and dining room (below) window openings. The insulated gable end was finally installed along with the roof decking, so this area is pretty much complete. The laundry room window will be interesting since the window itself is an arch top with two casements below, and the window trim will actually extend up over the header beam at the top of the arch. I think it will give the illusion that the room has a cathedral ceiling when it's really just flat . The windows will be divided by the porch roof which will be nice to break up this wall a bit so it doesn't look so monolithic. Too often we see houses that are just a huge wall of brick or siding without any break in the visual features. We were very careful to avoid that look.

Here's a shot of the mudroom when viewed from the kitchen. All the mudroom walls are up and they now adhere to expected measurements. As with the rest of the house, the studs are steel and the doors are framed in wood because you have to have something to screw the pre-hung doors into. You can see the door to the garage and how it's not bucked out on the right side of the opening. Without modifying that door opening, these walls wouldn't have lined up. Because of the garage being on a 45 degree angle to the house, this room has some angles, but it's necessary to "absorb" the angle of the garage, if that makes sense. Seen in this picture is the mudroom closet to the left of the garage entry door, the mudroom bathroom to the right (full bath), and the "locker bench" alcove just forward of the bathroom. While we made every effort to reduce useless space, there's one odd triangular storage room that comes off the garage, visible towards the right of the picture. This room is only accessable through the garage and will be used to store... whatever. The room all the way on the right of the frame is the dining room.

Here's what it looks like to
walk in the garage entry door. The
closet is to the right and the bathroom is to the left. Also on the left (exterior) wall is a door
that leads to the back porch and back yard.
We figure that this will be one of the main entries from the back yard,
the other being the sliding door near the kitchen, visible at the center of
this picture. Because of the utility of
this door, we're finding that the full bathroom here will be especially useful
and imagine using the shower to wash off dogs or kids coming from the
pool. The shower will be designed
accordingly with appropriate durable and easy to clean materials. I've contemplated using a utility basin sink
in this bathroom rather than a normal undermount since it would be nice to have
a deep sink that I don't have to worry about dirtying up. This can be finalized a bit later. You can get a better idea of the locker/bench
alcove looks like, to the left of the door to the kitchen. We’re not entirely sure what we want to use
for the kitchen door, if we have a door at all.
We were thinking maybe a dutch door that swings to the right. That way we can keep any dogs we might have
in here when we need to segregate them, but not completely close them off. We’ve also contemplated pocket doors, but
couldn’t fit it in since sockets would be needed in the kitchen walls both to
the left (fridge/freezer) and right (ovens) of the door.

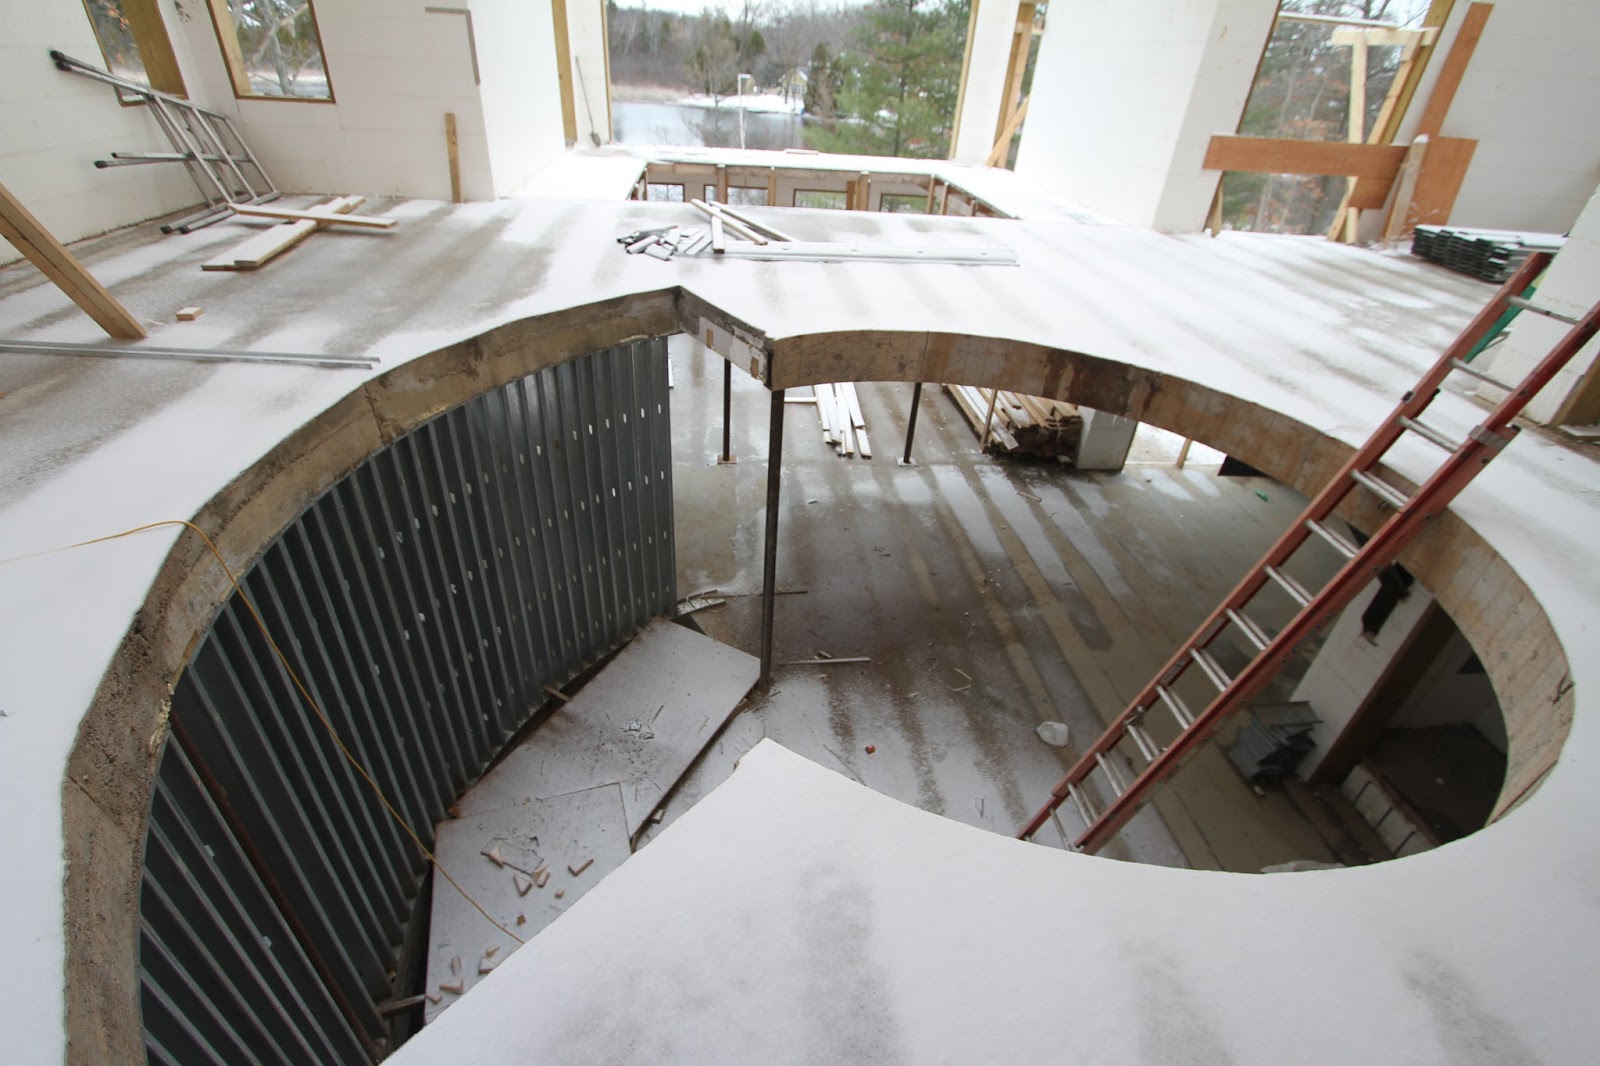
So they cut out the un-needed curved
I-beam from the rotunda structure, in anticipation of the stairs. Through careful engineering, no support
structures will be visible in the rotunda so the stairs will only be enclosed by
railing. We’re having a hell of a time
trying to decide what we want to use for balusters and railing. We floated the idea of glass panels to
Margaret, but it seems like using something like that would be counter to the
general design of the house (too industrial?).
We’re not really keen on any highly figurative railing and would like to
opt for a clean and “invisible” look.
Still working this one out.
You can also get a glimpse of
all the roof decking on they’ve installed on the side of the house. So the curved wall will extend from the first
floor to the second, all the way up to the ceiling. Just on the other side of the curved wall is
another bedroom/bathroom/closet, similar to the one downstairs. At first, we were wondering if the closet
will be big enough, but then realized how ridiculous that was since neither of
us grew up with our own walk in closet.
I like this picture, because you can get a feel of how open the rotunda
will look with the greatroom.

New walls upstairs! Here I am, standing in the master bedroom
viewing the master bathroom and master closet beyond. The doors to the master bath will be double
doors, but we’re not sure if we want them to be full double doors, or a reduced
width double door so the doors can be open and flat without interfering with
the master vanity, just to the left of the door. We figure a reduced width double door would
still be wider than a standard door width, but more compact than a full 64”
opening. Still deciding on the door
itself. At first, we liked the idea of
frosted glass, but then realized that any light pouring through in the morning
from one person getting ready, would fall on a person still sleeping. Margaret floated the idea of a sliding barn
door and we can see the utility of it, but still getting used to the look. A sliding barn door would solve the problem
of door swing space, but I’m not sure if it would be as effective blocking
sound.

Here’s the inside of the master bathroom. The water closet (toilet room) is on the
left, shower on the right under the window.
The window will be an arched “eyebrow” windows and it’s about
five-and-a-half feet off the ground. There
will be a curved pony wall in the middle of the space so that you can enter the
shower from either end. The pony wall
will house the shower heads and will be spaced about six feet from the exterior
wall. A long bench will run along the
exterior wall so the actual shower floor space will be just over four
feet. As mentioned before, this will be
a zero threshold shower. With the pony
wall extending only seven feet up there’s some concern that the shower will
feel cold because it’s not enclosed. I
guess time will tell with this.


Current design is different
than the blueprint with a single long floating vanity framed with towers. I’ve made a few 3d mock ups. The directional grain walnut cabinet material
is accurate, but the tiles aren’t.

The tub will be housed on the
other side of the shower wall, which will be nice because then the shower wall
can house all the pipes. We’ve narrowed
down the tub to a few choices, and are prioritizing length and depth over other
features, like air or lighting. We have
a jetted tub now and find that we rarely use it. We’ve seen a new wave of “bubbler” tubs,
where small bubbles come from the floor of the tub but decided against it since
we really don’t have a place to house a pump, and probably wouldn’t use it much
anyways.

Here’s a shot of the master closet and master bathroom, while standing
in the laundry room. There’s a wall that’s
yet to be installed that will separate the laundry room from the master closet,
which is good, because I got a chance to remind Matt that we want to push the
laundry room wall into the master closet by a few feet. This will accomplish two things. Currently, the laundry room window isn’t
centered in the room and that’s pretty annoying. Second, it will give enough space for us to
put the washer/dryer on the shared closet wall rather than having it on the
shared bathroom wall. This will put some
noise buffer between the laundry machines and the master bedroom. Even with the concrete floors, I was having
nightmares about the machine vibrations reverberating on all the hard surfaces
of the master bathroom. Also, this might
give a little better flow to the room and segment the washing area from a
potential craft area. It would have been nice to keep the laundry machines on
the shared bathroom wall to consolidate the pipes, but it’s not much distance
to move. We’re going to make every effort
to soundproof this room as much as possible.
The good thing is that it doesn’t share any walls directly with bedroom
space. Also, the concrete floors should
go a long way to dampening vibrations.
While we might not go as far as double walls, we might use green stuff
sound isolating goo, insulation in the walls, and sound dampening drywall. Our current house has the laundry room
separated to the master bedroom by the master bath, and drainage sounds and
spin cycles can still be heard at night.
Of course, the floor joists are shared so vibrations can propagate to
the bedroom, which will be alleviated by the concrete floor.

Here’s what the turret looks like from the inside now. You can see the plywood decking they
installed above the ceiling joists. Not sure why they did that I think the
joists are 2x6 so I’m hoping that allows enough space for lighting. It will make for a great surface for spray
foam at least. We’ve entertained the
idea of installing fiber optics into the ceiling here to simulate a starry
night. If I have access to this space
from the main attic space, then I could definitely make this happen. The plywood would complicate the process, so
maybe I’ll get a chance to run the fiber optics before they install the drywall
on the ceiling.

Here’s a better look at the turret ceiling. You can see that the truss structure allows
for the turret circle to be completed on the ceiling. I’ll definitely have to get up there and
install fiber optics before the drywall comes in. I’ll also have to be present for the drywall
install, because each fiber optic needs to be drilled through the drywall. I’m sure this will be a huge pain in the
butt, but the results would be awesome.
Here’s what the rotunda looks like from the end of the walk way. The
stairs will come up from below on the left with the landing across from where I
took this picture. The fireplace
structure from below will be in the middle of the opening to the greatroom with
this landing having its own fireplace.
The great room will be open to the left and right of this
fireplace. Since the both the fireplace
in the greatroom and on the landing are gas, there’s not much exhaust piping
that’s required but will still be housed in a chimney box. It doesn’t have to be a true masonry chimney,
but will use the cobble stone exterior where it exits the roof. As for the rest of the rotunda, there will
need to be railing in the middle, which will be connected to the one coming up
the stairs. The first bedroom door will
be on the left, the master on the right, then going clockwise around the
rotunda will be elevator, laundry room, then finally the turret room. The rotunda walkway terminates at this spot. We’re imagining a nice long hanging
chandelier in this space, and a tall Christmas tree during Christmas.

Here’s the exterior shot of the turret roof structure. I think they did a fantastic job of making
2x4 come to a sharp peak. You can see
how they alternate the length of every other truss to achieve the point. The overhang is generous enough and the roof
pitch is perfect. It’s really starting
to look like a modern Victorian.

This last picture is a shot of the side of the house, now that the
turret is nearing completion. When
completed, this side will also be bisected by the wrap around porch, which will
sit ten feet off the grade. On the
basement level, you can see the side walkout and mechanical room window. Left to right on the first floor is two guest
bedroom windows that flank the bed, the guest bathroom window, and lastly, a
study window. On the second floor is,
again, two windows that flank a bed, the adjoining bathroom window, and the
turret. Both bathroom windows on this
side of the house are static oval windows, adding to the Victorian look.
Now that we’re into April, the
expectation is that we’ll finish the roof by the second or third week of the
month. With the walls being co-currently
built, we can then call in HVAC to mark and run ducts. After that it’s other rough mechanical;
electrical, plumbing, and lighting and data systems. I’m not sure how long that will take, but I’m
hoping on a month or so. After that, we’re
looking at drywall and finishing! Could
the end be in sight? Maybe just over the
horizon.
No comments:
Post a Comment