Showing posts with label Roof. Show all posts

Monday, October 10, 2016

Copper roof started. Lots of progress elsewhere.

   A week into October and we're starting to see the begining of colder weather.  Temperatures are bouncing between nighttime lows of 40's F and daytime highs in the 70's, but progress is hitting a little surge.
   The copper roofers started on the turret roof on Friday, prepping the valleys where it meets the rest of the roof and covering the cone with an ice damn material.  They also started the drip edge flashing so I can show you pictures of how it's supposed to be done.  Hopefully the difference between the turret roof and curved porch roof won't be so blatant to be annoying.
   Lots of other progress from the carpenters around the outside and inside of the house.  All the windows are in, save for the replacement in the great room and laundry room, which we should see this week.  Exterior window and house trim is going up and missing interior walls are filling in.  At this rate, we'll be sealed in for winter.  What a difference from months previous. 

   Here's the state of the front of the house.  The turret windows have been installed on this side, but there are still two around the other side that have yet to be installed.  They'll probably go in this week, but the copper roofers have a scaffold set up in one of the window bays, so once they're finished, all the windows can be set.  Additional roofing membrane was finally installed on the turret roof.  The weather vane rod still needs to be installed, but the sky-lift was having some issues last week, so they couldn't get it done then.  It will go in before the copper roof work starts.  We'll be getting the actual weather vane in November, so the Dragon will be guarding the house well before we move in.


   Here's a little closer look at the turret from the ground.  You can see the additional membrane installed in the valley between the turret and flat roof.  This actually covers some of the copper flashing that protects the valley.  It's a generous overlay and well worth the effort.  The red metal hook is temporarily installed so the roofers can support their ladders on something solid.  The bolts secure under the shingles, so there's little chance they'll affect the waterproofness of the roof.

   Here's a close up of the valley, taken from the ground.  You can see where they started the copper drip edge and the same thing is done on the other side of the turret as well.  The copper valley is complete all the way to the top, so I think once they finish the drip edge, they'll install the standing seam roof.  It should take them a couple more days to finish, so the next update will have the final product installed.  The copper roofers will then finish off the asphalt shingle to meet up with the copper valley.

   Window trim is almost completely installed on all the windows around the house.  Here's the self adhesive flashing material they used over the nailing flange, under the trim.  The trim itself is a 1x4 pre-primed rough-sawn cedar, that will be painted white.  Originally we wanted Azek white trim everywhere for ease of maintenance, but since the HOA rules state that we couldn't have cement board shingles on the first floor, and we didn't want to mix the exterior materials between the first and second floor, we decided that we would use wood shingles everywhere on the house.  Once we knew we were going to have to deal with the painting maintenance of the house siding, it was a small leap and cost savings to change the trim to wood as well.  That way, the painters don't have to mask off the Azek to paint the shingle, which makes the painting labor easier and less expensive.

   Here's the exterior of the dining room window.  The top and bottom trim pieces are missing because they'll be treated differently.  There's just enough room at the top of the window to have the house trim, the piece that goes across the entire underside of the porch roof, act as the top trim piece for all the windows.  The bottom won't have a wood trim piece, but rather, a stone sill.  The stone will be the same material as the brick ledge, just dropped down for these windows.  There's a single piece of trim board installed between the two casement windows, which is a really nice touch, and makes the window look like one unit.  Attention to detail is important in this stage.

   Here's one of the side windows under the porch.  Again, the side window trims are installed with the top one being a single long trim pieces under the porch ceiling and the bottom will be the brick ledge.  The brick ledge will be a limestone material and acts as a flashing and border between the cedar shingle and granite cobble.

   Moving inside, almost all the great room windows have been installed.  The only one missing is one that arrived damaged, and will be replaced by Pro Brothers this week.  All the windows on the back wall are non-functioning.  We wanted the best view and casements would have closed in the frames.  The upper windows have internal mullions to carry on the look of the rest of the house windows.  The arches still need to be boxed in, but you can get a good feeling how they're going to look.

   The lower windows on the side of the great room are double casements.  The upper window is a non-functioning full arch, but I forgot to get a good picture of it.  I think having these two lower windows, one on each side of the room operable, will give us enough ventilation for the room, especially considering there's almost always a breeze.  Not only were these rear windows set, but they were also insulated with expanding foam.

   Here's a shot of the same window, down on the sill plate.  They just used a standard low expanding polyurethane foam for the joints, which should be good enough.  Sure there are newer methods and technologies for air sealing windows but this is the standard now.  I'll take the thermal camera to the joint during the winter to see how well this method seals up.

   Here's one of the non-operable great room windows, all sealed up.  You can see they added a 2x6 to the window buck to adjust the opening to fit the window, then foamed against that.  That 2x6 will have to be extended into the rest of the window opening for the window finish but that's up to the finishing carpenters to do.  The difference in noise and temperature is amazing.  Because of all the water surrounding us, we can hear a bit of road noise from the main road that runs about a mile away from us.  With the windows in place, the noise is gone and the temperature of the house is much more stable.  Winters here are going to be beautiful.

   Here's how they foamed in the oval window in the guest bathroom down stairs.  The gaps between the wood stud supports were filled with foam and trimmed down a bit.  I still need to discuss with Mike how these window openings will be finished.  I would expect there to be some kind of an oval "tunnel", which will be more difficult to make, but the correct implementation.  We just need to be on the same page.

   Besides windows, the carpenters built up some of the walls that needed to be moved.  Here's the final location of the turret bedroom wall, which needed to be moved because of the HVAC trunks going to the attic.  The same was done downstairs in the study but that room only lost the alcove rather than having the entire wall moved.  I'll have to see if we can get this duct space insulated, not only for energy efficiency, but for sound as well.
   Here's the study wall that was created to close off the alcove space.  Although we're losing the alcove, we'll probably make up for it by making this whole wall shelving/filing storage space.  The plan right now is to have and L shaped desk, that sits more towards the middle of this room so that we're facing into the room when sitting at our computers.  My back will be to this wall so I'll have a nice view out the front of the house.  We're making sure to get enough electrical and data pulled through the floor here so we don't have cable runs from the wall to the desk.  I'll have to make sure to keep a clean desk in the future because my current desk is a mess.

   All three sliding doorwalls have been installed.  The one pictured here is in the kitchen area and two more are downstairs in the basement.  The opening needed to be furred down to fit the height of the sliding door and although it looks and feels a bit low, it's a standard height sliding door.  In my next update, I'll detail the features of the door itself but my initial impression is positive. The door comes with a foot actuated lock and the door itself is lockable.  The screen has a latch as well, but it's not lockable.

   Here's what the doorwall looks like from the outside, on the back porch.  The door and screen glides smoothly on the track and I don't expect any troubles from them.  All the gliding hardware is stainless steel with multiple rollers.  The door handle is powder coated steel with a single thumb latch for the locking mechanism.  The frame, rails, and stiles are all foam filled for insulation, and the sill is aluminum.  We had the option of internal blinds, but decided to forego that feature. 

   Here are the numbers for the doorwalls, which are closely in line with the rest of the windows.  The air infiltration is 0.12 CFM, which is just about as low as the windows, which is impressive.  There aren't as many seals, and the by-pass design of the door inherently allows more air to infiltrate.  The glass spacers are non-metallic like the windows which reduces condensation on the interior.      Regardless, I'm happy with the numbers and don't expect the door to be overly cold.
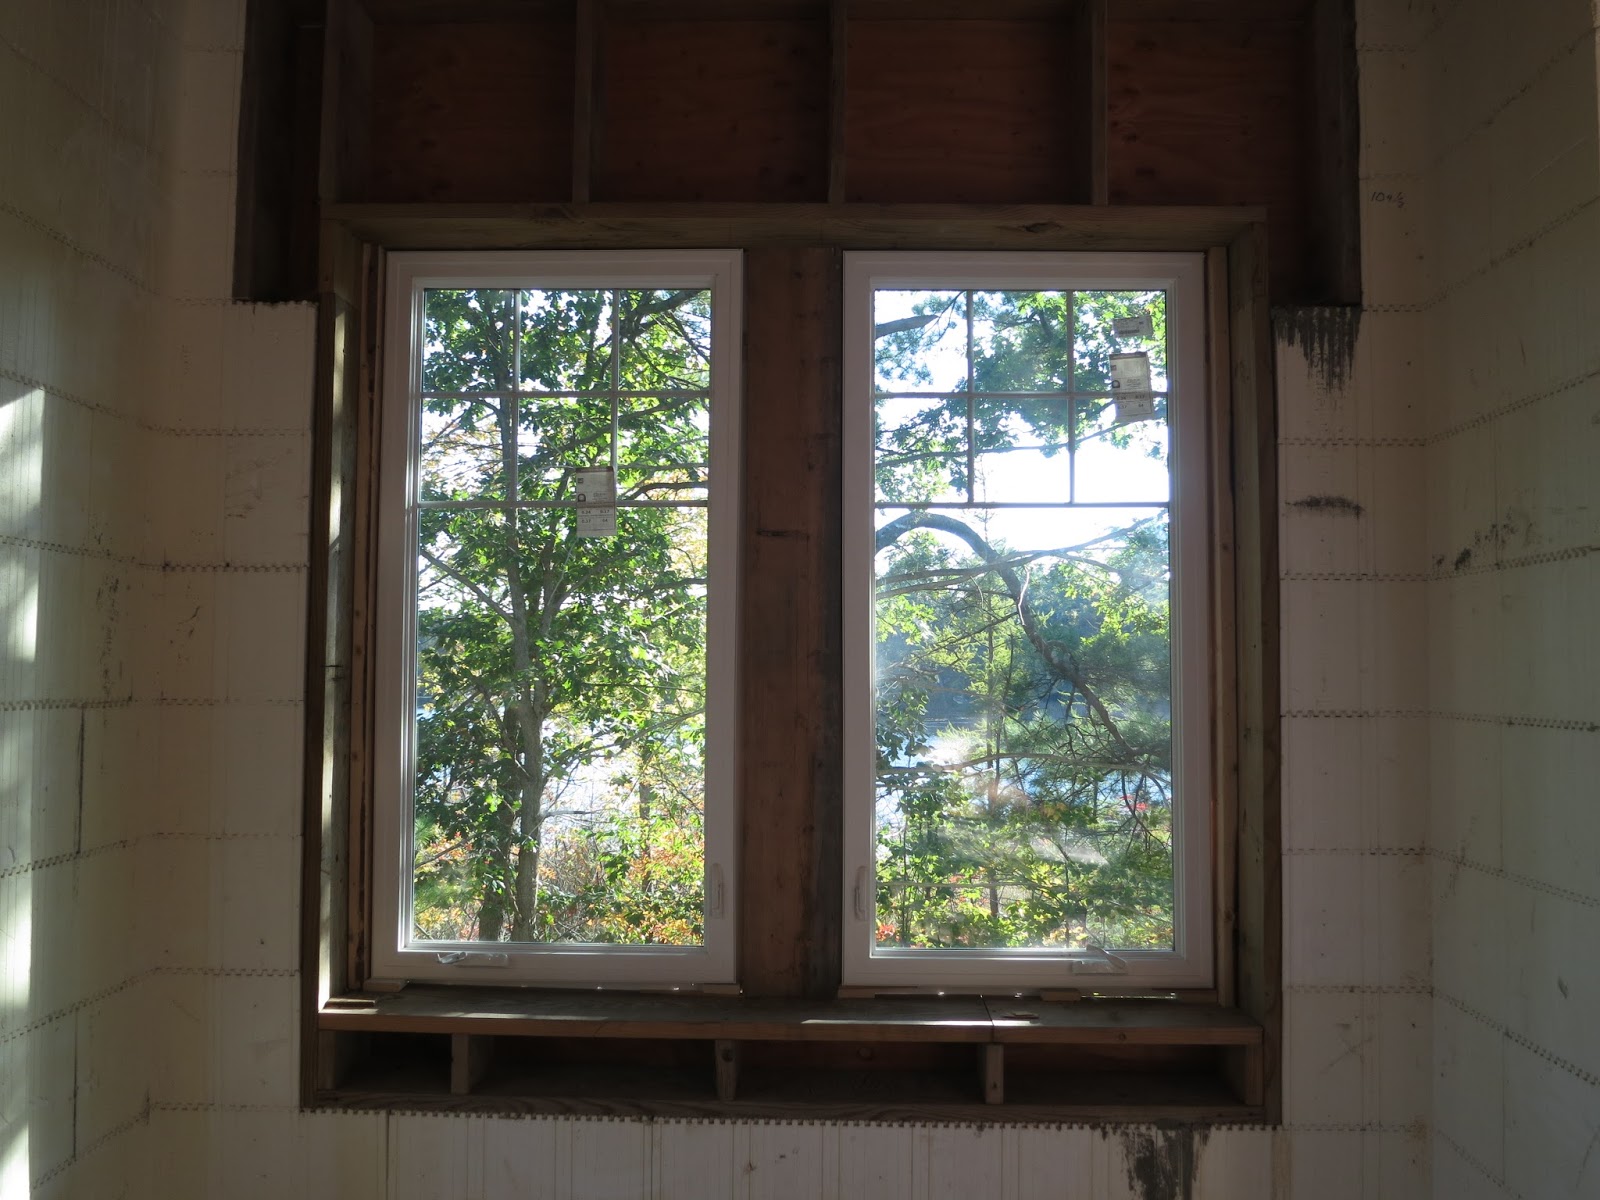
  Here are the installed windows on the side of the garage.  Even though this is a great view, we decided to get casement windows here so we can vent the garage.  Looking back, it's probably not necessary since we have garage doors on both the front and back of the garage, but it still might be nice to have these operable.  I'm really looking forward to building a gardening workbench in this space and having a colder place to overwinter plants, or put seeding trays for the garden.  This south-facing windows will allow for great sun during the winter.

   Here's the work that was done on the master balcony.  There used to be a straight pony wall here, but we had the idea to make this wall angled down to the pitch of the roof.  When we finish this, we'll have triangular glass piece fabricated to act as the railing here with normal rectangular glass railing on the face of the balcony.  Angling this wall really opens up the balcony and allows more light through.  There's big difference to the feel of the space.


Here's what the inside of the turret looks like now that the windows are in.  Two to the right aren't installed yet to give the copper roofers some space to work.  We decide to go with a full grid in these windows and feel that it really adds some charm to this room.  I'm not sure how we'll do window treatments, but it will be a trick since there isn't much room between the windows for curtains.  The sills should be deep enough for blinds if we go that route but I think that would detract from the aesthetics of the tall windows, even when the blinds are open.

   Here's a single window from top to bottom.  They're actually comprised of two windows attached together with brackets and all together stand seven feet high.  We're not planning on installing any window benches here, but rather keep it open and put comfortable furniture in here when needed.  Each of these lower windows are casements and open to the left.  We're hoping this will make a nice little play room for the twins, so we don't have to have toys all over the house.  Wishful thinking?

Here's the second floor oval bathroom window from the outside.  You can see how they applied the window flashing in a overlapping manner to shed water downwards.  Also you can see some of the house trim that runs under the roof overhang, that will be incorporated into the window trim.  Here it cuts into the oval, as it does with the round window in the front.  The rest of the round trim will just meet into this house trim. 

   Here's how the window trim ties into the house trim on one of the regular second story windows.  I think it's an elegant solution to a tricky situation.  Ultimately, when the trim is painted, it will all match nicely against the gray cedar shingle paint.  All the trim is the same 1 inch thickness, just different widths depending on where it is.  

   Here's a shot of the side of the house looking forward towards the turret.  It gives you a good idea of how the house trim meets up with all the windows.  This will happen on both the first and second floor, as well as some corner trim on all outside and inside corners.  The trim needs to be installed first so it can be caulked and painted before the shingle goes on.  The shingle will butt right up against the trim.

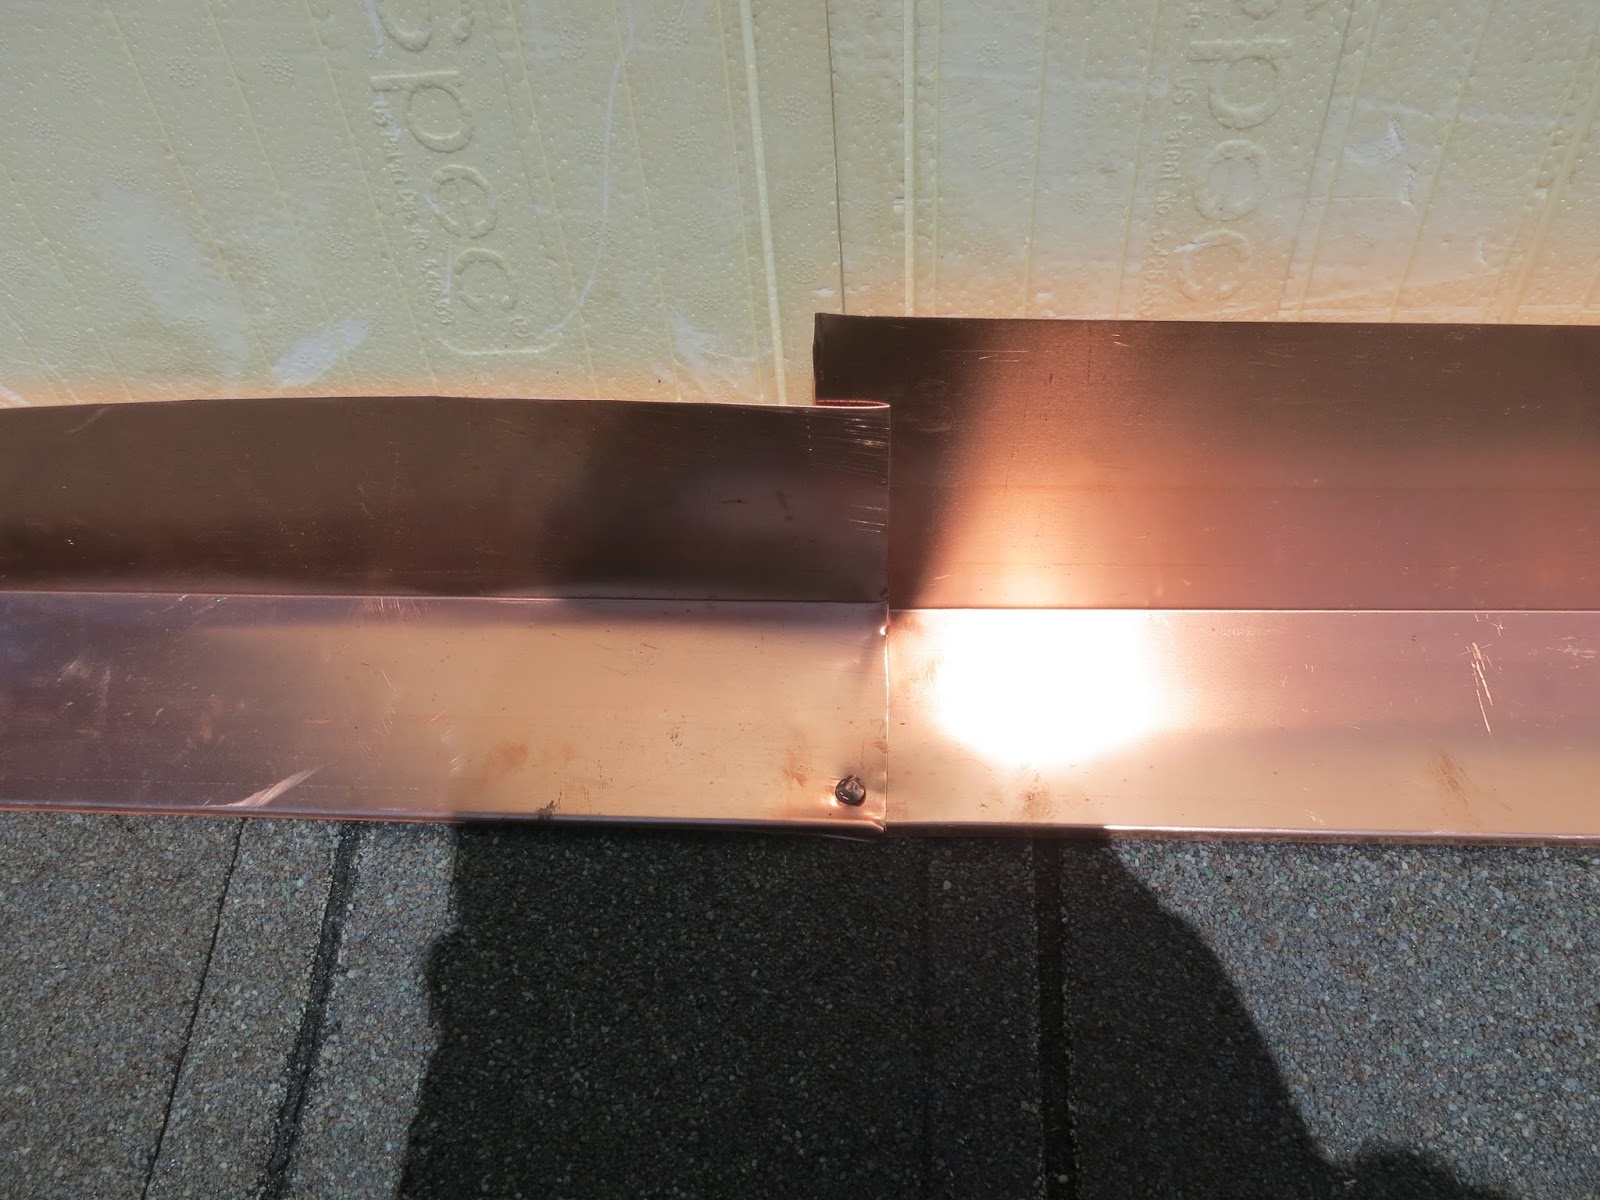
   I climbed up on the scaffolding a bit to snap a picture of the copper valley that's being installed between the turret and the house.  This is how it should be done.  The copper is overlapped to shed water downwards, and the seams are soldered tight.  The valleys that the other roofer did overlapped properly, but are caulked, which might be okay in the short term, but in the long term will eventually fail due to the different expansion rates between dissimilar materials.

   Here's a close up of one of the solder joints.  This type of joint won't break with temperature fluctuations and will remain waterproof for at least 100 years.  It might look a little messy, but considering the joint itself is a couple inches wide, it's not too bad; you're just seeing the edge of the joint.  The copper sits under the ice and snow membrane a good six inches so I'm very confident in this valley. 

   Here's how the straight roof overhangs were boxed in and terminated at the turret.  These were left open by Matt and no that the turret roof is going up, they can be closed up and finalized.  It will all be painted white before the shingles go on, so even the old cedar boards won't be unprotected when the winter comes.  We'll have to make considerations for all the water that pours off the valley since it might hit this area.  We didn't think we would need gutters on most of the roof, but we might need something here.

   Here's a close up of the start of the copper drip edge around the turret and a fine example of how it should be done.  This is a single piece that is snipped on top and crimped below to form the curve.  The other roofer just used lots of 6" sections to form the curve, which is a much less elegant solution.  Also, make note of the nails...

   Hey look, stainless steel nails.  Remember that the other roofer used hot dipped galvanized (zinc) nails, which is a huge no-no on copper.  The best way to go is copper nails, with stainless steel nails coming in second.  The stainless steel is not too far away from copper as far as galvanic potential so they won't be eating each other up.  Do it once, do it right.

   Here's the exterior side of the great room.  The top windows are arched so they can match up with the arch of the rear windows.  Below is the operable casements.  This is one area where we will probably need some gutters so the water falling off the roof can be taken far enough from the house.

   This window opening will eventually be filled with glass block when the masons come through.  It's a window for the mechanical room in the basement, so we don't need anything fancy or clear, just something to provide good light.  Right now it's just boarded up to prevent access.

   Both of the sliding doors are installed in the basement, so with the plywood in the glass block opening, and all the other basement windows installed, the basement is now closed up.  I have one set of keys for all the sliders and kept the other with the doors.  The basement is the first floor to be completely closed up.

   Some of the metal studs are in the master bedroom, waiting for installation for the dividing wall.  It will be a little bit of a trick to pull off since it's a free standing wall.  Some of these studs might be used in the bathroom as well.  We might need to end up making more of a narrow box rather than a single thickness wall so it can remain rigid and self supporting.  

   These turkeys decided to check out our build progress.  Don't they know Thanksgiving is coming up?

   So that's it for this week.  The next week should see the completion of the copper roof, installation of the geothermal wells, and maybe the completion of the house and window trim.  We need to decide on steel doors for the garage entry doors and get final measurements on the exterior doors in the mud room and great room.  The carpenters are also framing out the garage door openings and all the interior door openings since they weren't quite at finished height.  We have a meeting with Mike this week to review the proposed budget and settle up on some of the work that has progressed outside the bank.  Things are definitely moving in the right direction now!


Monday, July 11, 2016

All that's left is the copper cone.

   The weather is staying pretty hot so it's good that the roof shingle is all completed.  There's a little finishing work to do on the flashing and a good amount of clean up and that should conclude this week.  We're getting a quote on the copper roof turret to determine if it's feasible.  Alternatives would be to either just shingle it or install a copper colored metal roof.
   We actually met with the roofer to discuss the options and do a little walk around of the install.  I again broached the subject of the beer and wall damage and he again denied it was his guys so I think that's a dead end.  To my untrained eye, everything looks pretty well installed.  Sure there are a few odd flashing spaces and I would have like it if the flashing was overlapped a bit more, but everything should be okay.  Probably not the highest pinnicle of craftsmanship, but adequate.

   So here's the roof completed.  There's a little bit up at the turret that needs to be finished, but I think it's because they're going to apply Winter Guard to the entire turret and the copper flashing here still need to be installed.  I walked around the porches on the front and back and the shingle application looks clean and flat.  I don't see any apparent patterns or seams so it seems like they installed them with a good stagger.  From the ground, it looks great.  You'll notice that the waste pile looks a little smaller.  That's because the roofer managed to use a good amount of it on the curved porch section.

   Here's the last section that needs to be completed.  You can see the Winter Guard peeking through the void.  The plywood on the turret has a little sheen on it, so it's easy to imagine what the copper will look like.  I wasn't crazy enough to climb up on the top roof, but the pitch allows me to get a good enough look at the installation.  All the ridge vent has been installed.  I'll probably have to ask Matt to get some house wrap up on the chimney box and install a temporary cap so we can really be dried in.  The scaffolding on the turret will remain at least until the copper is put on the roof.  After that, the overhang on the turret can be completed.

   Here's how they ended up doing the drip edge around the curved porch.  They cut sections of drip edging and overlapped each a bit on the next one over.  Not the best way to do it but again, acceptable.  I would have preferred them to use downspout crimpers and crimp the nailing flange to achieve the desired radius.  This is an illustrated example of an adequate roofer and a good roofer.

   Oh hey look.  Copper nails.  This flashing is exposed to the elements and as such should definitely have copper nails.  I would have preferred copper nails everywhere, but the roofer insists that they're not needed. I'll keep a close eye on the step flashing that has the galvanized nails to see if it starts to corrode before the siding is applied.  If I see any sign of corrosion, I'm having the roofer come back and replace every single zinc nail that touches the copper.  I've gotten too much advice, warning me about zinc+copper contact.  I'm still thinking about hiring an inspector to get some backing.  Again, notice that the overlap of the two pieces is only about an inch.  Two inches would have been better.

   Here's what the gable peak on the front porch.  It looks like a good installation and the copper looks pretty fantastic.  Definitely something that I haven't seen driving around the neighborhood. Most of the roofs around me are ashphalt shingle, with some concrete tile.  Most roofs have a standard dimensional shingle and no metal valleys so this house will have that unique detail.

   Here's where the porch roof meets the curved porch.  They didn't install a copper valley here and when I asked about it, the roofer said that there's a foot of overlap in the shingles so a valley isn't needed.  I guess this is acceptable since there isn't a steep roof pitch between the two sections so I don't expect a heavy driving water force to push under the shingles.  You can also see how they installed the flashing around the curved turret, step flashing with copper nails. The roofer said that the step flashing will also have a copper adhesive to seal the edges.  Sealant will fail in time so I'll have to keep an eye on this area in the future.

   Here's a shot of the turret and front porch roof.  As I mentioned earlier, the roofer managed to reduce the waste pile and use the cut-offs on the curved section, since the curved roof requred shorter lengths.  Because of how this shingle is, there's a bit more waste when compared to other types of shingle.  You can't reuse a section if there's only half a "slate" on the sheet and you don't want to use short sections on the main field of the roof.  Roofing this curved section allowed us to use the short pieces and I think they did a pretty good job with it.  There are some areas where the shingles are too linear, but it's not a glaring issue.  

   Close up of the step flashing installed around the turret.  Again, since this is sitting on top of the shingle, copper nails were used.  I'm not sure if this kind of thing could have been a single piece.  I'm thinking that maybe another roofer would have used a single piece of copper and sent it through a roller to achieve the desired radius.  It would have taken less time for installation since there would be less cutting and fewer fasteners, but it would require some dedicated tools.  More of an aesthic annoyance than anything else.

   Here's the other side of the turret.  There's the same transition from the curved roof to the straight with the same shingle valley application.  The copper valleys are intentionally kept long on inside corners so the water will pour off the roof away from the house more.  I wonder what the noise level will be in a heavy rain storm with all that water running off the valleys.  Probably won't be able to hear it inside the house since it's ICF, but it will be fun to see buckets streaming off the roof.

   So that's it for this week.  When I talked to Matt last week he said that we're looking at getting the water and sewer trenched, pool excavated, and  garage slab poured.  HVAC should be coming in this week to start cutting the floors and I'm getting in contact with Pro Brothers about getting us scheduled for windows.  I got a chance to meet with another couple who are using Ken as their builder.  It was a nice opportunity to compare notes on our experiences and share thoughts.  I look forward to watching their progress to see if my slow experience is unique.

Monday, July 4, 2016

Rooooooof and wood.

   Hey!  Looks like we have a roof going up!  The roofers started work last Monday and got all of the garage, most of the back porch, including gazebo, and pretty much most of the second floor roof completed.  They still need to put copper on the turret, finish off the front porch, and finalize the finishing touches all around.  I contacted Great Oaks last week to inform them to try to pencil us in for the front landscaping completion, but haven't heard back from them so I'll Pro Brothers to tell them they can come and install the windows in a week.  Looks like we'll be closed up soon!

   Here's what the front of the house looks like now.  I think the Certainteed Grand Manor is a pretty good facsimile to slate and I've seen it on some really nice houses.  They give it a lifetime warranty, but they're pretty stringent about the installation procedure, so if anything is off, it nulls the warranty.  Roofers in general give it a 40 year life since it's a 5 layer shingle so I'm hoping that we'll never have to replace it in my life time.  Well, maybe we'll replace it once when we're old and gray.

   Here's the mostly completed garage.  There's still a bit of finishing work to complete at the gable end but it's otherwise finished.  You can see the ridge venting installed already.  Certainteed makes a ridge shingle, which is just a single shingle the roofers can lay on all the ridges.

   All the flashing in valleys and drip edges are copper.  This isn't copper plated either, it's true copper.  Here's the step flashing where the garage meets the house.  All the horizontal flashing is a single piece and all the diagonal is step flashed.  They overlap in such a way so gravity will shed water to the next piece of flashing, similar to how the roof is installed.

   Here's the Winter Guard they use on the first five feet of the roof to prevent leaks from ice dams that could form during the winter time.  Ice dams happen on the edges of roofs because the heat that escapes from the conditioned space inside the house heats the roof, which melts the ice and snow.  That melt refreezes on the overhangs since they're outside the house envelope.  This ice can "creep" back up the roof and make its way under the shingle, causing leaks and damage.  One way to mitigate this is to have good ventilation in your overhangs, so the roof never warms up too much.  Another way is to install this self adhesive membrane so if ice does form, it can't get to the plywood roof deck and cause damage.  It's code to have it installed, but it's always good to verify it was installed.

   Here's the back of the garage.  You can see some airlines and ropes still up on the roof from the roofers.  This section of the house is pretty much completed.  To my semi-trained eye, they did a good job with the install. 

   Here's where the back porch roof meets the master balcony.  You can see the gray underlayment they're using under the shingles where the Winter Guard isn't installed.  There's some copper flashing that will be installed here.  Usually a felt underlayment is installed under the shingles, and it acts as a water resistant material.  This is a synthetic material that purportedly doesn't buckle, allowing a smoother shingle appearance.

   Lower down in this section, you can see the Winter Guard.  Nice to see they flashed it up on the balcony wall, even though it will be copper flashed as well.

   Here's what the copper drip edge looks like.  This will be a nice detail since we won't have gutters on most of the house.  Eventually, the copper will patina to a dull brown, and maybe when my grand kids inherit the house, it will be a nice green.  We're not planning on having it chemically treated to accelerate the patina process.

   All the valleys have this "w" shaped copper flashing, which is kind of neat.  Our current house just uses shingles in the valley, but when you specify metal, they install this.  The "w" shape is nice because any water running down the roof slope with hit the shape and stop or slow it down, preventing it from forcing up under the other roof slope shingles.  These are just overlayed to run water with gravity but there might be some adhesive under the flashing.

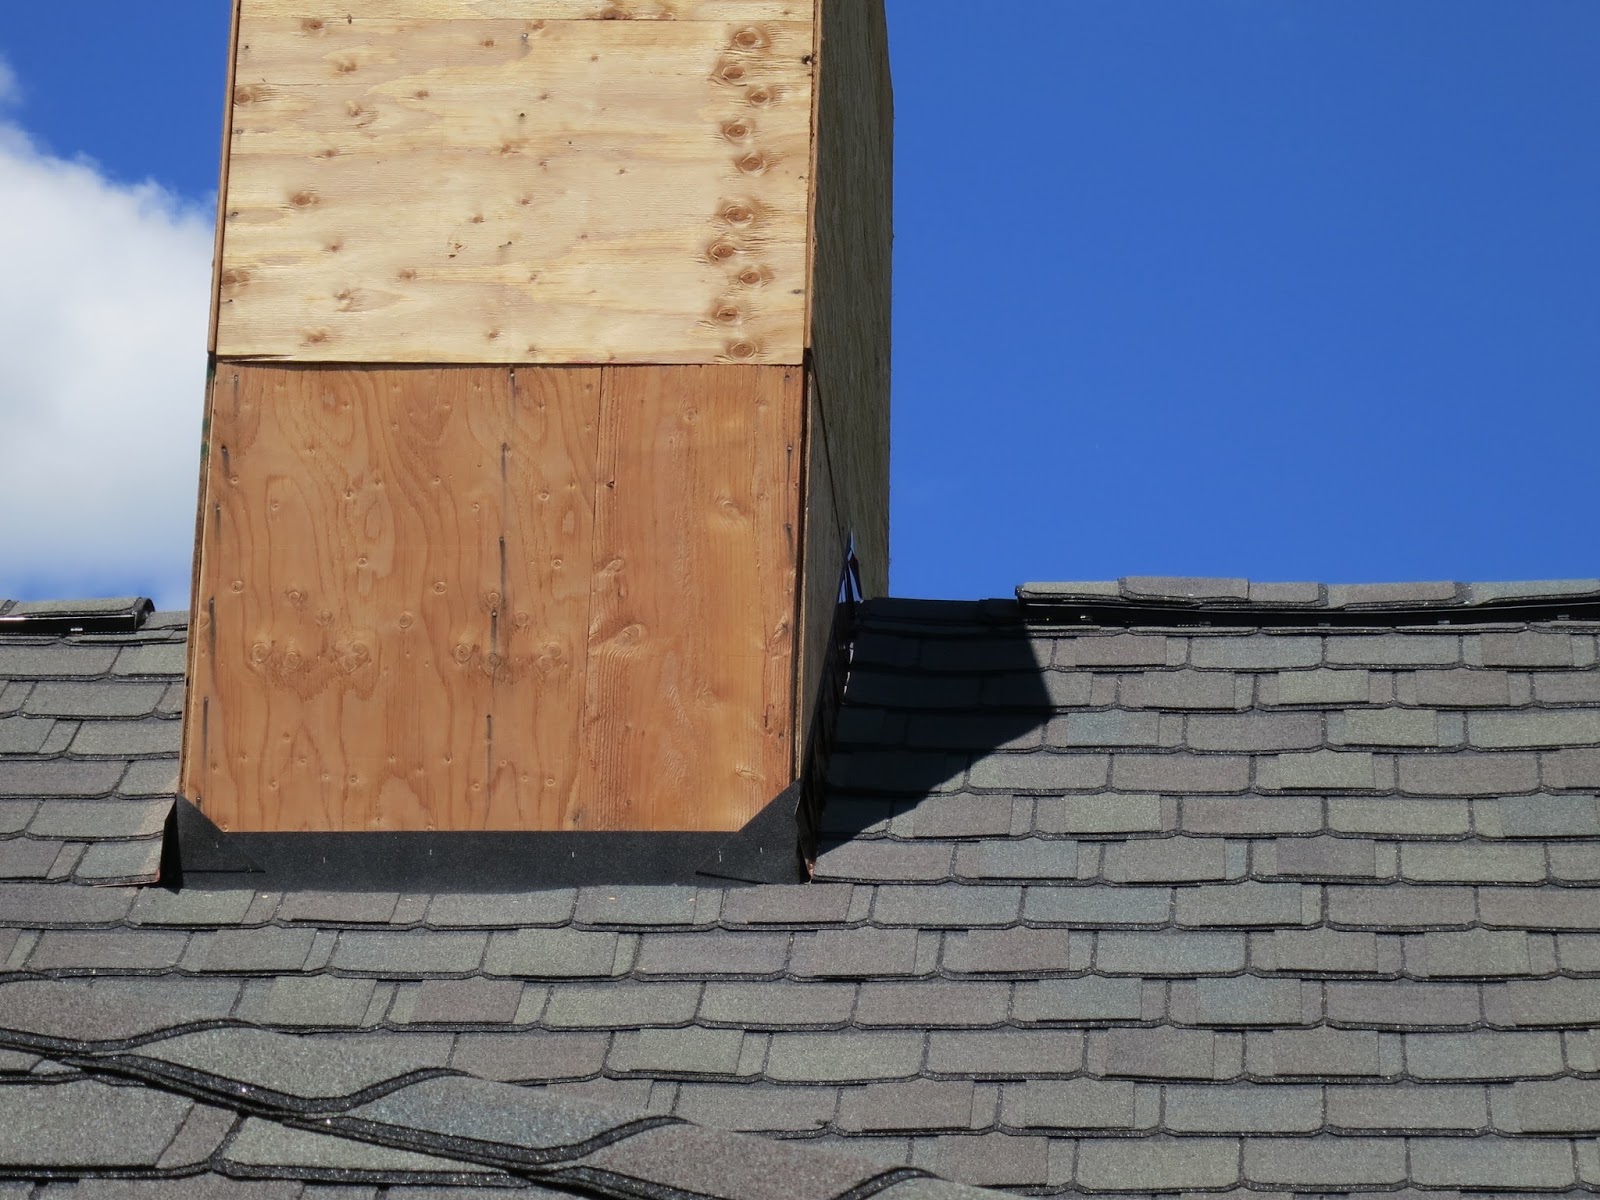
   It's a little hard to make out, but there's copper step flashing on both sides of the chimney box.  The lower side will be copper flashed with a straight piece, that sits on top of the shingle since you want the water to shed onto the roof, not under it.  You can also see the ridge vent installed at the peak, and a nice example of the ridge shingles in the foreground.  Also note that the Winter Guard has been installed up against the chimney box.  It's actually installed in every valley as well.

   So here's how the curved porch roof around the turret turned out.  Pretty nicely I think.  The roofers still need to get to this part and it will be interesting to see how they manage the curve both with the shingles and with the drip edge.

   Here's a close-up of the curved porch roof.  You can see the complexity involved with laying out the plywood to conform to the curves.  Really bang-up job with the installation here.

   In most places I've seen around the house so far, the valley copper extends out from the corner.  I'm not sure if they'll come back and trim it into the corner or if this is how it's usually installed.  I think it would make sense if we're getting gutters since this valley will extend down into the gutter, but without one, it kind of just hangs out there.

   Here's the ridge vent that's used at the top of the roof.  It's just a plastic ventilated sheet with a felt material on the underside.  It's designed to cap the roof ridge and close the plywood gap at the peak, while still allowing heat to vent out at the highest point.  Nothing special about this.
   Here's what the back of the house looks like.  We're thinking about putting a copper finial on the top of the gazebo, but that can come later.  They used a bunch of those ridge shingles to form the peak right now.  

   One last shot of the house in its current state.  The roofers should be able to finish the rest of the roof this week if everything goes smoothly.  I do have some reason to believe that thing will not go smoothly.
   Here's the state of the exterior ICF wall as you walk out the kitchen sliding door.  It looks like the roofers decided to make the wall into a dart board and shoot their pneumatic nails into my insulation.  Although there isn't any structural damage, the nails penetrated enough to reach the concrete.  Since the foam isn't self healing, I now have a few dozen holes through my exterior moisture membrane and insulation that leads right to the concrete.  I've already contacted Ken and Matt about this and I'm pressing heavily for some kind of financial restitution.  Not only is this highly unprofessional, but it's blatant vandalism.  Why is good help so difficult to find?  I wonder what could have lead them to do something like this.  Did they think I wouldn't notice?

   Oh hey, this might be why they felt so bold to shoot up my house.  This is after my clean up.  Empty cans were littered all over the front of the house and a few were thrown down the concrete retaining wall, one was upstairs in the master bedroom and one was in the basement.  Looks like a case plus a 6 pack of 20 oz.  Again, did they not think they were going to be found?  Ken and Matt have a pretty strict no-alcohol policy (amazing they even need a policy).  If the work is good, I don't care if they drink, just clean up afterwards.  This kind of stuff puts my whole confidence in their workmanship in question.

   Another major issue I have is that they're using the same galvanized steel nails they use on the shingles, for securing all the copper.  If you remember anything about high school physics, you'll remember that zinc + copper + moisture = battery.  In other words, these two dissimilar metals in contact with each other and in the presence of moisture, will galvanically corrode, specifically, the nail will be eaten up.  This is plain wrong, but holy crap, ALL of the copper is installed incorrectly.  Sometimes I wonder why I'm paying my builder when I'm the one catching all the mistakes.

On to nicer things, I finally got that pile of logs milled up into some awesome planks.  Owner Steve Mixter of MDJZ came to the lot on Saturday  with his portable sawmill and cut up about 6 of the logs I saved from the latest tree culling.  I thought I had a maple marked to save, but all the logs I had in the pile were red and white oaks.  There was one tree that was too crooked to mill, so that might have been it.

   Here's the biggest red oak on the mill waiting to be cut.  They took a few slabs off each side until a square beam was left, then just cut the beam into planks.  I requested 8/4 thick boards so Steve cut them as a heavy 8/4 so when they dry, they'll be a true 8/4.  Watching him work with his son Zack, you can tell there's a lot of experience needed to harvest the best boards from the log.  

   The bark slabs were sometimes placed three on a side so that stickers (spacers) could be cut.  The stickers are used in between the boards when they're in the pile to promote drying.  Also, narrower boards were harvested this way.  Native cut stickers will prevent "sticker staining", which happens when dissimilar wood species are in contact with each other during the drying process. 

   Check out this nice piece of white oak.  The sinewy markings you see are called medullary rays, which are only present when the wood is quartersawn.  If you imagine the cross-section of the tree is made up of layers of concentric rings, the medullary rays run out from the center of the tree.  These rays are valued for their figurative appeal but trying to harvest as many pieces of this type of wood from a tree creates a lot of waste since the tree would need to be cut radially from the center.  As such, you can either waste a lot of wood, or harvest these from the center cut of the tree, which we did.

   More medullary rays in some of the red oak, book matched.  You can see why the figure in this wood is desired in fine woodworking since it adds interest and character to the piece.  I have a good number of boards like this and two of the largest logs were book matched (mirrored) at the center of the tree.
   Some more light figuring in some of the narrower pieces of white oak.  I'm really looking forward to using this stuff.

   Here's the pile that I was left with.  About 900 board feet of 8/4 boards.  I paid Steve $480 for his time.  8/4 red oak goes for $6/B.F for rift sawn and $8/B.F for quartersawn.  I estimate I probably have close to $6000 worth of wood in this pile.

   I covered the pile with the left over stickers, covered by a tarp, then laid the bark slabs on top to keep it all in place and add some weight.  Here it will sit for at least a year to air dry before I can move it into the house to complete the drying process.  The wood is heavy with moisture and I couldn't move it into the basement or I would risk mold.  Under the cover of the trees, there's always a nice breeze blowing through here, so I think they'll air dry nicely.  Here's a Video of how the saw in action.

   So I have some issues to work out with the roofers but they should be done soon.  I hope to get rolling on the windows soon since I haven't heard back from the landscapers, then we'll be dried in for the HVAC to start work.  I'm a little nervous about having the windows in while there's still so much construction happening, but I guess that's how it's done.  The cabinets have been delivered to Cobblestone Cabinets and they can be held for a month without charge.  After that, it's 0.25$ per cabinet per day so it's not a small amount, but it won't break us either.  The clock is always ticking.