Showing posts with label Old Country Stone. Show all posts

Monday, June 12, 2017

Front Porch coming together and more interior trim progress

   Summer continues its steady march towards us with temperatures in the 80s and 90s with very little rain in sight.  Despite the hot weather, the house is a cooling respite from the "city" heat with the near constant breeze and shade providing forest.  Our eagerness to move in pushed us to visit the house twice this weekend, once with extended family and once late on Sunday to eat dinner in the gazebo and hang on to the weekend as long as we could.  A short walk up our cul-de-sac to another house construction yielded a pleasant conversation with a neighbor a street over, who moved in a year ago.  They confirmed our observation about the local area providing an "up north" small town feel, something we greatly look forward to.
   Progress continues well on three fronts; exterior stone, front porch, and interior trim.  The exterior cobble stone application is completed, with only the gazebo blue stone application remaining.  The front porch is about 40% completed and the interior trim has moved onto the baseboard installation stage and is already about 80% done.


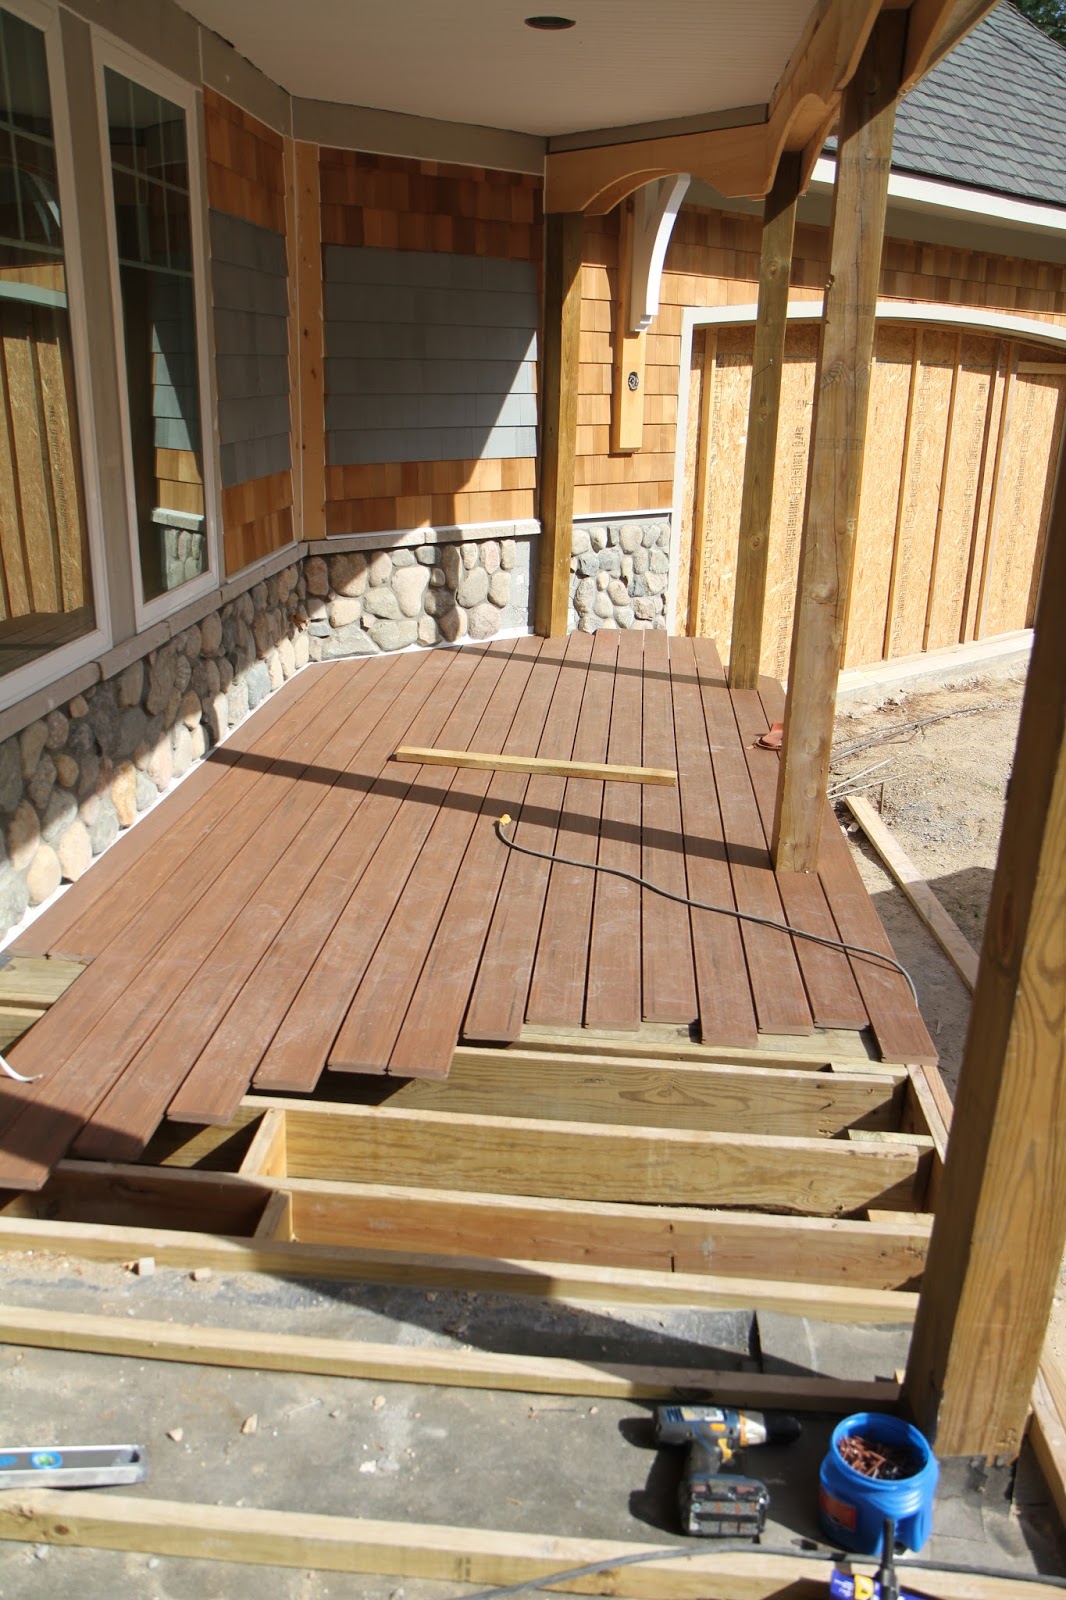
   The pile of building material in the front of the house is quickly diminishing now that the front porch installation is under way.  The installers come in on the weekend to work and say that it will take about 6 weekends to complete.  I don't doubt Mike did some wheeling and dealing to reduce the price of the install with the stipulation that it be performed as a side job.  It fits in the time table and saves us money so I'm okay with it.  Both the Azek deck boards and cedar beadboard is being exhausted from installation progress.


   A large section on the front porch, to the right of the door, was partially completed.  The final section in front of the door will be installed near the end of the build so the multitude of installers working on the interior of the house won't damage and add wear to the boards.  You can see the double header in the fourth joist gap where the deck installers secure a flat 2x10 into.  This is so the natural length of the boards have a place to end on, providing a solid place for the deck boards to butt up against each other.


   One more section has been installed on the side of the house as well.  It looks like they'll be installing the boards in the full 20 foot sections, rather than staggering joints across the entire deck.  At first I wasn't sure about the aesthetics of this kind of installation, but then I realized that this will reduce the number of additional blocking required to support the butt joints of the deck.  It will provide a much more uniform look, less traditional deck look, but I think it will be good.


   The Trex RainEscape system is mostly installed under the completed portion of the wrap around porch.  This will divert any water that falls between the Azek boards on the back corner of the house at one of the basement walkouts.  The final landscaping plan calls for a paver patio under the walk around porch so adding this water diversion system will help keep the area dry and useable when it's raining out.


  The flexible troughs are attached to the deck joists from above with mechanical screws and a waterproofing adhesive.  The troughs are then adhered to the downspout funnel pieces, which will all be connected to a gutter and with a single downspout, to divert the water to a single location.  I'm not sure how necessary this will be since the upper wrap around porch has a roof covering it, but some water is bound to trickle down through the deck boards, and this will help keep you dry.


   Old Country Stone completed the mortaring of the granite cobble on the main chimney and cleared out their scaffold.  This completes the granite cobble installation on all parts of the house. I'm not sure if they'll come back and mortar a bit more once the deck is completed, since there are some gaps that remain between the stone and the white aluminum flashing that sits on top of the Azek deck.  They also need to come back and install the blue stone pavers on the back deck, so we'll see them on site again.


   They close to finishing the ceiling of the gazebo with the installation of the cedar bead board.  All the sloped areas have been filled and the flat center section still needs installation.  This part is a little slower since they not only need to cut the ends of each piece to the correct angle, they also need to cut openings for the lights and speakers once the pieces are in place.  These boards will be stained dark to match the garage and exterior doors, but the butt joints between the sides will be covered with a white strip.


   Here's another angle of the gazebo ceiling.  Some of the tongue and groove bead board was damaged, so they'll have to be returned and new material delivered.  I think this is the only thing holding up the completion of this ceiling.  Once this is complete, then the ceiling for all porches will be finished.  There might be a few trim pieces that still need to be installed, but the majority will be done.

   Moving inside, Distinctive Designs delivered, but has yet to install, the french door to the study, so here it sits in the room it will enclose.  There's a protective film on the glass that will be removed after it's installed and painted.  If I remember correctly, the right side will have the door handle and the left will be openable with the astragal bolt but looking at this picture makes me double guess that.  I'll have to look and see where the light switches are in the room, then I'll know which door is operational.

   Baseboard installation is near completion in the master bedroom, as with the rest of the second floor.  There are some curved baseboards that still need to be installed on the curved wall sections, but this phase of the woodworking trim is nearing completion.  After this is done, they'll move onto the special installations on the rotunda walls, greatroom walls, and dining room ceiling.

   The half door to the seasonal storage space in the master closet had its door installed and trimmed.  It's not really going to be secret room since the door isn't going to be concealed, but it will have to be worked into the closet system, and my end up being concealed by hanging clothing.  The door will be insulated since the storage space beyond is insulated, but not conditioned.  We'll mostly use it to store off season clothes and maybe bolt down a small safe.

   The curved crown molding in the rotunda is taking shape.  There's one box left in the entry way closet, and probably over half the rotunda to complete, so I'm not sure if they need to get more or if there was some material stashed in a place I didn't look.  I confirmed that the material is some kind of wood resin material.  The dulled the knives pretty quickly when they tried to put it through the cutters, so it's a hard material.  Mike of Distinctive Designs said that he doesn't like to use the rubber molding, and this is a good substitute.  I think it will look good when painted, and you probably won't be able to tell the difference, even if you touch it.

  I had some friends visit the house after a birthday party for my girls and it came out that I'm running a build blog of the progress.  He requested to be put into the blog, so here you are.  They're standing in the turret, showcasing the completed window trims.  All that's left for the room is baseboard and flooring.

   The window side and top trim pieces were installed, completing the window trim.  I think the top pieces were cut from the wood composite material since they're very uniform in color with no discernible wood grain from where I was standing.  The crown molding in the turret was completed with the same composite material as the rotunda.  The trim in the turret really turned out great, especially with the continuous molding at the bottom of the windows.

   Here's the two supply vents in the turret.  The crown molding overlaps the openings a bit, but once we get the vent trim up, you shouldn't be able to notice it.  I don't think this will affect the performance of the air supply much, but we'll have to make sure we have a clean finish to this part.  You can see the filler they use to smooth out the nail holes and seams, but once you paint it, they'll disappear.

   The basement had its three doors installed for the mechanical room, future bathroom, and under stairs, completing the door installation in the basement.  There's no trim installed here yet, and I don't think we'll be getting baseboard trim.  I'm not sure what's happening with the door trim since the basement wasn't supposed to be a finished space.  We just need it to pass code right now, and we can worry about finishing the basement at a later date.

   That's about it for this week.  Lots of progress all over the house, but it feel slow because we're starting to get into the fine details.  As I mentioned, the front deck is slowly progressing but will remain unfinished until near move in.  Woodworking trim should move to the special walls and ceilings, and once completed, we should be getting paint up on the walls.  After paint is complete, we can order the wood floor for the rest of the house and start considering the finished plumbing and electrical installations.  Not many more steps to complete before move in, but it all takes a lot of time to do correctly.  11 more weeks!


Monday, June 5, 2017

Door-stravaganza

   Summer isn't officially here yet, but it's starting to get hot enough to feel like it with temperatures in the high 70s and humidity rising.  We got to squeeze in a quick visit to the house between busy work schedules and social functions but there was a lot of progress to look at.  There seems to be a little pause on the progress of the tile work while we work out budgeting for the more expensive foyer and bathroom tile.  Progress is nearing completion on the exterior stone with the granite cobble going up on the chimney and nearly every interior door has been installed and trimmed in the last week.  Deck installers have been sneaking in on the weekends to put in some time, but nothing monumental at this point.  Finished carpentry continues on the front porch and more evidence of painting prep was seen in the front of the house.


  Gratuitous car shot.  Not much difference on the front of the house as most of the front porch arch work is on the side.  We'll put in to Distinctive Designs to fabricate the gable pediments this week and hopefully they can get them done before the painters come in.  The new dumpster has some rubble in it, but no where near full.  The dark ash you see to the right of my car is the remnants of a burn pile where they dispose of wood cut offs from time to time.  Not visible in this shot is the caulking the painters applied to all the cracks between the various materials.

   Old Country Stone completed the concrete retaining wall by applying mortar to all the joins and installing stone and mortar to the small returns caused by the elevation drops.  Completion of these two parts fully completes this retaining wall.   We'll get the safety fence that will be installed on top of the wall, put in after the completion of the driveway.

   The mortar that fills the joints of the limestone blocks are cleanly applied.  You can see where some of the moisture from the mortar is absorbed into the limestone, darkening the surface.  This darkening will fade in time so I don't expect it to be an issue.  The safety fence will be bolted down into the limestone, and perhaps even down into the concrete wall itself.  It's not meant to stop a car, but it will be strong enough for a person to lean against.

   It looks like all the joints were caulked, strongly defining the areas that will be painted.  It's a paintable caulk that will be covered with the white trim paint, so there's no issue with the joint definition against the gray solid stain of the shingles.

  On the side of the wrap around porch, all the interior arches have been installed and the process of installing the exterior arches and filler pieces has begun.  There's some additional trim work on the curved porch part that has been plaguing completion of the porch, but I'm not sure what the final product will look like.

   As expected, Old Country Stone finished the installation of the lower porch pylons, completing this section as well.  I'm pleased with the finished product and can't wait to see the steel posts finally covered with the wood decorative posts.  the posts are about four feet high from current grade and will probably only be about three feet high from final grade.  There's still a good seven feet of post above the pylons, so it would be difficult for someone to gain access to the wrap around porch by climbing up on the pylon and climbing to the deck.

   Here's how the final pylon against the house turned out.  The smaller stone chips that were used to fill the wall after the limestone top was installed still need to be mortared.  There are a few places around the house where electrical receptacles are installed that have small stones installed, but not mortared, so there will probably be one more walk around with the mortar bag to finish of these parts.  We'll have to also perform an inspection to make sure the small details aren't missed since the scope of this install was huge.


   Here's how the side of the house looks on the driveway approach.  I can't wait to get all that red steel covered with wood and Azek.  The glass block for the mechanical room still needs to be installed as well, and I recall Mike affirmatively confirming with OCS if this is something they can handle.  There will be a mulched bed where the three pine trees stand and the rest of the flat space will be our front lawn with planted beds closer to the house.


   Here's a closer look at the side of the house, probably the first with the completed pylons and above porch stones installed.  I saw the decking installing crew at the house for a few hours on Sunday through the security camera, but I couldn't see what their progress was.  I just saw them moving some material to the front porch, so they're either staging up for installation or beginning the installation of the deck itself.

   Walking around the back of the house revealed a very tall scaffolding that reached from the basement walkout level all the way up to the roofline.  OCS is using this scaffolding to reach the chimney to apply the stone.  There's a pulley with a 5 gallon bucket attached to a rope to move mortar and stone to the top, and the top platform has a small pile of the granite cobble staged for installation.  There are a few roof supports and boards up there for them to stand on, but not much else in the way of comfort.  Definitely a job I wouldn't want to do.

   A good amount of progress on the chimney, considering all the other work they completed during the week.  I didn't take a good look from the other sides of the house, but it looks like they installed all the corner stones first and are filling in the rest.  They also parged the entire chimney so all the prep work is completed.  I figure they'll be able to finish this off during this next week if the weather cooperates.  We're already in a windy area, so a little more increased wind can make it pretty scary up there.


   A long shot of the back of the house finally hints at what it will look like after completion.  Once the stone on the chimney is completed, the only remaining task for OCS to complete is the application of the blue stone to the back porch and gazebo.  We obtained a quote for the completion of the front gate pylons, but we would need to know what gate is being installed, a detail we haven't figured out yet, so that's something that will have to wait a bit longer.

   OSB plywood was applied to the ceiling of the gazebo to prep for the installation of the stained beadboard.  I guess the trusses were a little too spaced out to apply the beadboard directly to, so this is the solution.  They'll probably apply the OSB to the flat part of the ceiling too.  There's currently a mourning dove nesting in the eaves, so they're giving her some time to finish up before they continue work back here.

   Moving inside, installation of the interior doors is nearly complete.  I found the dutch door that will be installed between the mudroom and kitchen, in the study, so hopefully it will be installed soon.  It's made of the same materials as the other doors, the only difference being that there's an extra horizontal rail between the upper and lower panels, which separates the two doors.  I can't remember if we opted out of having a small shelf on top of the lower door as is traditional with dutch doors, but when I measured the height of the two pieces, it was close to the height of the door openings, so I'm guessing there will not be a shelf.  There's no door handle hole in the top door half so I think there will be a surface mounted throw bolt that will lock the two halves together when we want it to operate like a single door.  We'll have to accommodate for another wall protection bumper for the top half.

   Here's a closer look at the internals of the door on the bottom half of the dutch door.  You can see the laminated layers of the LVL inside the door that provides a strong attachment point for the door hardware on the hinge side, and a solid material to drill and mortise the door hardware into.  The rest of the dividing rail is made from a solid wood that looks like pine or poplar, and both of these are sandwiched between two thin layers of MDF.  The MDF is an acceptable material for this application since it takes paint really well and should any damage occur, can be patched with Bondo and repainted.  Our current hollow core doors have a wood textured MDF skin which would be difficult to replicate with a patch so the smooth surface of our new doors will provide better longevity and repairability.

   A curious stack of boxes currently sitting in our entry closet is filled with these.  They appear to be some kind of hard resin material, maybe wood composite.  I believe them to be the material for the curved crown molding that will be installed in the second floor rotunda and turret.  It's not the rubber material once spoken about since it has a hard surface, but it's obviously flexible.  The 45 degree angles on the profile support my theory that it's for the crown and there are five boxes there, which is a significant total length.

   Although it might not be as strikingly visual as a complete coffered ceiling, it's still exciting to see the completion of most of the interior doors. It's a ton of work considering all the steps involved with each door.  You have to set and install the door casing, ensuring that the sides are plumb, the top level, and the frame, which doesn't have a threshold, is square when installed.  Then you can hang the door, ensuring that it is cut to the correct height, accounting for the floor that hasn't been installed.  Lastly, you can install the door frame trim to the appropriate level of finished carpentry expectation.  Overall, 19 doors were installed last week with maybe 3 remaining.

   Despite all the work Distinctive Designs is putting towards installing all the interior doors, there are signs of preparation for the installation of all the other final trim.  Staged in the greatroom is a stack of wide, pre-primed boards that I think will be used for the paneling in the around the greatroom windows, and perhaps in the rotunda.  These boards range in width and I think they're all half-an-inch thick, so the depth effect of the panels considerable. Half an inch will provide a good shadow line, and even though the flat of the panel itself is just going to be the drywall (I believe), once painted, will provide the look we're going for.

   The big mudroom closet gets two swing-out doors to enclose our family coat and shoe storage.  This closet is interesting because the shape of it is bigger than planned on paper.  The original blueprint had a blind triangular corner walled off into an inaccessible chase, but the final implementation kept all the space.  As a result, the closet can be defined into two spaces, a large flat wall for hanging items, and a smaller area that seems appropriate for shoe shelving.  The closet was supposed to be a reach-in, but has turned into a small walk-in.  Usually, you would see some kind of bi-fold door on a closet like this, but the double doors give the closet a little more gravitas.  While you might thing it would be a nuisance, opening both doors just to access items, in practice, you only need to open one at a time, depending on what you want to get.  I think we'll use the lockers for every day items; season appropriate jackets, daily use bags and shoes, reserving this closet more for storage.

   The door installation is prevalent throughout the house.  Here's a shot of the second floor room, slated for use by a potential future child.  Just like the guest room below it, this room had three doors installed and is completed in that respect.  Even though there's a curved wall on the hinge side of the door, the door opens to at least 90 degrees, with hardware installed.

   The doors to the master bedroom and master bath are in place as expected.  We don't have any operation hardware on any of the doors yet but I think that's more of a final finishing thing.  Currently, the doors stay where you put them, without swinging due to any imbalance.  Although you can feel the heft of the door when you move it, it swings easily on the ball bearing hinges.  Some strength would be needed to slam these doors, and they feel like they could do some damage if you got caught in them.  We'll have to be sure to hammer home door safety with the little ones.

   Here are the doors to the master bathroom and master closet beyond.  I think the decision to reduce the master bath door down to a single door was a good choice and made it easier to decide here to install light switches.  While it would have looked more impressive, in practice, only one door would be used on a daily basis.  I measured the door widths after the door installation and we're hovering just around the ADA recommended 32" on all the bedroom and bathroom doors, and close to 36" on the passage way doors.  I can't get over the optical illusion that they're narrow because of the 8 foot height of the doors.

   The laundry room, which is still the most completed room in the house, got its passage and closet door.  We'll need some careful selections on door stoppers because I'm not sure if the standard spring stops will be strong enough not to collapse under the weight of these moving doors.  Once pushed, they swing freely through their arch, losing very little energy to friction.  The laundry room closet will house the second floor cleaning supplies, vacuum, and probably the ironing board.  We looked into some kind of integrated ironing board solution, but it seems like there was always a compromise.  They look great, but don't perform as well as a full sized stand alone board.

   The turret bedroom has all three of its doors installed as well, with some unexpected results.  The bathroom door had no choice to open to cover the open closet area since the opposite side has the vanity.  There's no way around it and it shouldn't cause much issue.  The walk in closet door beyond is a little concerning.  The laundry room wall that is shared by the closet was implemented a little differently than on paper, so the closet actually lost some space.  The door opens close enough to the expected shelf space on the back wall to cause some concern, but we won't know until we have a closet system in there and clothes hanging.  There's no good way to cut down the door width so we'll just have to adapt when we attack the storage.


   This is the kind of product you get when your builder is awesome enough to closely coordinate the tile installers with the trim carpenters.  The other side of the shower wall in the turret bathroom has a finished bullnose tile, but this side would come to close to the door trim.  The tile installer coordinate with the trim carpenters and installed the last course of tile to a width that perfectly complimented the door trim install.  If we had this level of coordination from the beginning, I doubt we would have run into any of the issues we dealt with later in the build.  Lesson is: get a good builder from the beginning.

   So that's about it for this week.  It's hard to predict what exciting new things we'll see next weekend, but we will have friends and family visiting the site, many for the first time.  I'm happy to have something nice to show off, and can't wait to have lots of family gatherings in the future.  I'm guessing that the stone work will be completed on the chimney, baseboard trim and maybe some panel work completed in the house.  Besides that, I don't know what else to expect.  Maybe more completed tile work or complete front porch.  In any case, we're still on track for an August completion. 12 weeks to go!


Tuesday, May 30, 2017

Interior doors coming online

   With the final bank signing behind us, nothing is standing in our way to reach the finish line.  Despite the slight delays in funding, steady work still moved forward with progress on both the interior and exterior.  Lots of new word working supplies are staged around the house for yet another finishing phase of installation and installed tile steadily spreads into all areas of the house.


   The thinner stainable beadboard was installed in the barrel vault.  It seems like it makes the radius of the curve lesser, but it's probably because we're not seeing the internal structure anymore.  It follows the curve of the front door so I know it's correct.  The wood will be stained as close to the mahogany color of the door, Azek deck, and garage door as possible.  Coordinating all four colors will be difficult but if they're pretty close in color, it will be good enough.


   Here's an oddly blurry picture of the barrel vault; I'm not sure why this didn't come out better.  The beadboard slats are red cedar, but will be stained darker to match the deck.  I'm not sure how that will come out, but cedar is a good material to use outside.  This is the same beadboard that will go up in the gazebo ceiling and will be stained the same dark brown mahogany color.

   Installation and grouting of the exterior granite cobble stone is completed and the limestone ledge is in place.  There are still some joints in the ledge stone that need to be filled, but it's pretty much done.  There might be some grout filling down to the white drip edge, but I'm not sure if they'll do that after deck installation. Construction on the deck can now commence and some of it has been installed in other parts of the house.  I'm not sure where the pressure treated wood stacked here is going since all the deck structure is completed.

   Here's the front porch on the other side of the front door.  It looks like all the ledge stone has been grouted, but there still might need to be some finishing at the bottom of the stone.  Some of the smaller pieces are missing around the electrical receptacle so I guess that's proof that there's still some finishing work to do.

   The entire side of the house looks the same as the front with regards to the exterior stone.  The Azek deck boards will run perpendicular to the floor joists, so they'll run the length of the porch.  They're twenty foot pieces, but the porch is much longer than that, so there will still be some butt joints down the course.


   The lower porch pylons were completed and the exterior stone and limestone cap has been installed.  Grout still needs to fill the gaps between the stones, and the farthest pylons still need some stone, but that will be completed quickly.  After this is completed, the only remaining task is the application of the stone to the chimney.


   As expected, the single piece, square, limestone caps were cut down the middle and a gap was created to allow the post to pass through.  Also as expected, not all of the posts were perfectly centered in the middle of the pylon, and the wood boxing will have to conceal the variance between the posts.

   Here's one that was off center from the pylons.  You can sight down the pylons and see that they're all straight.  Also, the posts are plumb and the beam they attach to is a steady eight feet from the house, so I'm not sure where we're getting out of parallel.  This is the last post in the line and it's off by a half a thickness so the final box around the post will have to be at least two times the width of the post.


   These are the last three pylons that need stone applied and I'm sure Old Country Stone will make short work of finishing them.  It looks like OCS had to remove some of the finished stone on the wall where the last pylon sits.  This last pylon will probably look integrated into the wall itself once completed.  The lowest course of stone on these pylons will be below grade.  You can see the limestone ledge on the basement sliding door, which will be partially covered by grade, and paver patio some time in the future.  The ground will have to grade away from the house and there's a good foot or so that will need to be filled to accomplish this.

   Moving inside, pieces of cedar bead board joins the every shifting stock of interior trim.  Much of the window trim has been exhausted, and the remaining pieces are probably slated for door trim, once they're installed, and baseboard trim.  Now that the interior doors are in the house, there will probably be a hiatus on the trim installation while the doors are set.  After that, the door trim can be completed and the baseboard trim can go in since proper installation relies on a finished door trim.

   A door and door frame sits at every door opening in the house.  These two are sitting in the kitchen, but they're the two garage doors, one for the mudroom and one for the garage storage.  These door frames are different in that they're the thickness of the ICF wall and they have weather striping to seal out the cold.


   All the interior doors are solid wood, but the fire doors alone have these fire-rating tags on them.  I'm not sure if they're made from a different wood or how they're constructed differently than the other interior doors, but these have a 20 minute fire rating.  The holes for the door hardware were already drilled and the material looked like an LVL on all the doors, but knocking on the panels didn't yield any difference in the materials.


   All the interior doors look the same, although they have some varying width.  We tried to get all the doors at 34-36", but some are 32". All doors are eight feet tall with the only exception being the powder room door, whose height was limited by the rotunda structure.  The increased height and weight of the solid doors necessitate four hinges rather than the standard three and all the hinges have ball bearings between the mating surfaces to make moving the door easy.   The height of the door makes the width look narrow.


   Here's a close up of the hinges.  Square mortise brushed nickel finish with ball bearings on the resting surfaces.  The door is on the left and the casing on the right with the ball bearings.  The doors on our current house are hollow core with three brass curved mortise hinges.  A black powder that looks like charcoal dust would build up around the hinges.  This is because of the wearing of the metals grinding to powder and oxidizing.  Even with frequent lubrication, we would get this black powder so ball bearings should prevent this, while allowing us to easily swing the heavy doors.  The hinges are made by Penrod and having a square corner rather than a radius makes them a little harder to install.  You can't use a round router bit to mortise the hinge plate, but you can use a router to remove most of the material and either a chisel or corner strike to cut the sharp corners.


    The pantry doors are currently sitting in the pantry.  When it comes to interior design, I'm generally hands off, relying on better minds than mine to make the aesthetic decision.  This is one small part that I gave my input on since I see it as more of a functionality thing.  The pantry is big enough for us, but it isn't a huge room and it sits near a traffic intersection.  I though it would be a good idea to install a vertically split, spring hinge double door in the pantry for a few reasons.  If your hands are full, you can just push open the doors for entry/egress.  If we had a single door, it would either have to swing in, reducing the wall space for shelving, or swing out, blocking the traffic flow and pantry doors are rarely closed after use, so it would have been a hindrance. The narrow doors don't impinge upon the walking space much when pushed out, and occupy less space when pushed in.  I really had to lay out my reasons and I hope this works out since it was all my idea.


   The spring hinge mechanisms are cut into the bottom of each door, but otherwise, the door just has a pin on the top and bottom to swing on.  A decorative metal plate covers the hinges and there's usually a "stay open" position you can push the door into if you really need it to stay out of the way.  These doors have a slight radius eased into the edge so they clear the door jamb during operation.  They have a similar arch top panel style, but are bisected by a vertical stile since there are two doors.  I don't think they'll look out of place, and we might consider adding a metal plate for a pushing surface.

   Wall tile in the mudroom bathroom has been installed, but none of the floor tile is in yet.  This is going to be a more utilitarian bathroom, and we just happened to have enough room for a shower.  It works out well because we can use it to wash a dog or people can use it to shower off after coming in from the future swiming pool.  It's easy access from the back yard through the mudroom exterior door, and there's all tile surface in the mudroom so we don't have to worry as much about dirt and drips.

   The mudroom bathroom vanity has also been assembled and set.  Since we have an odd angled wall in this room, we got the vanity designed to fill the space with these shelves.  It's probably a good place to store extra pool towels because anything else might not look good on an open shelf.  The counter top will be a solid surface material and the sink will be a bit larger than standard undermount to provide a little extra utility.


   The garage has finally been taped and mudded, but doesn't have any primer applied.  The incorrect master balcony doors haven't been taken away yet but almost everything else has been removed from the garage.  Garage doors are expected in the next few weeks, which should add some light to the space, but I'm not sure when paint will be completed.  Eventually, we'll want to epoxy the floor since we've had great results with the DIY kit we applied in our current house.  That might be after move in depending on the cost and how long it puts the garage out of commission.


  This piece of curved railing is currently sitting in the greatroom.  Besides the obvious curve, there's a slight curve in the vertical direction.  I wasn't sure where it would fit at first, but after exploring the rest of the house, I'm pretty sure this is the stair railing for the first floor.  The railing will begin at a newel post at the bottom of the stairs and end at another newel post at the top of the stairs so I don't think there will be a vertical transition to the rotunda railing.

   The underside of the rail is on the left and the top is on the right.  We went with a pretty standard and simple design, with a small bead running the length on both sides and a nice depression to grab onto.  It looks like it's made of red oak and will be stained dark to match the floors.  The floors are white oak smoked and stained dark, so the wood species is a pretty close match.  I think the color staining will be close as well.


   I almost missed the basement stairwell railing, sitting on the stairs, but there it is.  We're only required to have one railing, by code and I think it's better to only have one.  There's standard hardware available to attach railing to a wall, and I don't expect anything fancy will be used.  I'll have to ask my aesthetically minded counterpart if she wants something cleaner looking than the standard.


   The master bedroom eyebrow window trim is complete and ready for paint.  The top curve window casing is just the kerf cut MDF without and veneer applied.  I'm not sure if it's going to stay that way since it's just going to be painted, or if they'll apply a veneer to it now that it's in place.  The latter would be a pretty difficult thing to do now that it's up and the MDF might provide a good enough surface once painted.  Either way, I think they did a fantastic job with the trim and the shape really makes the room.

   One finishing surprise is that the master bedroom dividing wall was clad in the "reclaimed wood" material.  I think it's meant for floors and it's a luxury vinyl product meant to simulate real wood.  It's about a quarter of an inch thick and has a very realistic texture, complete with radial saw marks.  We chose this material because of the thickness and ease of installation.  We needed something thick enough to miter on the corners to achieve the wrap around effect, which I think turned out well.  The TV will be mounted on the bed side of the wall, but we don't have plans for the sitting area side of the wall just yet.  I think it looks good and adds some character to the room considering it's a large dividing wall.

   Another surprise is that Azek decking on the master bedroom balcony is completed.  I knew deck installation was going to be starting up, but didn't expect this to be the first to be completed.  Since the exterior doors aren't installed yet, we almost missed this addition, but we happened to be looking out the window and saw it.  The temporary balcony door is held shut by four wood screws and since we didn't have a way to remove them, we just climbed out the window to check out the new decking.  The balcony is eight feet deep and ten feet wide, so it will be big enough for a couple chaise loungers and a small table, which is plenty big enough for our use.  We ended up lying around out here for a bit, just talking about life in general, something that we'll probably duplicate many times in the future.

   The Azek is the mahogany color in the "vintage collection" line.  It's well textured and has some darker streaks that provide a nice wood grain appearance.  There's a barely noticeable PVC off-gassing scent which will probably fade after time and the surface was a bit hotter in the sun, but not too hot to touch.  There have been some issues with color fading and chalking, but I'm hoping they've improved their material quality, or that our decks will be in the shade enough to not be affected.  The boards are grooved on both long edges and accept a hidden fastener system so no face drilling is necessary.  The fasteners are visible through the board gaps, but they're not unsightly.  The sleeper joists here are spaced 16" apart so the deck has a very slight give to it when you try to bounce on it.  The first floor deck is spaced 12" OC to reduce this feeling so it will feel much more solid.  I'm happy with the install up here and expect the first floor deck to look just as nice.

   Here's a look at the balcony as a whole.  Some cedar shingle still needs to be installed on the angled dividing wall, both sides and we there will be a glass rail up here.  The front of the balcony will have a standard installation, but the angled part will have a triangular shaped piece of glass to match the angle of the roof.  I'm excited about having this extra sitting space off our bedroom.  It provides good views of the lake, future pool if you're close to the rail, and gazebo if you're at the rail.

   Prep of the master bathroom tile install comes in the form of the installation of our master vanity!  These are Omega cabinets with a continuous grain walnut slab door with a floating vanity between two towers.  The space under the vanity will be lit with low voltage lighting and the entire back splash will be tiled to the ceiling.  Two Robern medicine cabinets will be installed in the spaces and we'll have three wall sconces for face lighting.  The faucets are wall mounted and the sinks will be some kind of semi-basin design.  This is way more storage than we have now, but we also don't have a small linen closet in this room, so I think many of the linens will be kept in the towers, along with toiletry resupply storage.  I honestly don't know what I'll do with all the drawer space since I currently use the space under my sink and one drawer for all my stuff.  Counter top items will be kept in the medicine cabinets, keeping the counter clean (ideally).


   The drawers under the sink are "U" shaped to provide space for the drain plumbing.  Since we have drawers in this cabinet, an under mount sink is not possible.  I think this was a decision made way back when we ordered the cabinets, but honestly I can remember now.  I don't think we have the sinks in this room nailed down yet, but I'm pretty sure we don't want a bowl shaped basin sink.  Maybe something similar to what we're doing in the powder room with a semi-recessed basin if the drawer configuration allows for it.

   The cement board in the master bathroom shower has been completed and coated in Redguard waterproofing.  Apparently, cement board itself isn't completely water proof, as well as tile and grout, so an additional waterproofing membrane is needed, hence the Redguard.  With this step, the bathroom is ready for tile.

   Here's another look at the wet wall of the shower.  The two large circular things at the bottom are mixing control valves.  The left controls the shower and the right controls the hand shower and overhead shower.  The and shower will be between the two mixers.  You can see the master closet door past the shower entry on the left and master bathroom door through the shower entry on the right.  We're not planning on installing any doors on either of these two shower entry ways but I have concerns that the shower will feel cold since all the heat and steam can escape into the bathroom.  The door openings are 28", which sounds narrow, but our current shower has the same width opening, so maybe that's a standard measurement.

   It seems like the laundry room is becoming the room where everything gets finished first.  It was the first room with a completed tile floor.  First with all the cabinets installed, and now it's the first with baseboard molding installed.  The baseboard is similar to the window and door molding with a two step design and it's very tall.  I'll have to take a tape measure to it, but I'm estimating it's seven or eight inches tall, which seems to fit in just fine.

   All the doors are present in this room, but need to be installed.  As you can see, much of the baseboard has been installed, save for the areas near the door since they require a finished door trim to terminate into.  We're planning on pulling out the base cabinets that flank the washer and dryer so that they'll be flush with the front of the machines.  This will increase the depth of the countertop, but provide a more finished look to the space.  The original plan was to have the machines sit proud of the side cabinets.  Adding that depth shouldn't hinder access to the wall cabinets above them.

   Distinctive Designs also finished the covering for the center style on the laundry room window.  They created a box to cover the insulation and board that separates these two windows, and I think it came out rather nicely.  Simple design, but adheres to the over all look of the rest of the window trim.


   The turret bedroom is turning into the staging area for the rotunda woodworking finishes.  It's currently holding the rotunda railing, all three newel posts, and the floor bullnose trim pieces for the rotunda floor.  The rotunda railing is in three parts, but will probably be cut to fit the railing support posts other than the newel posts, if there are any.  The three newel posts were boxed up for protection, but one of them was opened, giving me the opportunity to take a peek at it.

    Like the railing, the newel posts are made of red oak, and have a paneled design like the first floor walls of the rotunda will.  There's more detail and profile on these than there are in the rest of the house, but the style is similar to what will be on the front porch posts.  They'll be cut to height during installation and the railing will attach to the flat surface near the top.  These will also be stained to match the railing and floor color.


   Here's a close up of the top of the newel post.  It has a rounded off square cap that matches well with the level of detail in the rest of the house.  A carved, figured top would have been out of place so something cleaner seems to fit well.

   Here's a close up of the top part where the railing will attach to.  There's no paneling detail on this section since you need a flat surface for the railing to attach.  The section below it is paneled, supplying much of the fine detail to the post.  The post is pretty heavy overall and very solid feeling.  I haven't gotten a time line on the installation so when it goes up, it will be a nice surprise.

   If you're wondering how they constructed the curved railing, this will explain it all.  There are actually ten separate quarter-inch thick pieces of red oak laminated together in a curved jig.  The inner and outer pieces are thinner and selected to be of clearer stock since they're the most visible.  These two pieces are thick enough to take the carving of the profile so the removal of material doesn't cut down to the other laminated layers, or else you would see the outline of the mismatching woodgrain.  The balusters we'll be using are tubular stainless steel so I think these will just be drilled into the wood, or an inner mounting sleeve will be attached over which the baluster will slide.

   These pieces confused me at first, because I wasn't sure what function they served.  After thinking about it for a bit, I realized that they're the bull nose trim that will run on the floor around the inner rotunda.  The wood floor doesn't have a trim piece that can finish off the edge of the floor so Distinctive Designs is making these pieces so the floor has something to terminate against.


   Here's one of the pieces in place.  The underside is cut and the floating edge is rounded to provide a finished edge.  I'm not sure if these pieces are just for testing or if they'll all be this short.  Since the board itself is pretty wide, I'm guessing that they'll need to make these pieces short to accommodate for the curve of the rotunda.  The trick will be matching the wood grain so it doesn't look segmented as it makes its way around the hall.

   Two of the three round windows have been completely cased and trimmed ready for primer and paint.  The large round window in the turret bedroom, at the center front of the house was unexpectedly larger, requiring the window trim to be cut down a bit to fit the closet wall, but that seems to be the worst of the fitment issues.  The round casing turned out really well and makes the window really feel like a portal or ship port hole.  The reveal of the window frame itself with respect to the casing is uniform which really adds to the quality of the install.

   The wall tile in the turret bathroom has been completed and is awaiting grout and the shelf tiles.  When the grout is applied to this wall, the tile in the turret bathroom will be near completion.  Some of the bathrooms are getting a tile wainscoting, but I don't think this is one of those rooms.  When the doors are installed and the door trim completed, this will nearly complete the room.  Just counter, sink, toilet, and finished plumbing will be needed.  We haven't decided what we'll do about the tub with respect to water control.  We don't really like shower curtains, but it might be easier to use one while the kids are still young and we need to wash them.  A sliding glass shower door is definitely better, but make the opening smaller.  We'll probably end up using a shower curtain and later changing it to a glass shower door of some kind when the kids get older.

   Here's how one of the oval windows turned out.  It's as good as the round window up front and I'm really glad we got these installed.  The other windows mask the thickness of the walls a bit, offering a good sill to sit on, but the thickness of the walls are exaggerated more on the round windows for some reason.  There's no reason to put a window covering on the upstairs windows, but there's one oval on the first floor in the guest bathroom that we might want to consider blocking for privacy.  It's on the porch and the interior may be visible from the outside.  I'm not sure what our options are for oval windows but I'm guessing it will have to be a specialized design.

   The compound windows on the first floor in the dining room and study also got the center divider covering, completing the trim out.  We're still debating using window coverings on these windows since we're out in the middle of the woods, but even with the finished trim, we have plenty of sill space for blinds or curtains.  I think we would like to keep them open since we like the depth; it makes a short bench to sit on.  I'm thinking that nearly all the window trims are completed, just in time for the interior door and associated trim install.  A couple of more weeks and the baseboard might be completed too, which would put us on track for painting at the end of June and wood floor after July 4th.  

   In the beginning of the final interior push, I found it hard to believe that it would take three more months to complete everything, but now I can see the amount of work left.  Even with the work load, everything is progressing quickly with new and exciting developments every week.  Next weekend, we'll probably see the installation of a few of the interior doors.  I think paint colors are the next big decision to make with hardware second.  As long as we have all the finish plumbing and electrical decision made, everything else is in the clear.  14 weeks left!