Back on track with the weekly updates. I got a chance to visit the house on an incredibly beautiful summer day with temperatures in the low 80's and the ever present breeze to keep me comfortable. I found incremental progress on all the items from the last mega update, so I decided to take some more detailed pictures since it seemed like there was too much to write about last week. Omar, the tile installer was supposed to be back last week, but I didn't see evidence of any progress. Distinctive Designs is hard at work completing the great room and moving onto the rotunda. Porch posts wraps are still going up and are about 60% complete. This update will be about lots of little details I was too rushed to see last week.

Here's evidence of the beautiful day I was lucky to have. The piles of fill dirt remain undisturbed and I haven't gotten a time table on when that will distributed. The more I see the color on the house, the more I like it. I was worried it would look too green at first, but it's really starting to look like a blue-gray to my eyes now. There are some wood filler spots the painters need to cover, but besides that, it's only the trim that needs painting. Forecast this week shows a good amount of rain, so I'm not sure that will happen this week.

Here's the side of the house as you come up the driveway. This is actually taken at a lower elevation that the driveway will be, so technically it's from the "front" yard. Most of the front porch posts remain unwrapped as are the lower posts. You can see nailers on the front of the beam that will attach the porch fascia during the final steps. We're still reviewing porch railings since the ten foot spans between the posts is making it difficult to move forward with the original idea of using the Trex railing system. The glass block in the mechanical room still needs to be installed, and it might be done by Old Country Stone when they come back to finish the mortar on the front porch.

Here's a shot of the back corner of the house. More beam fascia attachments are ready to go when needed. It will probably be one of the last things installed on the deck. This back section of deck needs to be removed and reinstalled since the installers forgot to tape the seams for the water catchment system. Good thing they used screws to secure all the boards.
I'm not sure if I posted a picture of the
Trex RainEscape on the long section of the deck. It doesn't extend all the way to the front of the house since we were interested in only covering the part of the deck that will be above the side walkout patio. We'll still need to figure out how to attach the gutter system, and how to hide it aesthetically. This weeks rain will see if we really needed something like this.
An updated shot of the back of the house. One day, a few years from now, we're hoping that all the landscaping will finally be finished. I'll be able to look back on all these pictures I'm taking and recognize the change we brought to this piece of property. Every week I visit, the details get smaller and smaller, but it seems like the effort to get them done increases. Earlier in the built, all the problems were big, but it was much easier to see what needed to be done. There are so many little details left, but we're good hands with Mike and his small army of workers.

The back porch posts got their top caps installed this week. I asked Mike whether they needed additional flashing to water proof them, and he assured me that the MDO is weather proof and requires no additional flashing, especially once painted. The posts on the gazebo still require the capping parts and the bottom trim, which will be installed after the blue stone is set. I had enough foresight this trip to bring a camping chair and take some time sitting in the gazebo. Once again, no mosquitoes or bugs bothered me and got to enjoy the sounds of nature. We really lucked out with the placement of the house with respects to the gazebo. Angling the house on the property makes the gazebo jut out clear of the rest of the house, placing the gazebo out in the peninsula cross breeze. There always seems to be a slight breeze blowing through here, which isn't present on the master balcony. I'd like to say it was intentional, but this time we were just lucky.

This is how the columns are topped in the angled corners. It seems like nothing is standard in the gazebo and there are slight variations in each of them. One of them is significantly different, but there's not much that can be done about it. More of the previous builders errors coming back to haunt us. At least it's not a structural issue.
Here's the bottom of one of the gazebo post wraps. Normally I would be apprehensive about seeing a wood based material sitting right on the concrete, but in this case, I think it will be okay. First, it's the MDO, a marine grade plywood covered with a resin impregnated paper. Second, the entire base will be under about two and a half inches of blue stone and mortar, limiting the water that will reach the base. Lastly, the trim will be caulked around the base, further preventing water infiltration.

All the gazebo posts have been wrapped and have top trim installed. They still need the panel cove detail and bottom trim once the blue stone is installed. The landscaping plans call for having a slightly raised garden on this inner corner of the back porch, removing the code requirement for a railing, but we might want one to additional safety and visual continuity. I'm not sure when OCS will be back to install the blue stone, but there's talk of ordering counter tops for the kitchen and BBQ area.
I haven't posted a picture of the end of the garage after stain yet so I'll get one in before any more changes happen here. One more element that needs to be added on this side of the house is the addition of the gable pediment. One goes here, and one goes on the front of the house above the laundry room window. I have some more detail shots of the pediments later in this update.
I climbed up on the retaining wall to get a shot of the piles of fill dirt from a different perspective to really show how much fill there is in this spot. I think that even when the piles here are distributed and compressed, we'll still need some more, some of which will be taken up by the driveway. Mike will get the grade to where Great Oaks will need it to be so they can bring in the driveway base and asphalt. There will be other places fill sand will be needed so this is just the beginning.
Here's another shot of the driveway fill piles. It's not just the area near the retaining wall that needs fill since the entire motorcoach way is low by a couple of feet. It's probably about time to bring in Great Oaks to start construction of the driveway and porch steps, so getting this fill dirt in needs to happen before they can come in to bring the grade to final height.
Three posts are now wrapped on the front porch, but not to completion. The cove detail in the panels still need to be installed on the two newest posts. I think they'll probably wrap the posts then install the cove details later. If materials aren't an issue, we can probably expect all the posts to be wrapped in a couple of weeks, but all this is pending completion of the front deck.

Here's the side porch near the back, to highlight the sealing tape for the Trex RainEscape. The last few boards need to be installed, then Old Country Stone can come back and install the last bit of joint mortar down to the white flashing. They left this unfilled so the deck installers had some flexibility in the flashing when tucking in that last board. The deck installation as been put on hold as the owner and supervisor of our installation had a heart attack a couple of weeks back. No debilitating damage, but I'm told the blockages required stents. As traumatic as it was, he wanted to come in last week, but Mike told him to wait a bit before he started working again. Need another example of dedication?

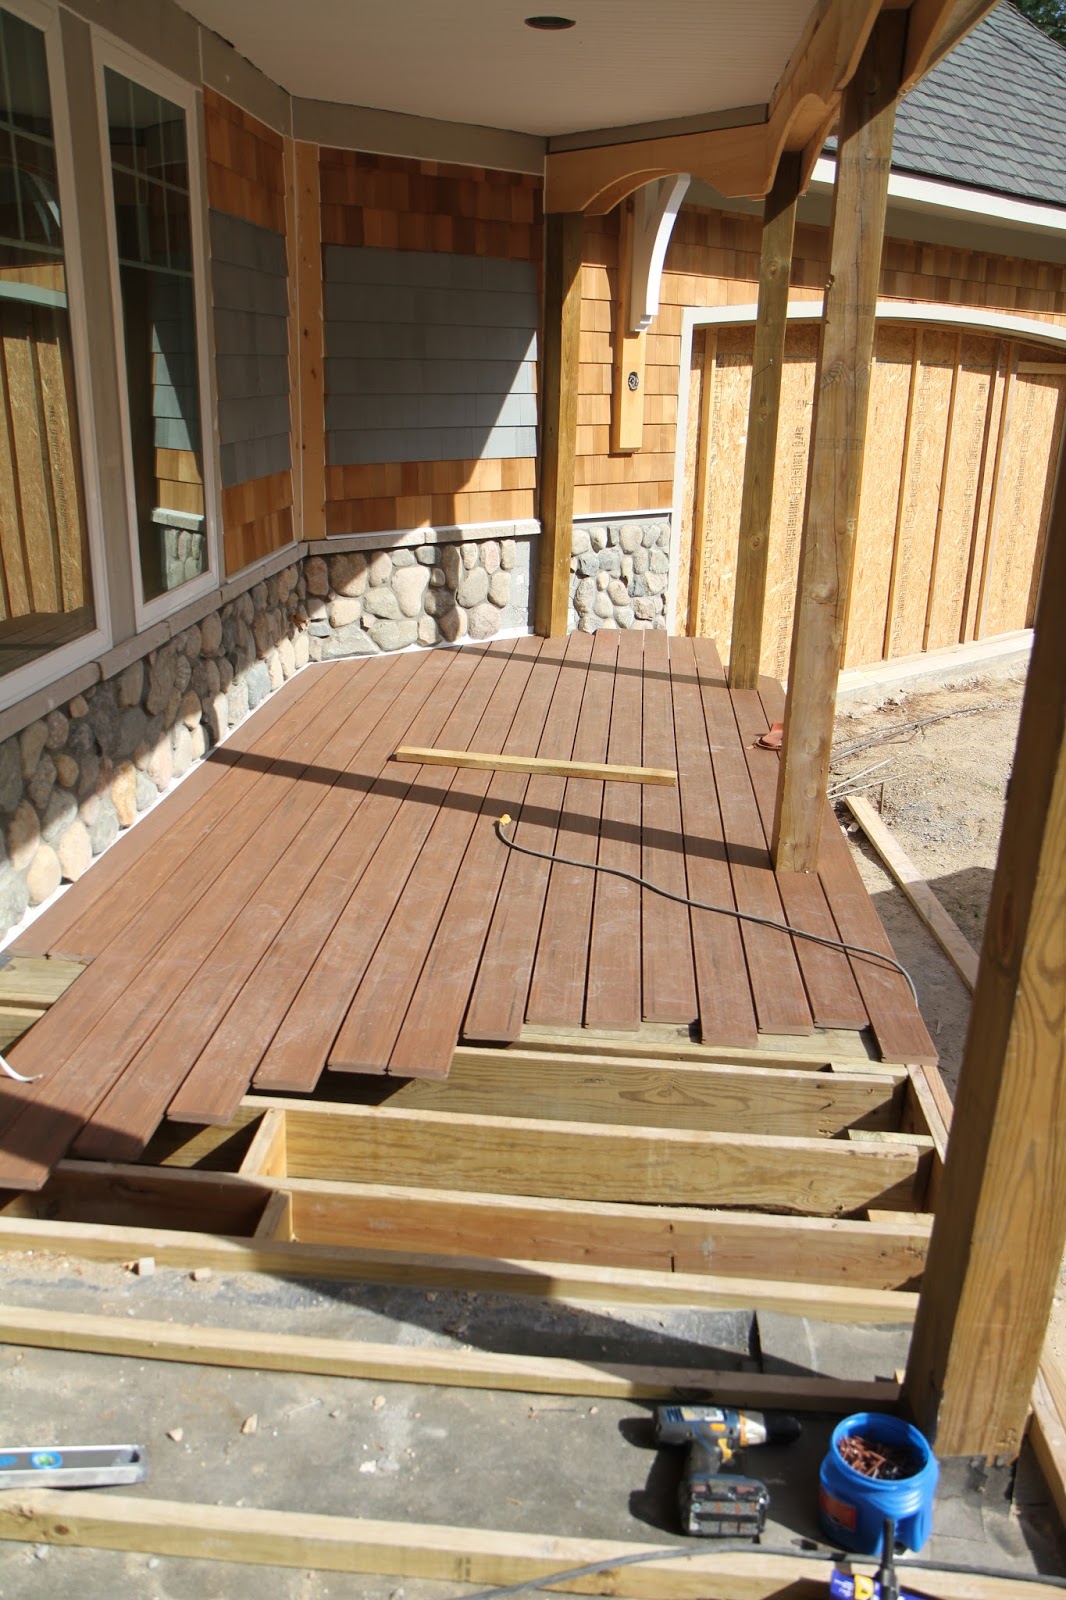
So here's the current condition of the front/side porch. All that's really left is the completion of the front corner, the part in front of the front door, which will be finished near move in, a few border pieces, and railing. It's completely walkable and I take every opportunity to do so whenever I visit. As I mentioned, we're looking at options other than the Trex railing system for the porch, which means it's probably worth it to consider using it elsewhere. We'll need railing on top of the retaining wall as well as on the garage side porch. We would like to use glass railing on the back porch and master balcony though.

We talked to Margaret about disliking the saturation and color of the tin ceiling in the rotunda and she agreed that it didn't look how it was expected. We talked to Distinctive Designs to see if anything could be done to lighten the appearance and I found this at the house this visit. Some of the high points were removed with a scotch brite pad, allowing the metal to shine through. I think if we want it to shine more, we might need to apply a glossy lacquer over it.
I'm not sure how long this has been completed, but Distinctive Designs modified the scallop detail on the rotunda stairs. There used to be more protrusion points that we thought were too decorative, so they trimmed them off very well without leaving a trace. I'm guessing they used a palm router and template since it looks so clean. You really have to keep your eyes open for changes or else you'll miss something.
Although the great room isn't finished, Distinctive Designs has started to layout and install the baseboard and paneling in the rotunda. The corner of the stairs at the basement door shows a piece of the standard baseboard plus some curved paneling installed at the base. There will probably be some kind of build up for the baseboard since it's a concave curved surface, but the profile should be the same. The paneling in the rotunda will be the same as in the great room and will only be present on the first floor.

The actual second floor is very thick, due to the Litedeck construction. In areas where it's visible, like the rotunda stair well here, we'll have to use some creative woodworking to conceal any irregularities in the concrete pour. The curve was cut in the foam and thin plywood was used as a form, but the resulting curve doesn't exactly follow the curve of the wall. The options are to grind the concrete away, a difficult endeavor due to the metal fibers, or conceal it, which is what we're doing. Wood spacers are being installed against the concrete so a "belt" can be installed around the inner rotunda. This belt is the delineation for the rotunda paneling and will also help dress up the floor. You can see that each piece installed so far is different so it takes some effort to normalize the curve.

The stack of pre-made corners in the great room have been greatly reduced since they're all on the posts out on the porch. Many more will be needed for the rest of the front porch. I'm not sure if they're making them on site or in their workshop, but it's not like I'm finding large sheets of MDO lying around the house. Most pieces are already cut, so I'm guessing they're cutting them in their workshop and assembling them on site.
Progress was made in the great room paneling, but it's all in the fine details so it might not be visible in wide shots like this. Most of the panel bead is installed with the exception of the difficult curved pieces near the speakers. There's a lot of great detail to look at with this installation, so lets take a look.
Here's the baseboard where the paneling and the regular walls of the greatroom meet. The "panel" itself is just the existing drywall so really it's just the frame that sits proud off the wall to provide the paneling effect. It's only about 3/4" so the level or detail on the return of the baseboard is very well executed. The overall theme of the work here is "very clean miters".
Here's the bottom corner of one of the windows. The continuous sill frame that sits proud of the panel frame provides more depth to the panels and gives the illusion of being much thicker and more substantial than it actually is. There might only be an inch of additional depth added to the window casing, but it adds one more layer to the panel design.
Here's the detail and level of miter accuracy on one of the panel beads. As far as I could tell, this level of craftsmanship is present in every panel in the room. All the small finishing nail holes will need to be filled before painting, a task that requires thoroughness and an organized methodology. I don't envy that woodworker.

Unfortunately, sometimes things don't line up, and this might get under the skin of some people. I'm not sure if there's anything we can do about it now, but the electrical receptacle isn't centered in the little panel. It might have been centered on the wall, but for some reason, the window casings might have needed to been shifted a bit, which shifted the panels, un-centering the receptacle. Since this is an exterior wall, this receptacle box is embedded in the foam of the wall, as well as cut in the drywall. To fix it, we would need to cut away some drywall on the right of the box, cut away some of the ICF foam, unscrew the metal shallow depth box, shift it over and re-secure it, then fill the foam and drywall gaps. Not impossible, but a good amount of work.

All the exterior doors have been trimmed out and had any wood or cardboard blocks removed, so they appear as if fully installed. Hardware will be installed by Hardwood Door and Bevel when they finally deliver the two remaining doors but at least we can get an idea of what everything will look like. This is the large glass door to the greatroom from the front wrap around porch. We're not too worried about privacy from this door since it's up high on a porch, and we're in the middle of the woods. Also, it's not really looking into the main space of the greatroom so even if we had to worry about a neighbors' line of sight, they wouldn't be looking at the primary sitting area.

Here are a few pictures showing details on the gable pediments, before they're painted and out of easy visible reach forever. Every time I look at these, I'm always super impressed with the level of craftsmanship that went into them. I was thinking that I would be able to make these myself, but after looking at what Distinctive Design created, I know that I couldn't have made them this good. It looks like all the pieces are glued and screwed with a good quality coated torx screw, nicely counter sunk for a flush install. No splitting or tear out of the screw holes means they take care of their countersinking bits.

All the center detail work sits in a channel of the frame, which provides more strength and greater depth to the entire pediment. Many available online are very shallow, that is, they might have two elevation changes from frame to field. This one has three, outer frame, inner frame, field. You might not recognize the difference, but your mind will tell you there's something more interesting with the additional shadow lines. When I sent the original renders, I didn't have that extra detail, but Distinctive Designs took it upon themselves to inject more craftsmanship into the project and it's well appreciated.

Some progress in the kitchen: The electricians installed some LED puck lights in the upper glass cabinets so that the cabinet installers could finish the installation of the crown molding. This completes the top trim of the cabinets, with only the finishing trims on the toe kick remaining. The doors will need to be adjusted eventually and we need counter tops and backsplash, but the to-do list for the kitchen is getting smaller and smaller. The hunt for a kitchen hood is still ongoing, constrained by budget and availability. We tracked down a wood hood manufacturer that has a style we like right in our own town, but they only sell wholesale so we may need to employ Cobblestone Cabinets again to represent us and obtain pricing.

Choosing a cabinet light for our cabinets was a little bit more difficult than expected. Because we have inset doors, we don't have a face frame to hide linear LED tapes behind. Also, light is expected to leak around the door frames a bit. Because of this, we decided to use a simple LED puck light to provide down light on the contents of the upper cabinets. Although the cabinets below these are also glass front, we won't be lighting them internally. I'm told these have a warmer color, but since we can't turn them on yet, I can't confirm.
The top hardware for the double swing pantry doors were also installed by Distinctive Designs. The bottom hardware will need to be installed after the wood floors are in. I think the only reason the manufacturer made this hardware rounded was for looks, because it makes installation a bit more difficult. Distinctive Designs took the time to mortise the hardware in as well, which wasn't necessary, but really adds a nice touch aesthetically.

The mudroom exterior door was in a bit of a tight space so modifications need to be made to the common door trim in order to get it to fit. Like the doorway between the kitchen and mudroom, the two steps in the molding remain unaltered, but the field and thickest part was reduced to fit the smaller width. Visually, it might not be noticed since the over all profile is retained. The normal width top curve meshes seamlessly with the modified side trims. Seriously, if you need quality installers for anything woodworking, look up Distinctive Designs in Lapeer, Michigan.

Easily missed item so I'm not sure how long it has been installed, but a roller latch for the big mudroom closet doors was mortised in to the top of the frame. I've never used this kind of latch before and I'm impressed with how well it works. The doors line up perfectly and the detentes of the latch plate provide a crisp closing for the spring loaded roller mechanism in the top of the door. No other latching mechanism are needed so it makes for a very clean installation. Functioning door handles aren't necessary, but we might install dummy handles for door continuity.

As I posted last time, the garage and garage storage doors are installed, awaiting hardware. I just noticed that there isn't currently a hole for a deadbolt. I think all the garage access doors I've lived with have had a deadbolt so I guess I'll be requesting one for this door as well. Seems kind of odd that it wasn't included. This door molding needed to be modified to fit the narrow width as well, so I guess if you look around the mudroom, you might not notice any glaring moldings out of place. While it might seem odd that the door opens away from the perimeter wall, we had the light switches placed on that wall so it makes sense to in the current swing configuration. The closet might count as a perimeter wall and it's nearly deep enough for the width of the door, so there's no concern with functional aesthetics.

Here's the garage entry and garage storage doors with the stairs installed. We're still mulling over the stair configurations and trying to decide if it's as efficient as we want. I measured how far out a straight shot stair without a landing would place the steps to the garage entry, and it put it just a few inches farther out than it currently is. The only question is if the landing is more ergonomic and if it's worth taking up all the space. I have to admit it's comfortable to use the landing upon exiting the door, but it might not be necessary. The only negative about the current layout is the wasted redundancy of two stairs, and the additional time it takes to follow the traffic pattern. None of it is permanent so we can change it as we will.

I mentioned this in the last update, but didn't take a clean picture of it. The baseboard molding in the garage is a simple primed square profile, but it completes the look. It will probably be painted with a satin or gloss paint after the walls have been painted, but it serves its purpose, concealing the bottom edge of the drywall and what visible ICF there is.
Here's a look at the dutch door between the mudroom and kitchen, with the bottom half closed. The bottom half has the operational door handle and the top half will have a latch to connect it to the bottom half. While it's possible to close the top half, it's not possible to secure it closed without the bottom half, so it can swing freely. I think we'll really come to appreciate this door when the kids get a bit older and we have them and their friends running in and out of the house to the bathroom from the pool, or if we want to separate the dog from the rest of the house, but don't want to audibly isolate them.
The door jamb on the dutch door was notched to accept the ledge on the bottom half of the door. All these doors are heavy, and the ball bearing hinges make them a breeze to swing. I can't wait to test the sound blocking capabilities when we finally move in, but I expect they'll perform really well.
Another small detail that I missed some time in the past is the little window molding on the garage windows. Since it's in the garage, there's really no need for anything super decorative, but DD installed this trim with a bead, which looks great. You'll only notice the attention to detail if you're paying attention, but for us, the homeowners, it speaks volumes to the level of commitment these guys have to give us a quality product.
Lastly, one more thing I didn't have time to take pictures of last time is the crown molding in the dining room. This room will also be getting a decorative ceiling treatment, but the crown molding in the alcove here looks really nice for some reason. I think it's the combination of the curve and alcove that makes the crown look particularly fancy. I can't wait to see the ceiling.
That's it for this week. It's difficult to say what the next week will bring, but I'm guessing more completed millwork, maybe a paneled rotunda or completion of the great room. We need to get rolling on some finishing details but we're already half way through July, so it's go time for the end! 7 weeks until the end of August!